1. Locate: Locate the Attendance tool
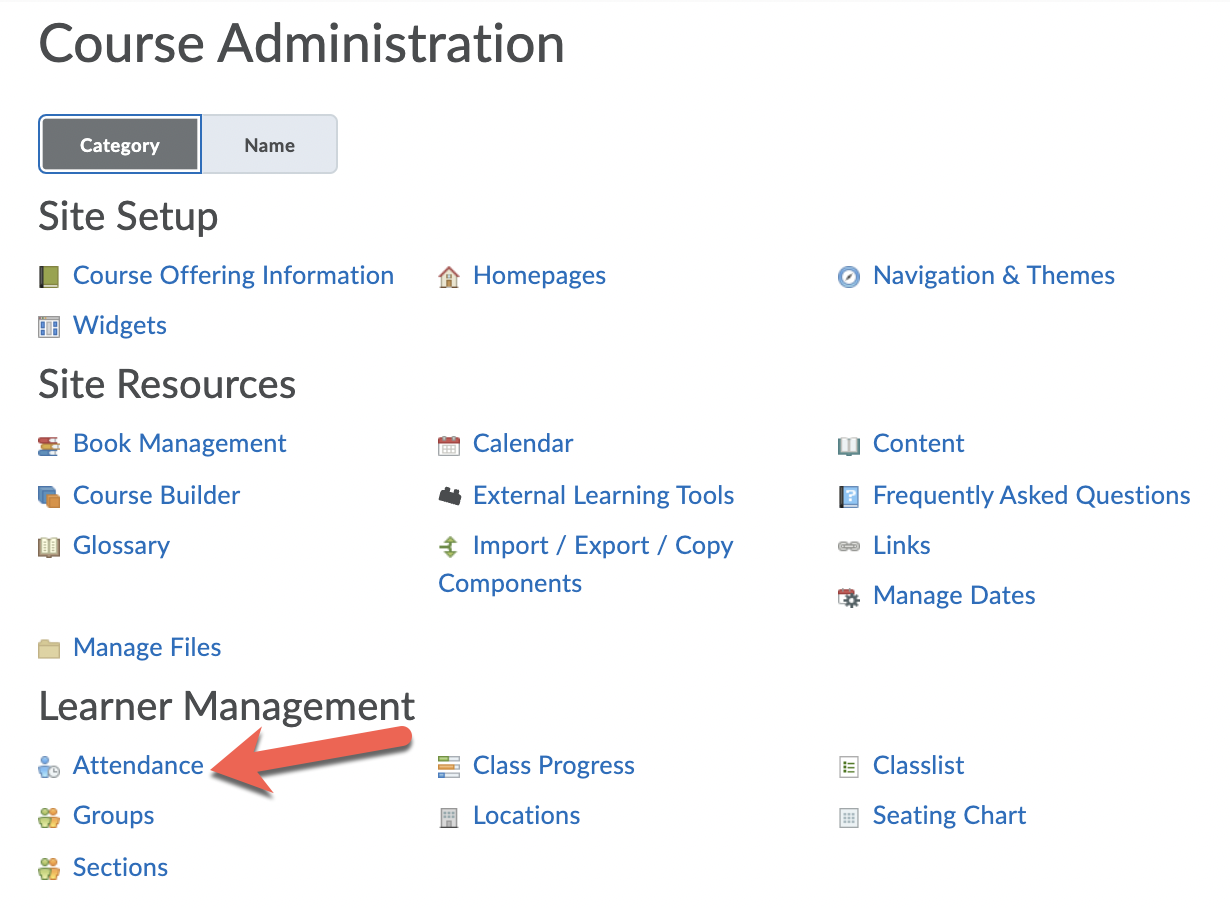
Find the Attendance tool on the Course Admin page.
- Click Course Admin in the navigation bar.
- Click the Attendance link to enter the Attendance tool (located under the "Learner Management" header).
2. Create: Build an attendance register or registers
An attendance register is a grouping of class sessions and is the first step to using the Attendance tool.
For example, if you plan to track daily class attendance, you would create a single register that contains individual sessions for each date your class meets.
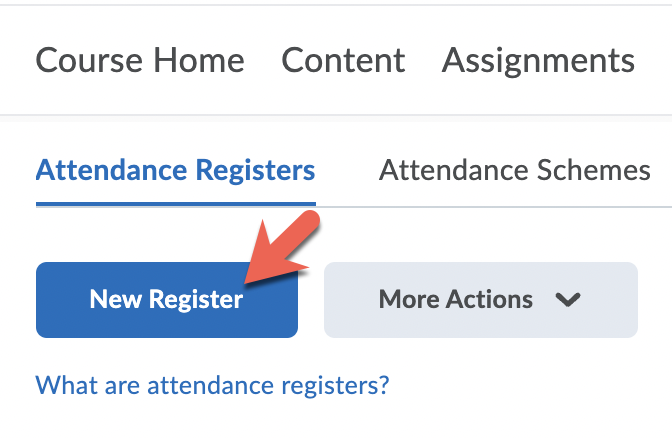
- Click New Register after entering the Attendance tool (see section 1 above).
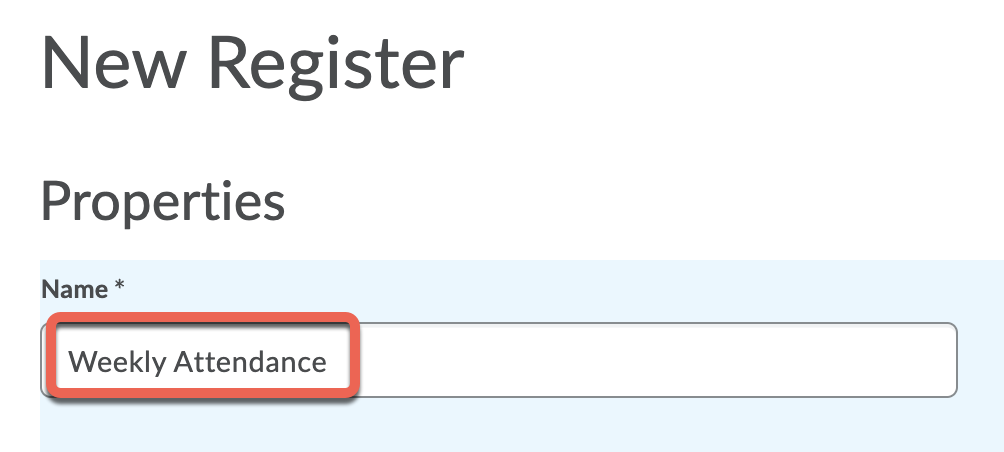
- Enter a Name for your attendance register (e.g., "In-Class Attendance", "Weekly Seminar", etc.)
- Use the Attendance Scheme dropdown menu to select the attendance scheme. Select System Scheme for the default: P (100%) for present and A (0%) for Absent. (To create a custom scheme, see section 4 on this help page.)

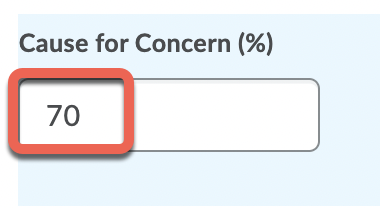
- Enter a Cause for Concern value (not required). If students' attendance falls below this percentage, they will be flagged in the Attendance tool.
- If you would like students to be able to view their attendance information, check the box next to the option to "Allow users to view this attendance register".

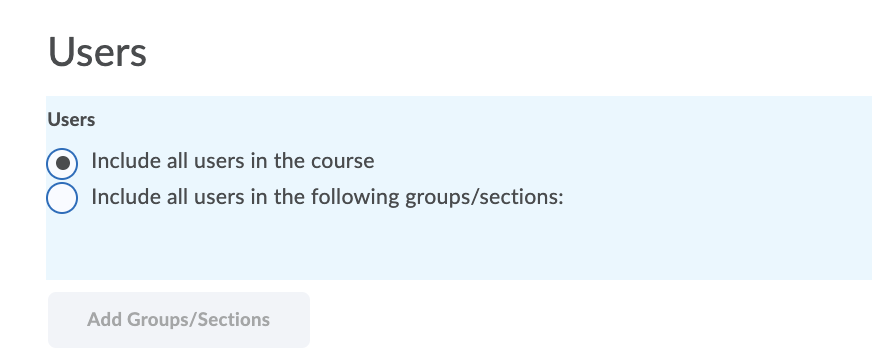
- Using the radio buttons in the Users section, choose to include all users in the course (most common) or limit this attendance register to only select groups or sections. If limiting to groups or sections, click the Add Groups/Sections button below the options and select the appropriate group category or section. (If using Groups, these need to be set up in the Groups tool prior to creating the register.)
- Enter a Session Name for each of the individual sessions for which you will be taking attendance. Typically, these are the dates the class meets.
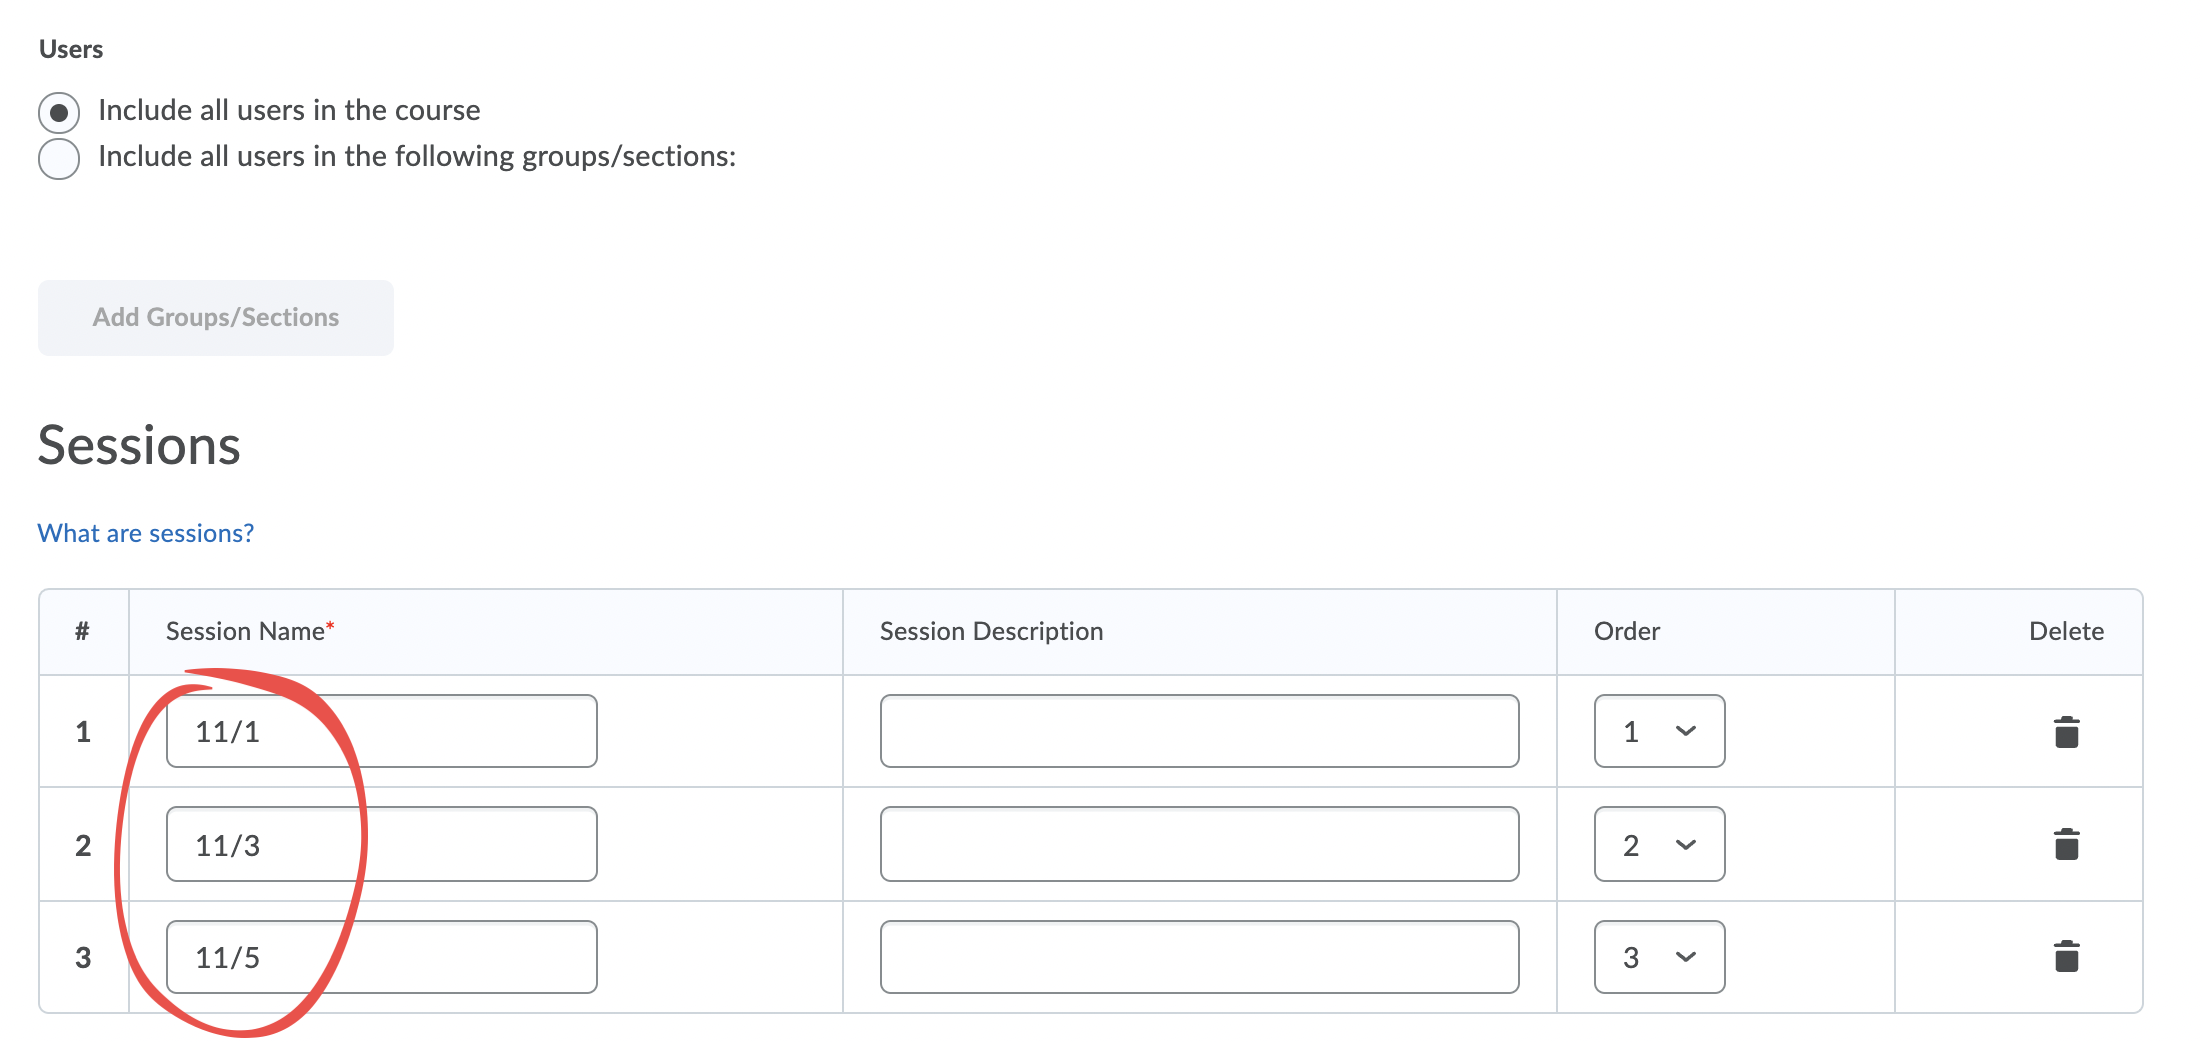
- By default, D2L provides three sessions for your attendance register. To add more sessions, enter the number of additional sessions needed in the Add Sessions field and click Add Sessions. To remove a session, click the Delete icon.
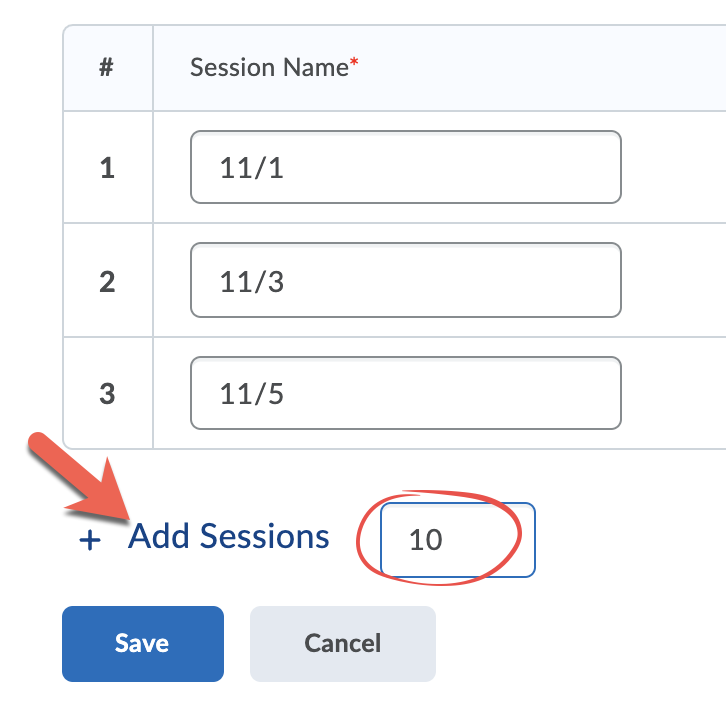
- If you have added sessions, be sure to enter a Session Name for each new session.
- Click Save to save your attendance register.
- Click Close to leave the register.
3. Edit: Make changes to an existing attendance register
Edit an attendance register
- Click the down-arrow next to the the attendance register name to open the action menu and click Edit Register.
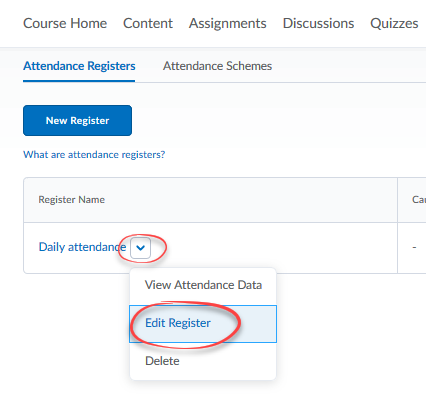
- Make the desired changes (refer to section 2 of this page for more information about available options).
- Click Save.
- Click Close to leave the register.
4. Create: Define and apply a new attendance scheme
You can create your own custom scheme to use in an attendance register.
An attendance scheme is used to determine what percentage of an attendance session a participant earns. The default System Scheme is simple:
- Present (P) = 100%
- Absent (A) = 0%
But you can make the attendance scheme as complex as you'd like, using as many attendance statuses as you'd like. For example, if you are tracking daily class attendance and want to mark participants who arrive to class late, your attendance scheme might look something like this:
Present (P) = 100%
Tardy (T) = 75%
Absent (A) = 0%
To create an attendance scheme:
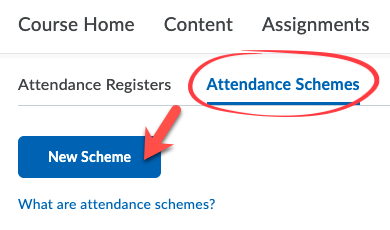
- Click the Attendance Schemes tab (to the right of Attendance Registers).
- Click the New Scheme button.
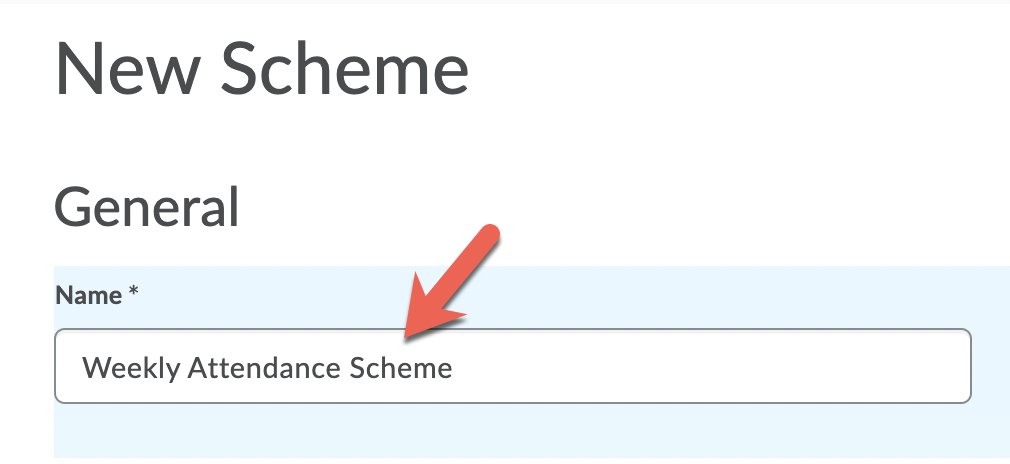
- Enter a Name for the attendance scheme.
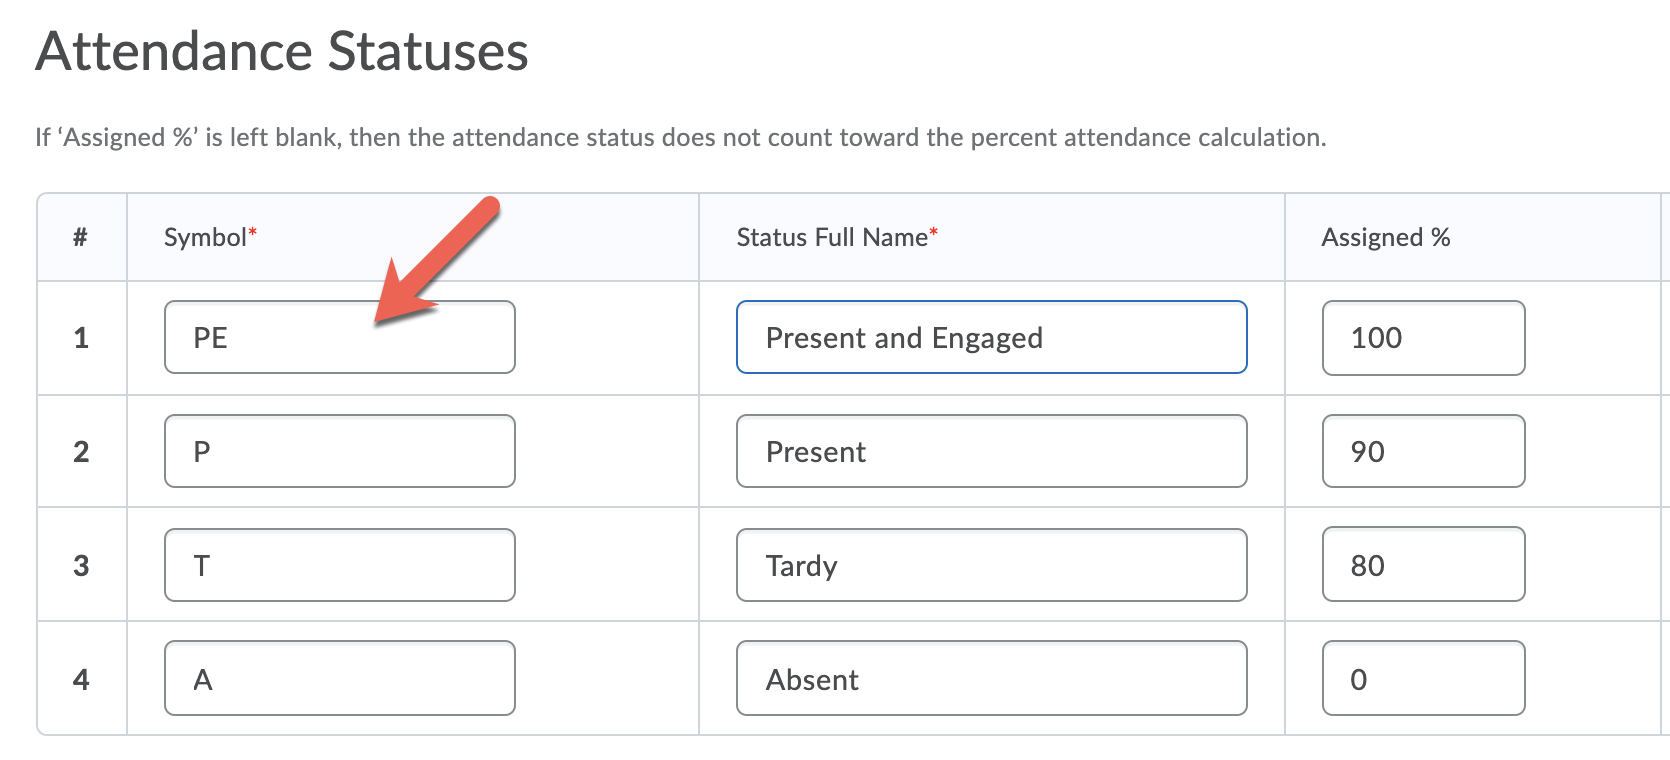
- Enter the Symbol you would like to appear when entering attendance data for each attendance status (e.g., T).
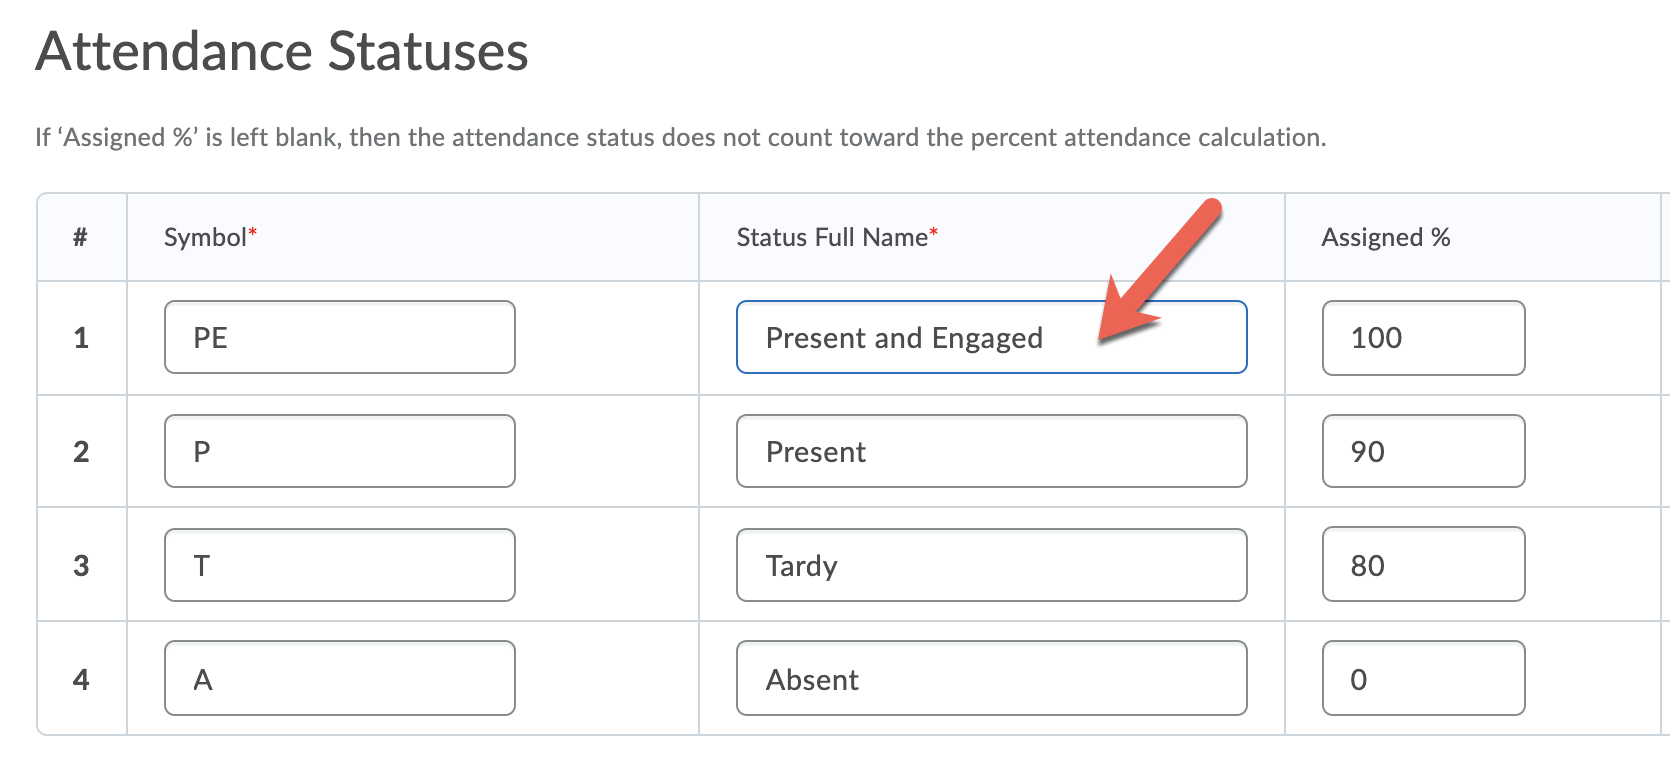
- Enter the Status Full Name for each symbol (e.g., Tardy). This allows you to provide more description for each status.
- Enter the Assigned % for each status (e.g., 80%, 90%, etc.). This step is not required, however, if you'd like to calculate an overall percentage for Attendance and use the "Cause for Concern" value on your register, you will need to enter values here.
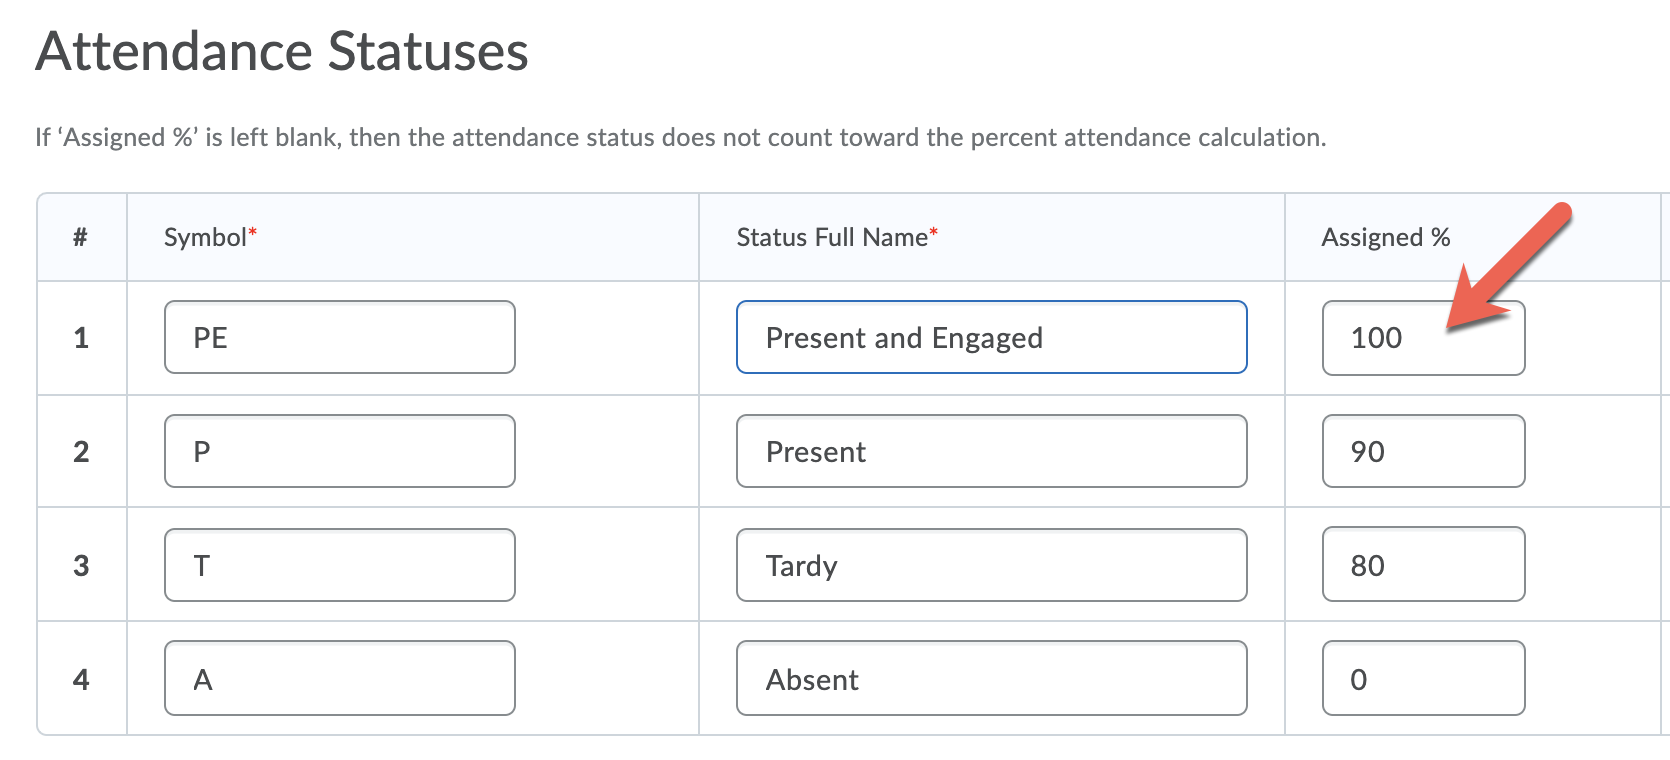
- By default, D2L provides three attendance statuses for your scheme. If you would like more than three, enter the number of additional statuses you would like in the Add Statuses field and click Add Statuses. To remove a status, click the Delete icon.
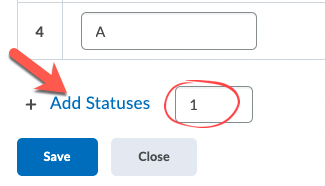
- Click Save to save your attendance scheme.
- Click Close to return to the Attendance Schemes page.
To apply the new scheme to a register:
Note: The attendance scheme can only be changed if attendance data has not already been entered in that register.
- Click the down-arrow next to the the attendance register name to open the action menu and click Edit Register.
- Click the Attendance Scheme dropdown menu and click the desired attendance scheme.
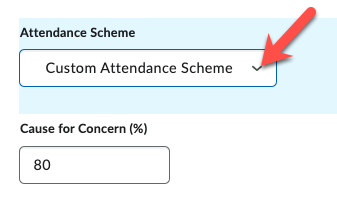
- Click Save to save changes.
- Click Close to leave the register.
5. Delete: Remove an attendance scheme from your course
Learn to remove an attendance scheme
- Click the Attendance Schemes tab.
- Click the down-arrow next to the the attendance register name to open the action menu and click Delete.
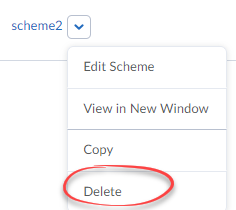
Note: An attendance scheme cannot be deleted if it is connected to an attendance register. The "Delete" option will not appear in the action menu if this is the case. You will need to first disconnect the attendance scheme from any attendance registers it has been applied to. Please refer to section 3 above to make changes to a register, including changing the scheme.
- Click Delete on the confirmation window that appears.
6. Manage: Enter attendance data
Learn to enter student attendance data
- From the Attendance Registers page, click the down-arrow next to the register name to open the action menu and click View Attendance Data.
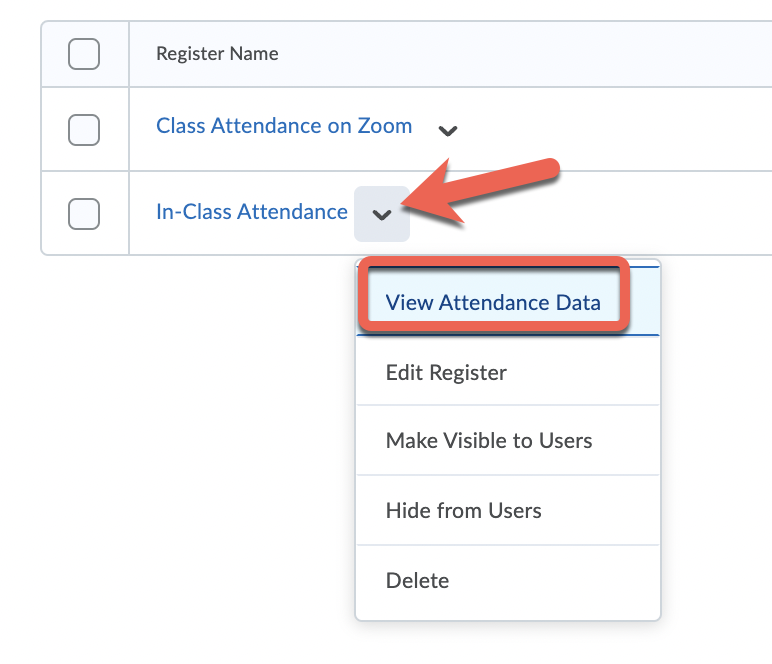
- Click the Enter Attendance Data icon located to the right of the appropriate session name.

- Click the Attendance Status drop-down menus and click the appropriate attendance status for each participant.

- Click Save to save your changes.
To enter the same attendance status for selected participants:
- From the Attendance Registers page, click the down-arrow next to the appropriate register name to open the action menu and click View Attendance Data.
- Click the Enter Attendance Data icon next to the appropriate session name.

- Check the box next to the name of each student you'd like to give the same status to and click Set Status.
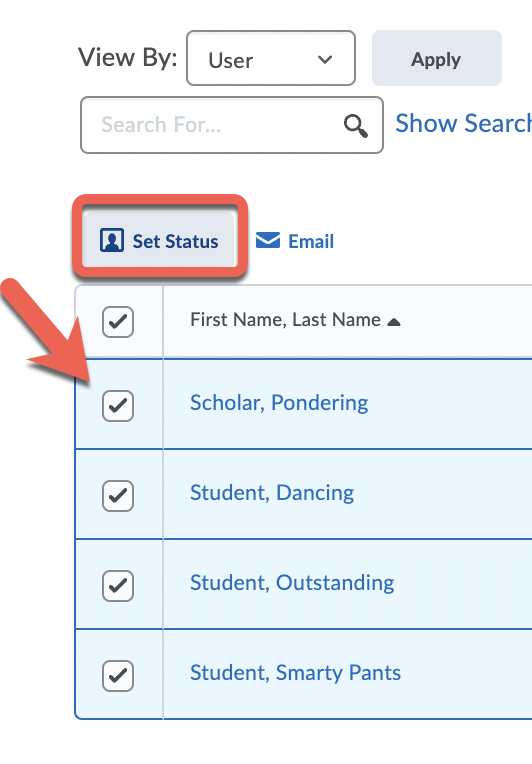
- Click the Status drop-down menu and click the desired attendance status.
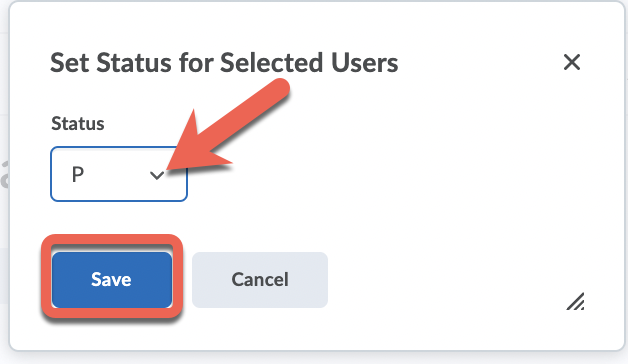
- Click Save on the Set Status for Selected Users window.
- Click Save on the Set Attendance Data screen.
To enter the same attendance status for all participants:
- From the Attendance Registers page, click the down-arrow next to the appropriate register name to open the action menu and click View Attendance Data.
- Click the Enter Attendance Data icon next to the appropriate session name.

- Click the Set Status for All Users button located near the top of the screen.

- Click the Status dropdown menu and click the desired attendance status.
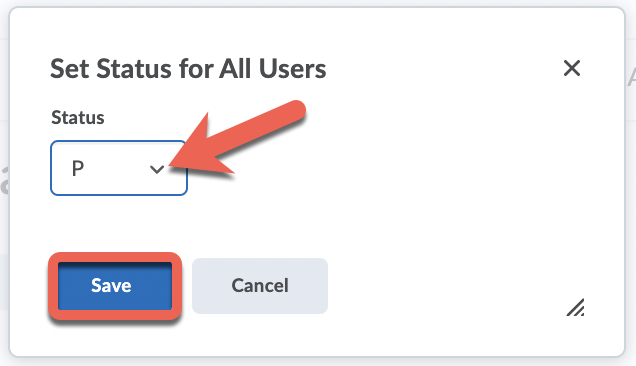
- Click Save on the Set Status for All Users window.
- Click Save on the Set Attendance Data screen.

