Panopto is a video recording tool that can be used to manage videos in a course, to record lectures or lab demos, to live stream events and for video sharing. For detailed video tutorials and help documentation, please visit the official Panopto Support Homepage.
For a one-on-one training appointment on using Panopto please contact UCATT D2L Consulting and InTech team at d2l@arizona.edu.
1. Install: Access and Installation of Panopto Recorder
Learn how to access, download, and install Panopto.
There are two different ways you can access and use Panopto on the UA campus. You can use it in relation to a D2L course where only those enrolled in that course will have access to your videos or you can use it with your NetID and have broader sharing capabilities.
Access Panopto via D2L
- Login to D2L by going to https://d2l.arizona.edu and entering in your UA NetID and password.
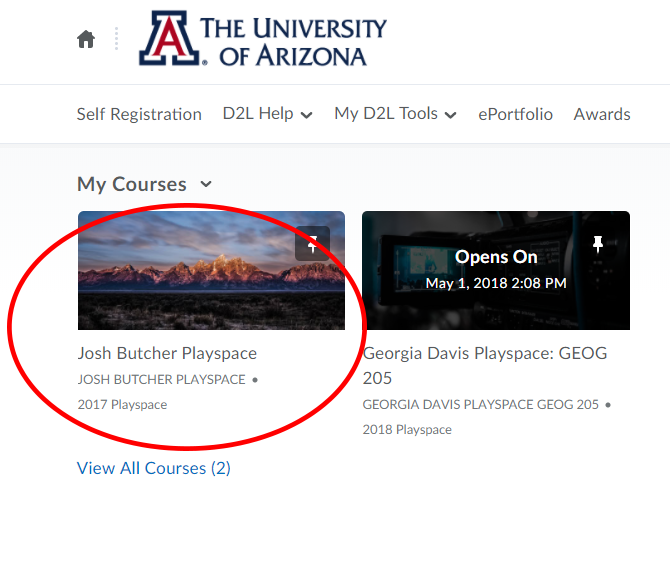
- Access the course you plan to use with Panopto by clicking on the course under My Courses.
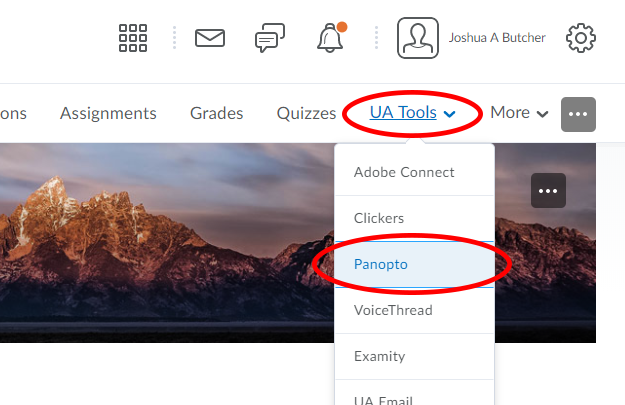
- Click the UA Tools drop down menu on your course navbar and select Panopto.
Access Panopto via your NetID Login
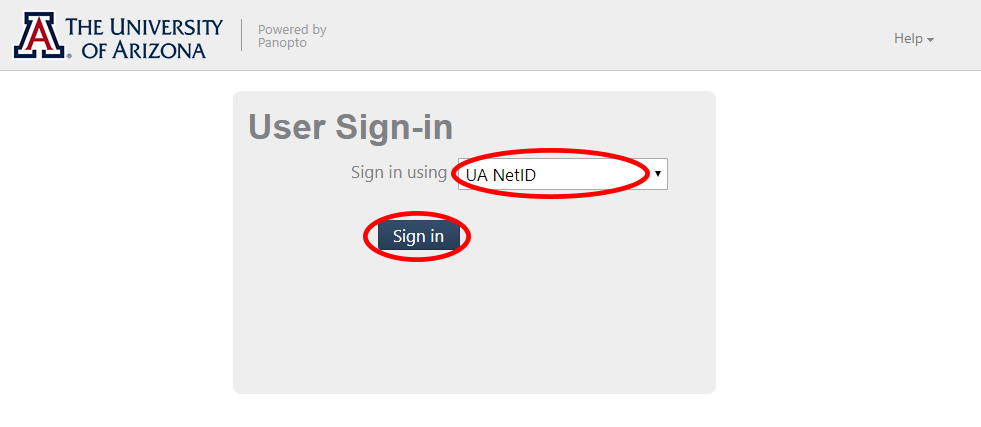
- Go to https://arizona.hosted.panopto.com.
- Make sure UA NetID is chosen in the "Sign in using" drop down menu.
- Click Sign in.
Download and Install the Panopto Recorder
After logging in to Panopto either via the D2L or NetID method you will be within the Panopto web interface. Do the following to download and install the Panopto Recorder on your desktop. The Panopto Recorder is needed to create video content.
- Click on the Download Panopto link in the upper right underneath your account name.

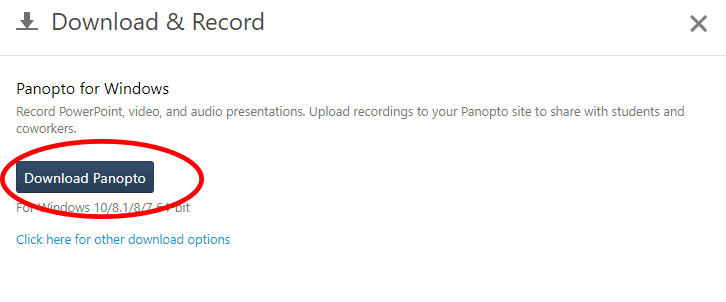
- Click the Download Panopto button. If you are on a Windows machine it will download a Windows executable (.exe) file. If you are on a Macintosh it will download an installation package (.pkg) file.
- Locate the Panopto Recorder .exe (for Windows) or .pkg (for Mac) file and double-click the file to run the application. The installer will self-extract and begin the installation.
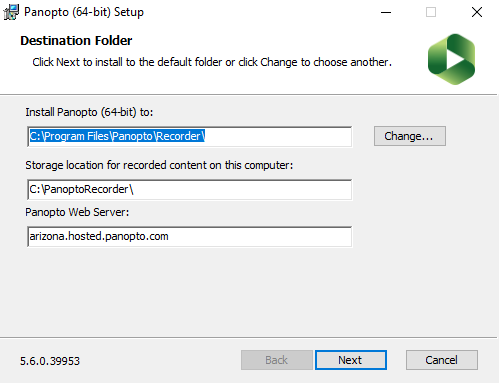
- For the Windows installation, select a Destination Folder to install the recorder; a Storage location where you would like your recordings to be saved; and the URL (without http) of your Panopto Web Server. In our case the web server is arizona.hosted.panopto.com. Click Next.
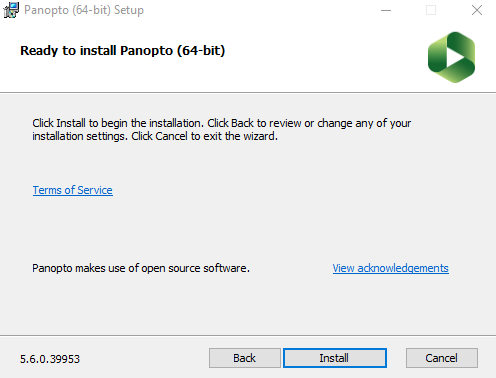
- Click Install and the installation will begin.
- Once the Panopto Recorder is installed you will see an icon on your desktop or it will appear in the programs list (for Windows) or will appear in the Applications folder (for Mac).
- You must have the Panopto Recorder installed on your computer to be able to create videos.
2. Create: Create Video using Panopto Recorder (Install required)
Learn how to create and record a new video session using the Panopto Recorder software.
To create content in Panopto your account will need Creator access. If you get an alert that your account does not have creator access contact one of the UA Panopto Administrators by emailing acad-tech-support@list.arizona.edu and they can give your account creator access.
Note: Make sure to log back into D2L and open Panopto through UA Tools every time you open the Recorder so your D2L login information is passed to Panopto automatically.
- Once you are logged in to the Panopto web interface, click on the Create button. Here are the different options within the Create button.
- Record a new session - This option will allow you to download and install the Panopto Recorder. If the Recorder is already installed you will have the option to launch the recorder; this will also automatically sign you into the recorder with the credentials you used to login to the web interface (NetID login).
- Upload media - This option will allow you to upload audio files, a single video, or multiple videos (up to 100 at once), that will create new Panopto Sessions.
- Webcast - This option will create a URL for you to live broadcast to at a later time.
- Build a session - This option will allow you to upload multiple videos and PowerPoint files to create a Panopto session.
- New Folder - This option will create a new folder on the server that you can use to upload and/or record to.
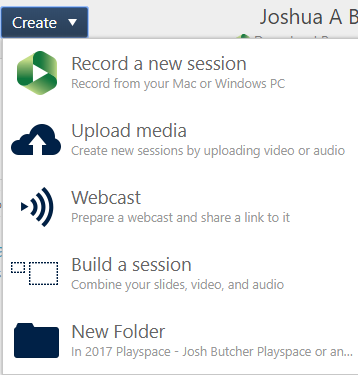
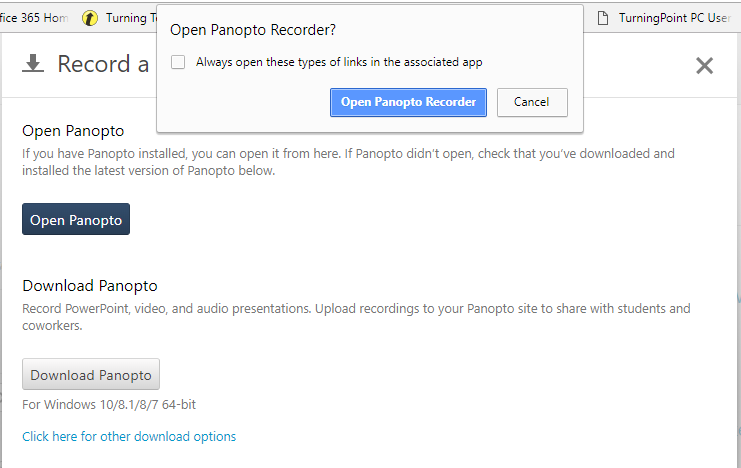
- To create a recording click on the Create button (shown above) and choose Record a new session. If you have the Panopto Recorder installed then it will ask you to open the Panopto Recorder. Click Open Panopto Recorder.
-
Recording with Panopto for Windows
-
Recording with Panopto for Mac
Important Points to Remember
Once in the Recorder, choose a folder if the default folder is not correct, name the session and select your recording sources. Always make sure you have an audio source chosen within the Primary Sources. We recommend you record at a High quality for your primary sources. Choosing to capture PowerPoint does not capture any animation or embedded video that might be in your PowerPoint presentation. All this option does is take snapshots of each of your slides to use to develop a table of contents for the video. If you want to capture the PowerPoint presentations animations (bullets coming in separately, embedded video, etc) then you would need to capture the main or secondary screen, whichever one your presentation will be projected on during the video.
The following information will assist you in getting started with Recording in Panopto:
Using basic setup for recording videos
For more in depth instructions please refer to the official Panopto help documentation and video tutorials.
3. Create: Create Video using Panopto Capture (No software required)
Learn how to create and record a new video session using Panopto Capture (beta).
Panopto Capture allows a user to easily record audio, video, and entire screens or application windows right from within your browser. A user can access Panopto Capture directly from their browser, and no software download is required. The instructions below will guide you on how to make a video using Panopto Capture.
To create content in Panopto your account will need Creator access. If you get an alert that your account does not have creator access contact one of the UA Panopto Administrators by emailing acadtech@arizona.edu and they can give your account creator access.
- Once you are logged in to the Panopto web interface, click on the Create button and select Panopto Capture.
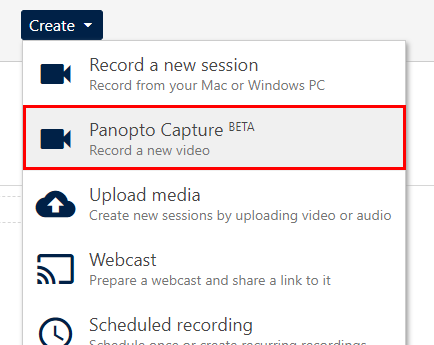
- Panopto Capture launches in a new browser tab.
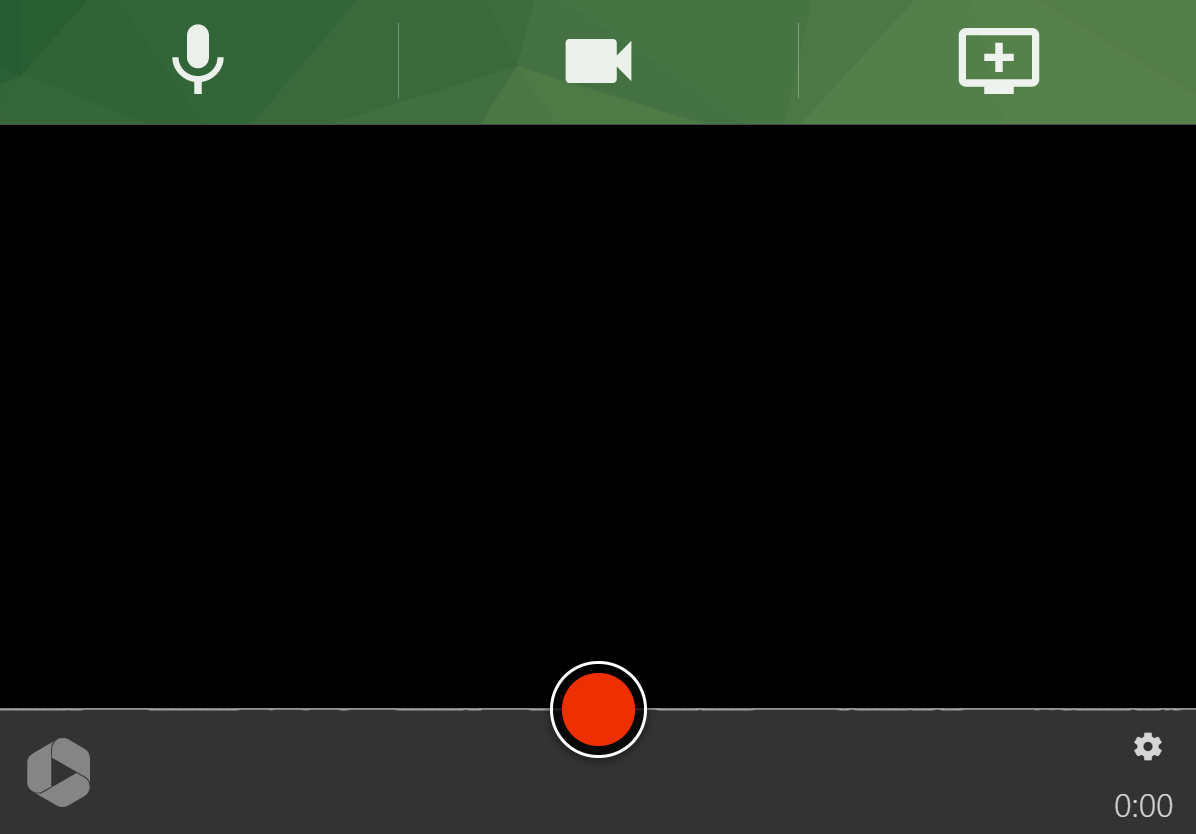
- To create a video, first select a microphone to use with the recording. Click the microphone icon in the upper left corner of Panopto Capture.

- Each microphone connected to your computer will appear as a button in the preview area. Select the desired microphone by clicking on the button.

- Talking at a normal volume will allow you to test your microphones. The bar at the left of each box indicates how well the microphone is picking up audio. Select a microphone that shows green in this bar. If yellow or red is showing, the video's audio may be distorted. If no green is showing, the microphone is not picking up audio.
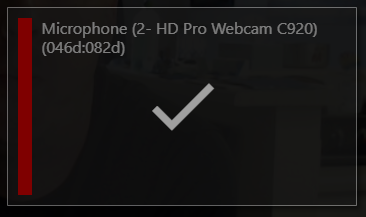
- Talking at a normal volume will allow you to test your microphones. The bar at the left of each box indicates how well the microphone is picking up audio. Select a microphone that shows green in this bar. If yellow or red is showing, the video's audio may be distorted. If no green is showing, the microphone is not picking up audio.
- To record a camera source, select the camera icon in the upper center of Panopto Capture. If you do not want to record any cameras, you can skip this step.

- Each camera connected to your computer will show up as a button in the preview area. Each button will show a preview of each camera. Select the desired camera(s) by clicking on the button(s).
- The first camera selected will be recorded as the primary video source. This source appears in the upper left side of the video viewer and is typically video of a presenter.
- Any additional cameras selected will be recorded as secondary video sources. These appear on the right side of the viewer along with screen or application sources.
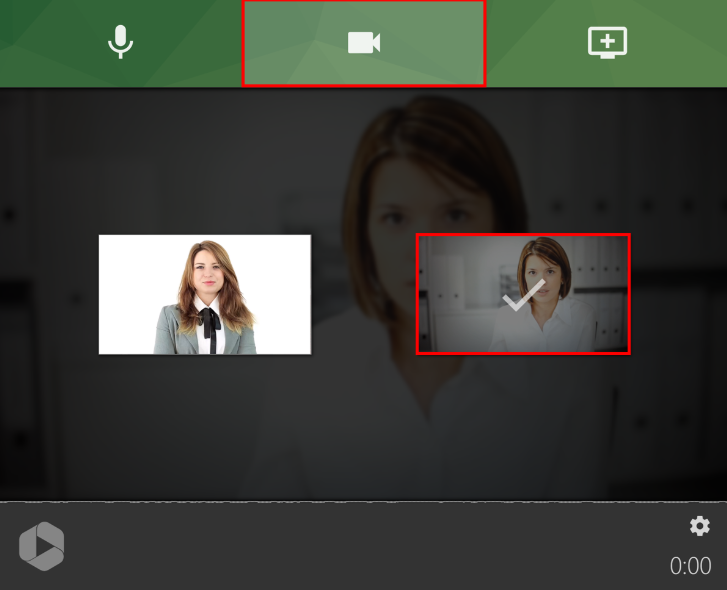
- Each camera connected to your computer will show up as a button in the preview area. Each button will show a preview of each camera. Select the desired camera(s) by clicking on the button(s).
- To record a screen, application window, or individual chrome tab, select the monitor icon with the plus sign in the upper right of Panopto Capture. If you do not want to record any screens or applications, you can skip this step.

- A window will open. Here you can choose the source to record.
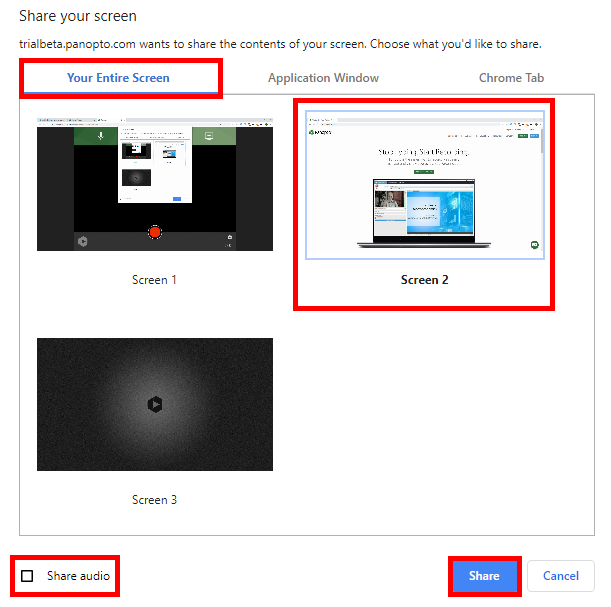
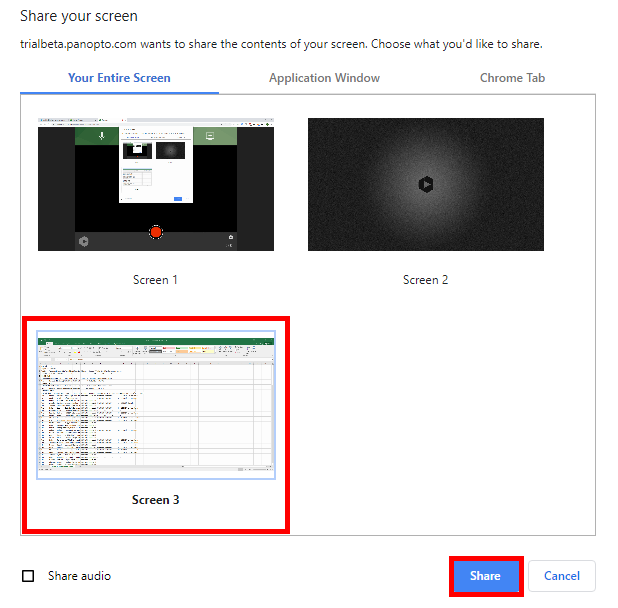
- To record everything that happens on your screen, choose Your Entire Screen. Then, select the screen to record and click Share. Optionally, select Share audio to add the audio from your computer to the recording (i.e. if you are playing a YouTube video).
- To record everything that happens in one application window only, choose Application Window. Then, select the application to record and click Share.
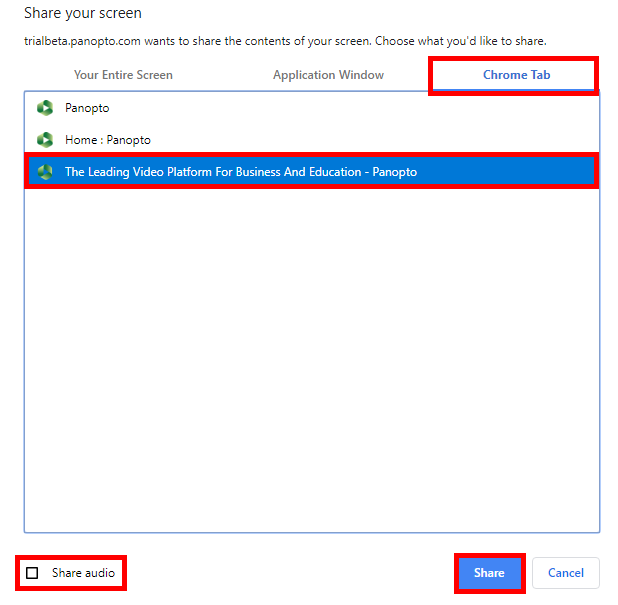
- To record everything that happens in one Chrome browser tab, choose Chrome Tab. Then select the tab to record and click Share. Optionally, select Share audio to add the audio from your computer to the recording (i.e. if you are playing a YouTube video).
- To record everything that happens on your screen, choose Your Entire Screen. Then, select the screen to record and click Share. Optionally, select Share audio to add the audio from your computer to the recording (i.e. if you are playing a YouTube video).
- After choosing one screen or application source, you may add additional sources by selecting the monitor icon again.
- A window will open. Here you can choose the source to record.
- To learn more about different settings you can adjust related to Panopto Capture please see Panopto's help page at https://support.panopto.com/s/article/How-to-Create-a-Video-Using-Panopto-Capture.
- To begin recording your video, click the red circle button at the bottom center of Panopto Capture. If enabled, you will see a 5 second countdown on screen, and then the recording will begin.

- To stop recording, select the red square button at the bottom center of Panopto Capture. The video will immediately begin to upload. Do not close the Panopto Capture browser tab until the upload is complete.

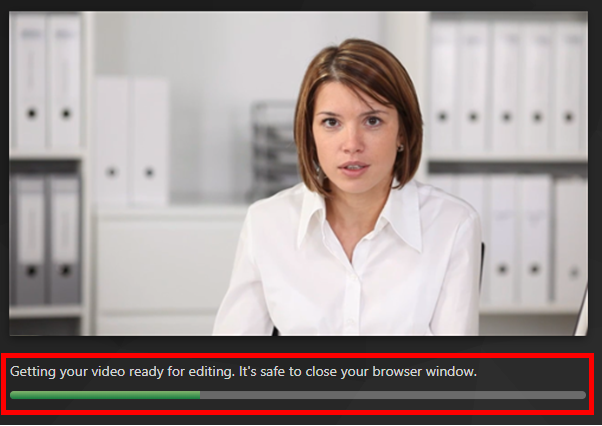
- Once the recording is stopped, the video will immediately begin uploading to your Panopto folder. A new screen appears that shows the video's upload and processing progress. Even before the uploading is complete, you can select Share to invite others to view your video.
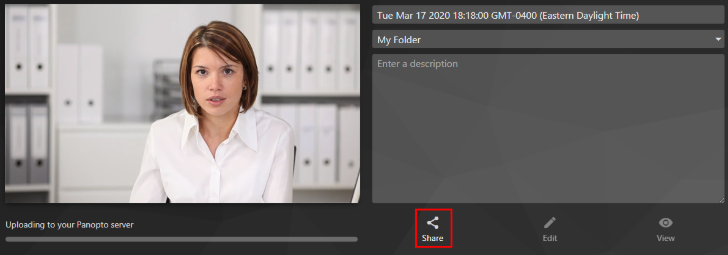
- Do not close your browser tab until uploading is complete. Uploading is complete when the status bar reads "Getting your video ready for editing. It's safe to close your browser window".
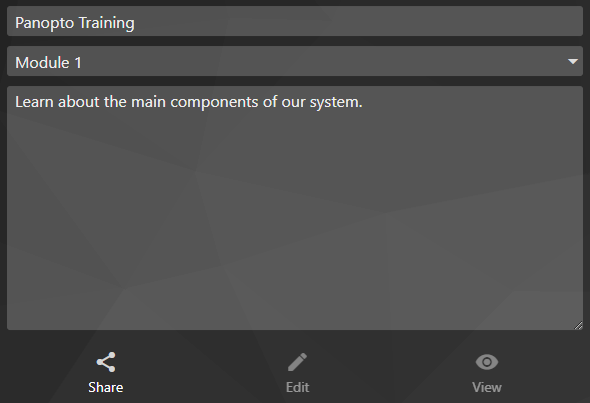
- At this point you can change the name and description for your video using the entry boxes on the right side of the screen.
To change the folder, type the name of the folder or use the drop down menu to choose from all of your folders.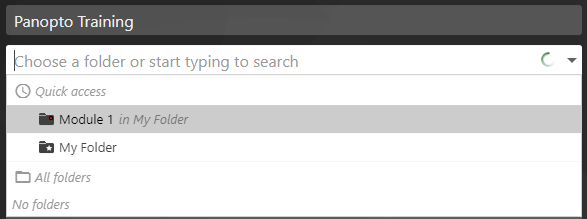
- When the video is finished processing, you can also begin editing or viewing your video by clicking on the Edit button or View button.

- If you need to record your video again instead of saving it to your folder, click Redo in the upper right corner.
- If you would like to record another video, click New in the upper right corner.
The following information will assist you in getting started with Recording in Panopto:
For more in depth instructions please refer to the official Panopto help documentation and video tutorials.
4. Create: Create Assignment Folder for Students to Post Videos
Learn how to create an assignment folder for students to create and post videos to.
To create an assignment folder for the students in your course to have the ability to create and post Panopto videos to you first will need to access your course in D2L.
- Login to D2L at https://d2l.arizona.edu and access the course for which you want to create an assignment folder.
- In the navbar click on UA Tools and then choose Panopto.
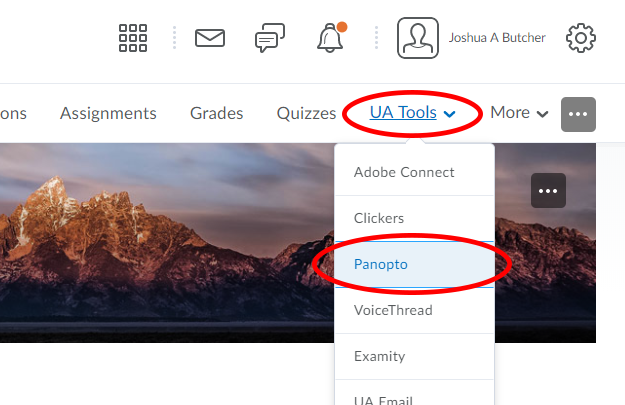
- This will take you to your course Panopto folder.
- Click on the Settings icon for the course folder.
- Click on Overview section. On the Overview screen, click on the link labeled "Create Assignment Folder".
- Once the assignment folder is created, you will see a new link that is <name of folder> [assignments].
- Exit out of the folder settings window by clicking the "X" in the upper right.
- You will see that the folder has been added as a subfolder to the original with the word "[assignments]" added to the end.
- Now the students in the class will be able to add content to the newly created [assignments] folder.
5. Edit: Edit Video Sessions
Learn how to edit video sessions after they are recorded.
The information below will assist you in editing existing Panopto sessions (videos).
Note: Make sure to log back into D2L and open Panopto through UA Tools every time you want to record or manage your videos for your course.
Editing
The Panopto editor allows for easy web based editing from any modern browser. You can perform quick, non-destructive edits to any video on the Panopto platform that you have creator rights to and deliver exactly the content you choose to viewers.
For detailed written instructions on using the Panopto editor please see Panopto's Basic Editing documentation.
Learn About the Panopto Video Editor Video
How to Trim a Video in the Editor Video
Note: More tutorial videos on editing can be found by viewing their How To Videos page.
6. Add a Quiz to a Panopto Video
Learn how to add a quiz to an existing Panopto video.
In Panopto you have the ability to add quiz questions to any Panopto video at any point during the presentation.
Create a Quiz
- Open your video within the Panopto editor by clicking the Edit button on your video.

- Click in the timeline to navigate to the place in the video where you would like to insert a quiz. The red vertical line will indicate where the quiz will be added in the video.

- In the left navigation menu, click on Quizzes, then select Add a Quiz.
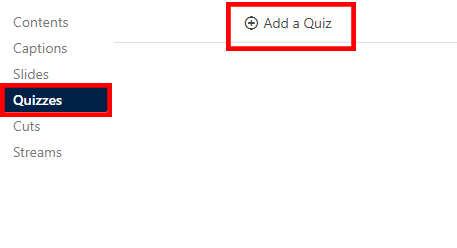
- A quiz window will appear in your secondary stream window where you can fill in the details for your quiz.
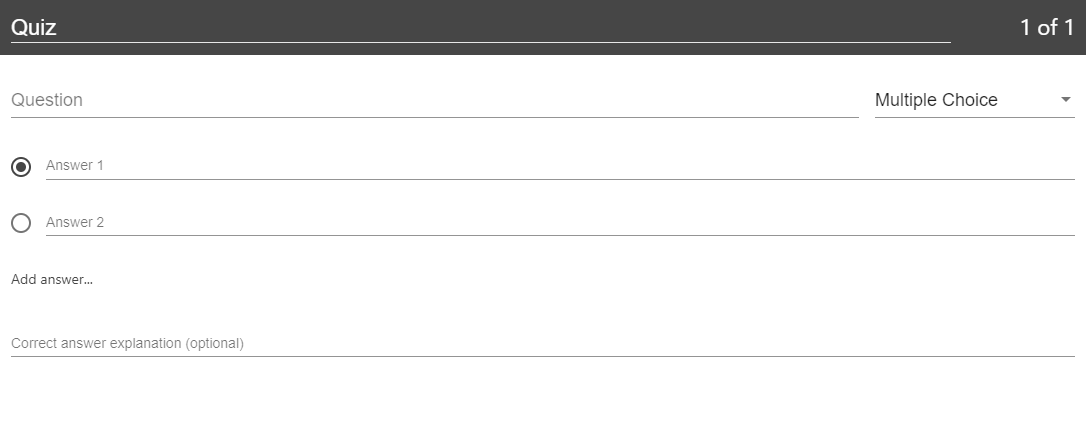
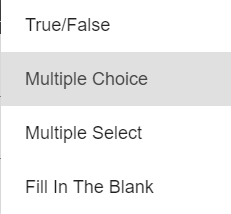
- Within the form, you can select the drop-down menu in the top right corner to show different types of quiz questions. The quiz options include True/False, Multiple Choice, Multiple Select, and Fill In the Blank. The default is multiple choice.
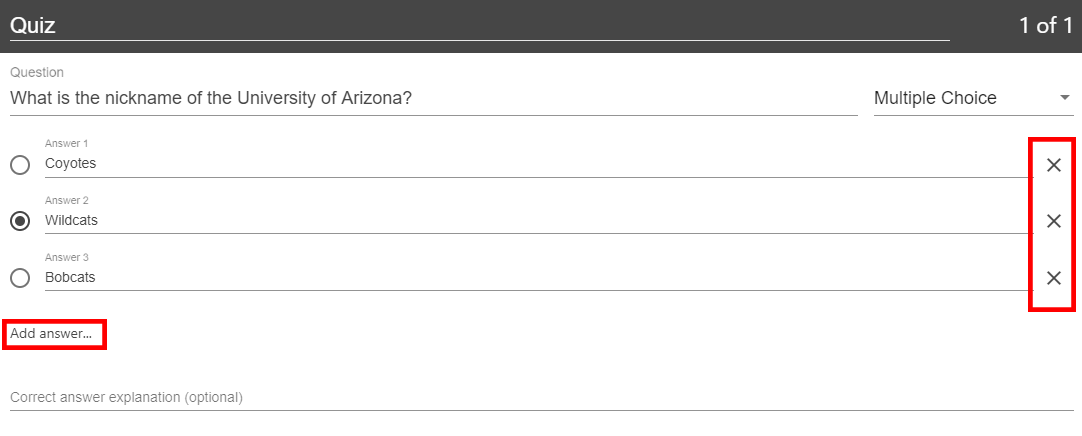
- Multiple Choice: Gives you the option to have several answers present, but only one answer can be chosen as correct. When the option is first chosen, there will only be two answer fields. Another answer field can be added by clicking the "Add Answer..." button. You need to have the correct answer selected before adding another question. To remove an answer you can click on the X next to any of the Answers.
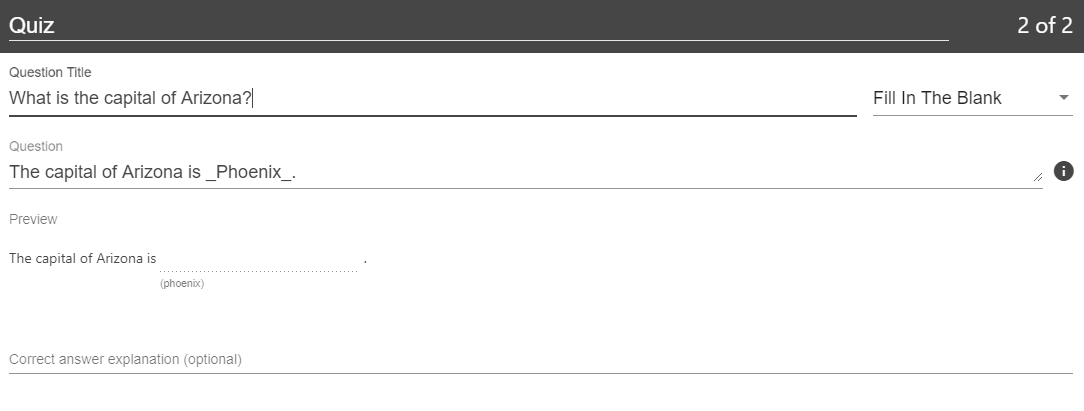
- Fill In the Blank: Gives you the option to ask questions that require users to fill in answers to the question. The prompt will ask for the correct answer to be provided.
- True/False: Gives you the option to ask a True or False question.

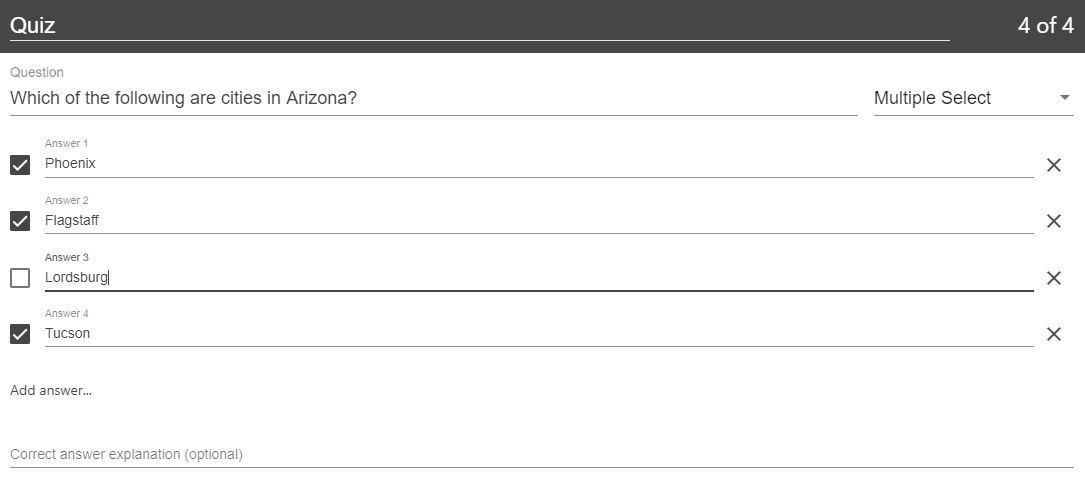
- Multiple Select: Gives you the option to have several answers present and more than one can be selected as correct.
- Once you are done with a question and want to add another question, click the Add a Question button at the bottom of the form.

- If you need to navigate to a different question in your quiz, you can use the Back and Next buttons at the bottom of the form.

- Once you have added all of your questions, click the Done button at the bottom of the form.

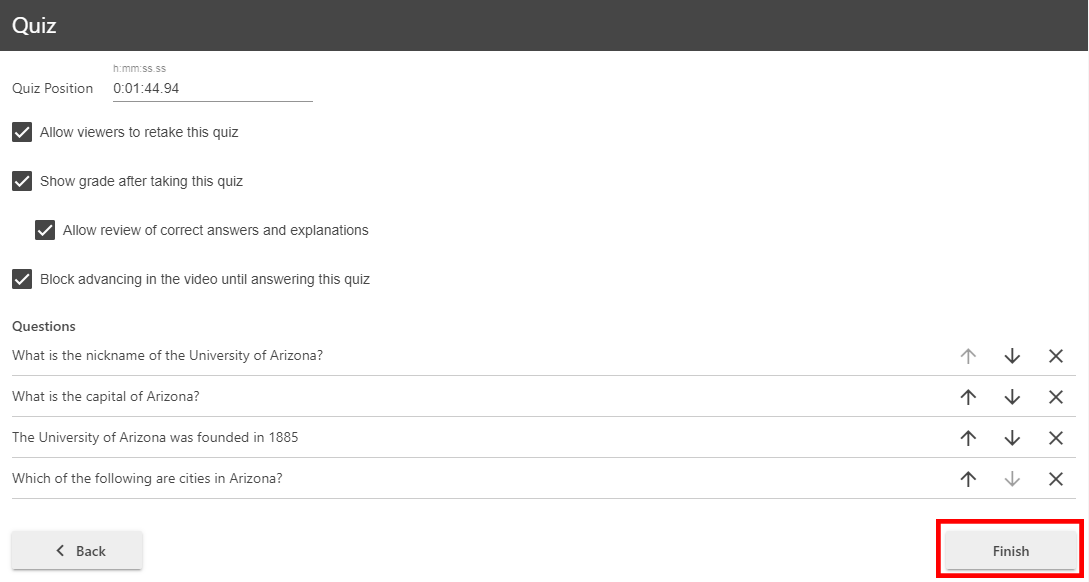
- You will then be directed to the Options page for this Quiz. In this page you can:
- Allow viewers to retake the quiz
- Show grade after taking this quiz (If this is enabled you can also allow review of correct answers and explanations)
- Allow review of correct answers and explanations
- Block advancing in the video until answering this quiz
- Delete questions by clicking the X's
- Reorganize the questions by using the arrows
- Once you are finished, click the Finish button.
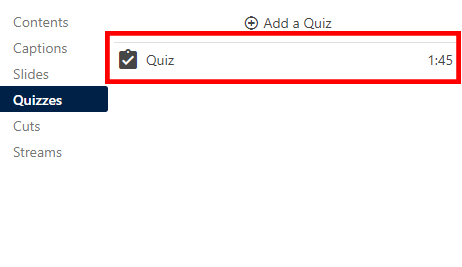
- The name of your quiz will now appear in the Quizzing pane.
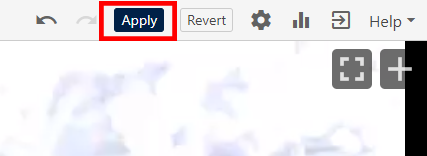
- Repeat these steps for each quiz you want to add to your Panopto video. When you are finished, click Apply at the top right of the Panopto editor.
- During playback, when it is time for a quiz the video will pause until the question(s) is/are answered.
Viewing Quiz Results within Panopto
- To access the results of a quiz within the Panopto interface, click the Settings button on the video where the quiz was created.

- On the left, click the Quiz Results tab to display the results.
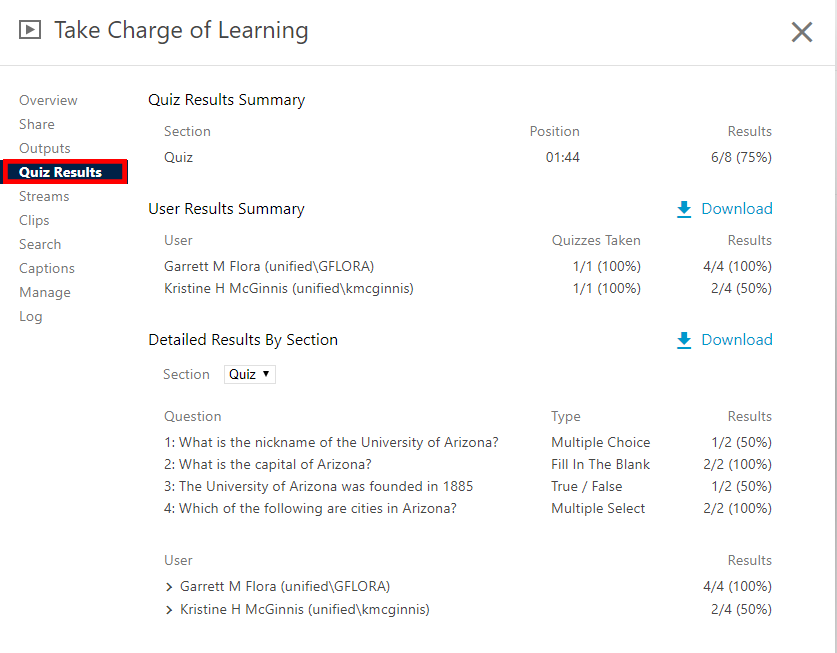
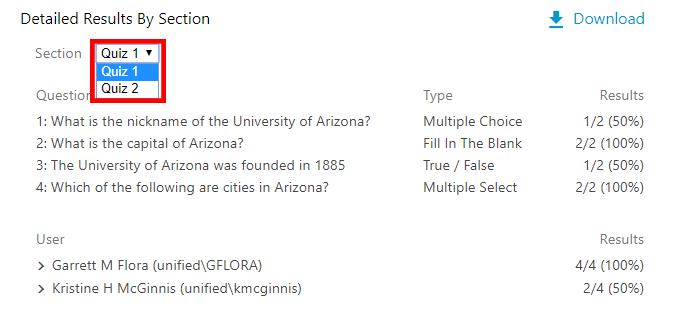
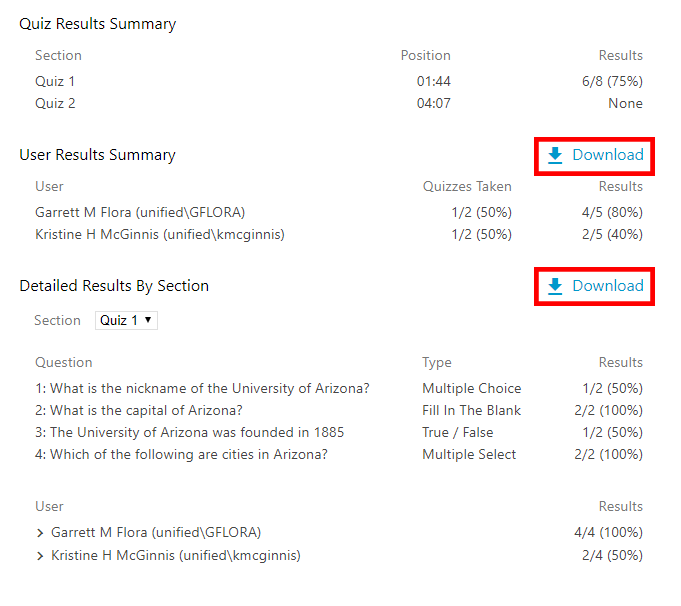
- From this tab, you can see Quiz Results Summary which shows the total number of correct answers and questions as well as the percentage correct for each quiz. You are also able to get a more detailed view of results by section. Click the section drop-down to select which quiz section to drill into (if you have multiple quizzes in a video).
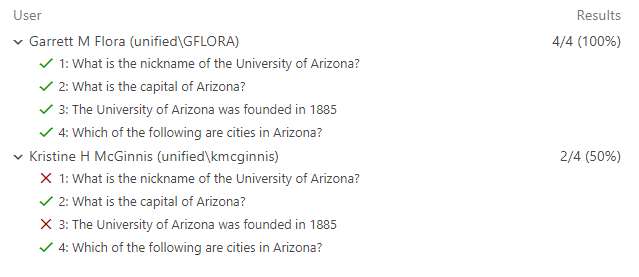
- You can also expand each user to see which questions they got correct and which questions they got incorrect.
- You will also see an option to Download. This will make it possible to convert the quiz results to .csv files including the username, quiz, question, response, and correctness.
7. Use a Panopto Quiz as a Graded Activity in D2L
Learn how to use a Panopto quiz as a graded activity within D2L.
You can use a Panopto quiz as an activity in a D2L course and have the grades get automatically reported to the gradebook.
Inserting a Quiz
- First within Panopto, you must prepare a Panopto video with a quiz if you haven't already. You can follow instructions in section 5 above "Add a Quiz to a Panopto Video".
- Within D2L, navigate to your course and click Content.

- If a content module has not been created yet for the course, then create one. Click inside the Add a module box and input the name for the module. Note: Your module will be automatically created when you click outside of the text box.

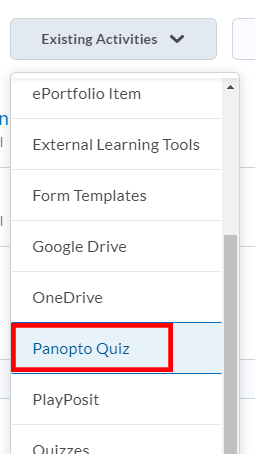
- In the content module, click Existing Activities.

- Select the Panopto Quiz tool.
- This will open a session chooser for you to select your Panopto video. Select the video that has your quiz and click Insert. Note: You may need to scroll down to see the insert button.
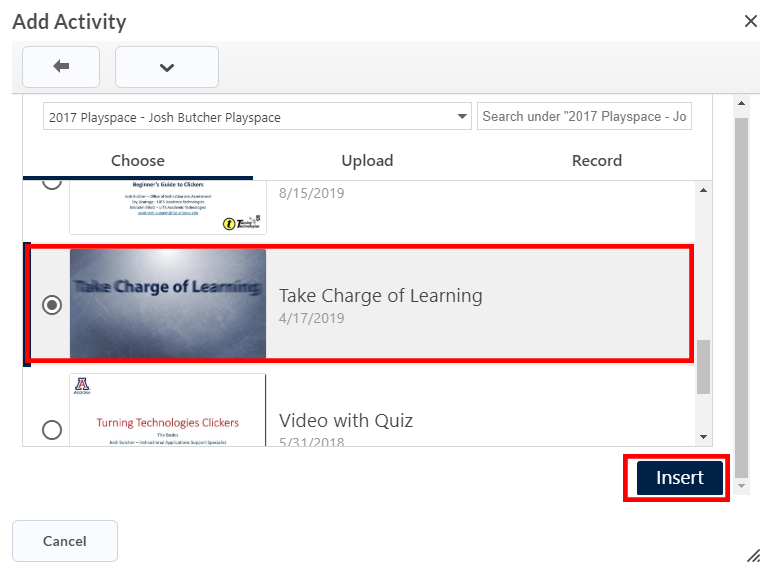
- This will add the quiz to the content module as a new External Learning Tool.

Viewing a Quiz and Syncing to your D2L Gradebook
- Select the video quiz to open and view it.

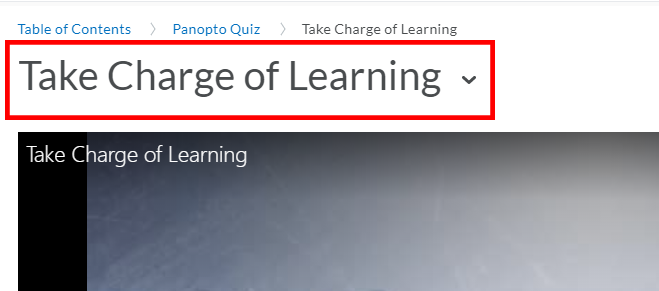
- From this page, if desired you can select the title of the video to edit it.
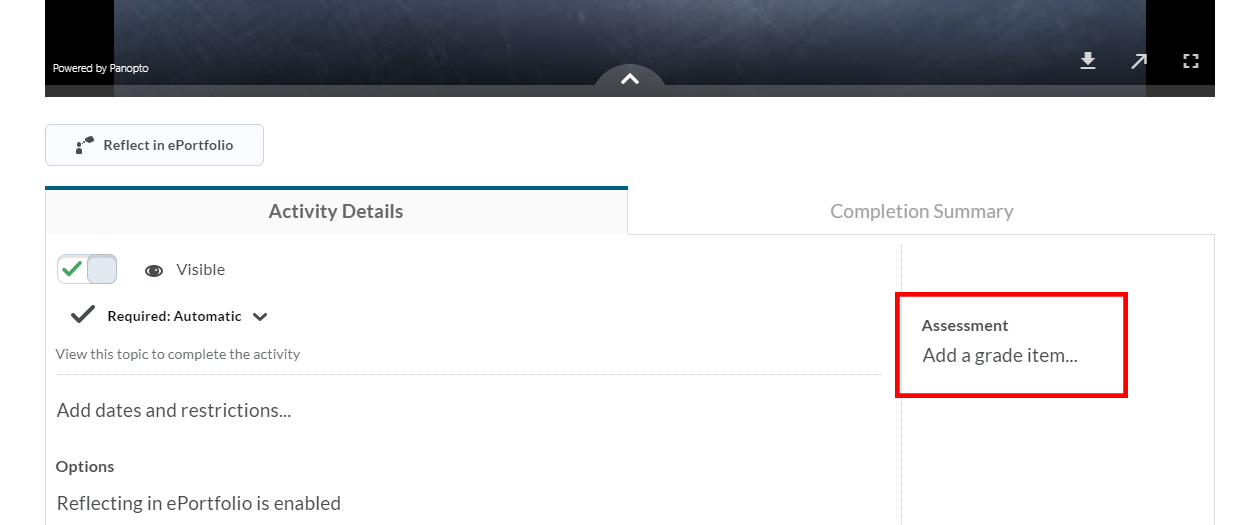
- To sync the quiz grades to the course D2L gradebook, in the Assessment section of the Activity Details, add a new gradebook item or select a current one if it is already created.
- If no gradebook item is selected, one will be automatically created once a student submits a quiz. By default, the quiz will be scored out of 100 points.
- If a gradebook item is selected, the quiz grades will be synced with the selected gradebook item. This may take a moment to update after submitting a quiz.
- Select Grades from the course navigation bar to see grades for all students who have taken the quiz so far.
8. Move: Move Sessions to Another Course Folder
Learn how to move sessions to another course Panopto folder.
Panopto Move and Copy documentation
Each D2L course site has its own folder within Panopto created by default. The Panopto content you create in one course does not automatically get copied to the Panopto folder for a new course, even if it is the same course. However, you can move and copy individual sessions (videos) from one folder to another by hovering over each session in the list of sessions and selecting the session. Once the session is selected, the options to Delete, Copy, Move and Share will appear.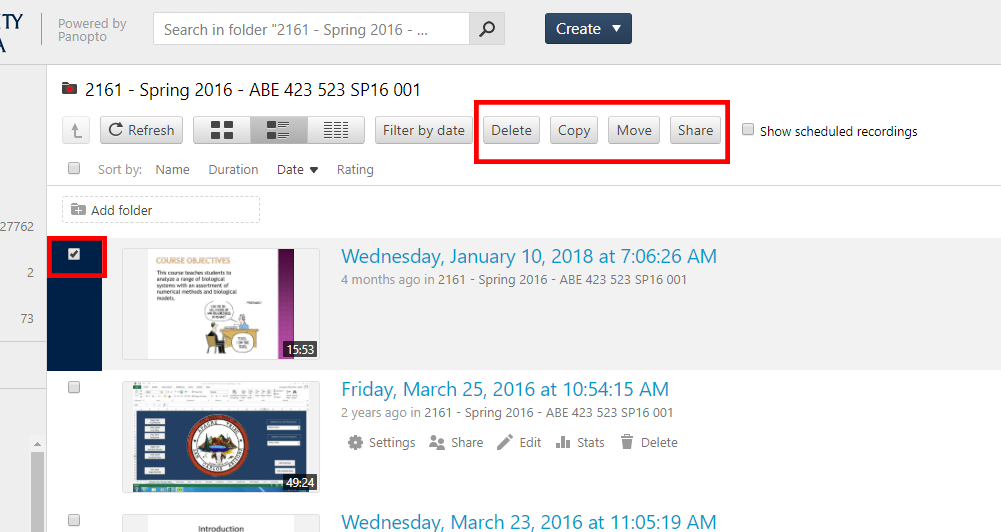
By selecting "Move", you will get the option to move the session to another folder. You will need to choose which course folder you want to move the selected video(s) to. Moving the session will move the session to another folder, but will not preserve the original session location. It will no longer be in the original folder that it was previously in. 
You can also bulk move or copy sessions (videos) by selecting them all by clicking the box at the top of the list of sessions. It will select ALL videos that are listed in the results on that screen. You may need to increase the viewing options for results by page to get ALL videos within a folder if you have over 25 videos within that folder. The default view is to show the first 25 videos within a folder. Say your folder has 31 videos in it. Doing a bulk select would only select the 25 videos that are appearing on this results screen. If you change the results per page to view 50 videos per page then all of the videos in your folder would then appear in the list. You could then do a bulk select to move or copy all of your videos at once. 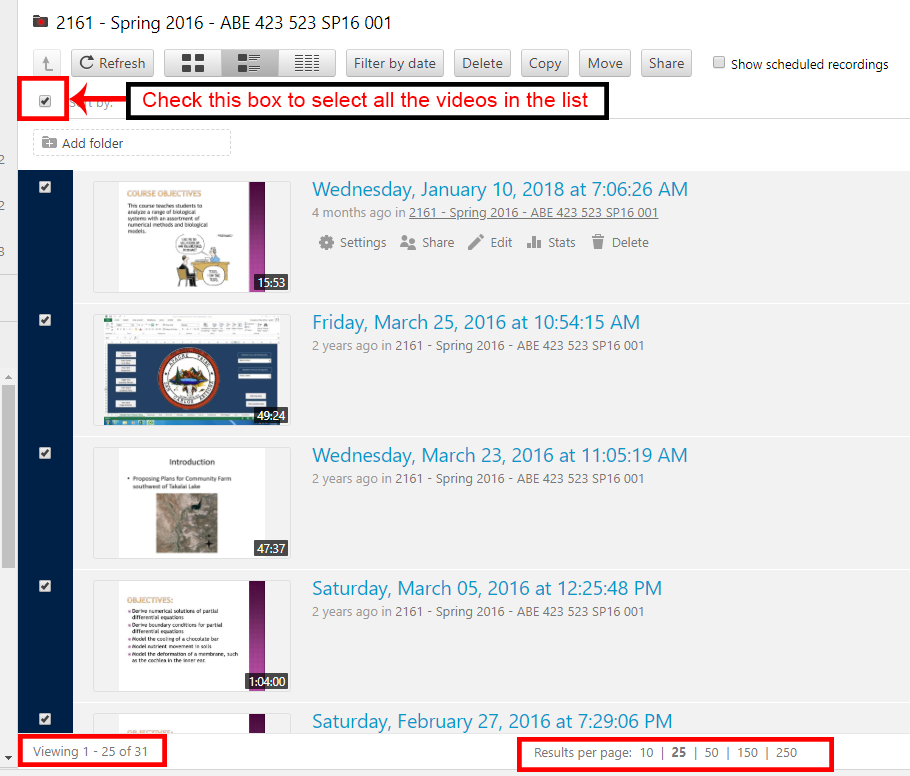
9. Copy: Copy Sessions to Another Course Folder
Learn how to copy sessions to another course Panopto folder.
Panopto Move and Copy documentation
Each D2L course site has its own folder within Panopto created by default. The Panopto content you create in one course does not automatically get copied to the Panopto folder for a new course, even if it is the same course. However, you can move and copy individual sessions (videos) from one folder to another by hovering over each session in the list of sessions and selecting the session. Once the session is selected, the options to Delete, Copy, Move and Share will appear.
Selecting "Copy" will allow you to Copy the session to another folder. You will then need to choose the course folder you want to copy the session to. Copying will move a session to another folder, while preserving the original session location.

You can also bulk move or copy sessions (videos) by selecting them all by clicking the box at the top of the list of sessions. It will select ALL videos that are listed in the results on that screen. You may need to increase the viewing options for results by page to get ALL videos within a folder if you have over 25 videos within that folder. The default view is to show the first 25 videos within a folder. Say your folder has 31 videos in it. Doing a bulk select would only select the 25 videos that are appearing on this results screen. If you change the results per page to view 50 videos per page then all of the videos in your folder would then appear in the list. You could then do a bulk select to move or copy all of your videos at once. 
10. Statistics: View Session Statistics
Learn how to access and view statistics of a particular session.
To view information on a session, such as time viewed, minutes viewed and who viewed it, there is a Stats button you can click on by hovering over the session or folder you would like to view. For more information visit Panopto's Statistics documentation.
11. View: View Your Sessions
Learn how to view your sessions within Panopto.
Viewing a Video
Panopto Viewer Layout
- Information Bar
- Primary Video and/or audio stream
- Search
- Contents, Captions, Notes, Bookmarks and Discussion
- Screencapture, PowerPoint or any Secondary Video
- Player
- Timestamped Thumbnails for navigation
Viewer Layout documentation
Accessibility Features
- Screen Reader Support
- Keyboard Access
- Viewer Captions
- Shortcut Keys
- Embedded Player Captions
Accessibility documentation
12. Settings: Folder and Video Settings
Learn about the different settings options you have at the folder or video level.
Folder Settings
The following covers settings that can be adjusted at the folder level.
Step 1
In the upper right corner of the folder, select the Settings icon, which looks like a cog wheel.
Step 2
On the Overview tab, you can edit the folder's name, parent folder, and description. You can also create an assignment folder, which is a special subfolder that allows users that can view this folder to create and submit video sessions privately.
Step 3
On the Share tab, you can get the folder's direct link or embed code, change the share permissions, or invite people to have certain level of access to the folder.
Step 4
On the Settings tab, you can edit your Viewers' permissions, enable special features (such as Downloads, Smart Chapters, Content Language, and Captions), and control the dates of when the folder and its videos are available.
Step 5
On the Order tab, select Set the display order for this folder in order to drag and drop the videos within the folder to appear in a certain order.
Step 6
On the Manage tab, view the folder's id or delete the folder.
Video Session Settings
The following covers the basic settings for the sessions. There are various settings you can access by hovering over your session, and selecting Settings.
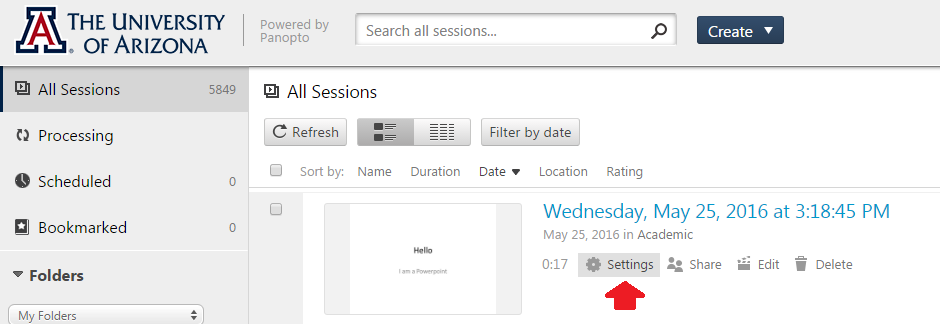
This list of Settings includes:
- Overview: Provides session information, allows you to enter a description, and provides you with links to other actions such as Share, Edit, and Resume. Most importantly, it provides you with Availability options so that you can decide when and for how long the session is available to be seen, if applicable.
- Share: Provides Share Options, such as session link, embed code, and permissions, as well as the option to invite people to the session.
- Outputs: Provides various Output formats and ways to access them.
- Quiz Results: Allows you to view the results from any embedded quizzes that were in the session.
- Streams: Combined with HD recording, adaptive streaming helps a presenter deliver the best possible experience to users on connections ranging from 3G wireless to gigabit LAN.
- Search: Allows you to search inside the content of your videos. You can search for any word that is spoken or shown in any video in your library and fast forward to that precise moment with one click. It is made of primarily of two components Automated Speech Recognition (ASR) and Optical Character Recognition (OCR).
- Caption: Provides the ability to upload Captions. If you need assistance with captioning a video you can contact the University of Arizona Disability Resource Center. Within the Panopto editor of a session you can also add ASR generated captions.
- Manage: Provides the ability to Merge, Copy, and Delete a session.
- Log: Provides a detailed Activity Log.
13. Embed: Embed Panopto Video in D2L Content (non-graded)
Learn how to embed a Panopto video into your D2L content modules.
To provide the easiest access to Panopto videos, insert the video in an HTML page. You can insert more than one video on an HTML page, but if you insert too many the page will load very slowly. Best practice is to limit the number of Panopto videos on a page to no more than 3.
Note: Before you perform the following steps make sure that you have logged in to your D2L Panopto account via the UA Tools > Panopto link in the navbar.
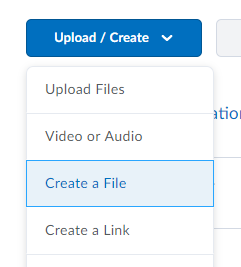
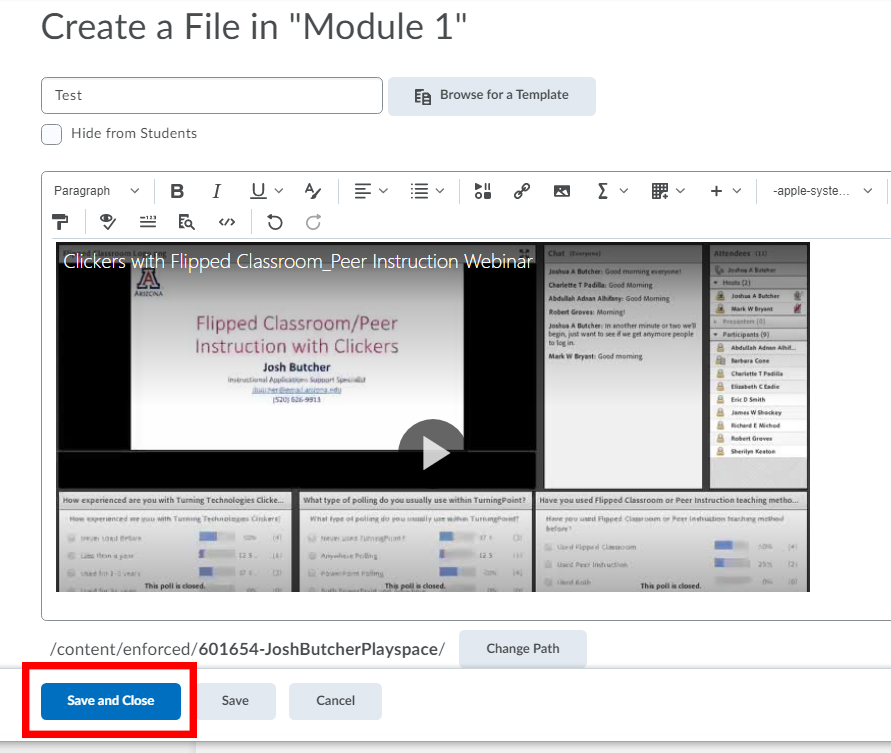
- Within a module in Content, create a new HTML file by clicking on the Upload/Create button and choose Create a File.
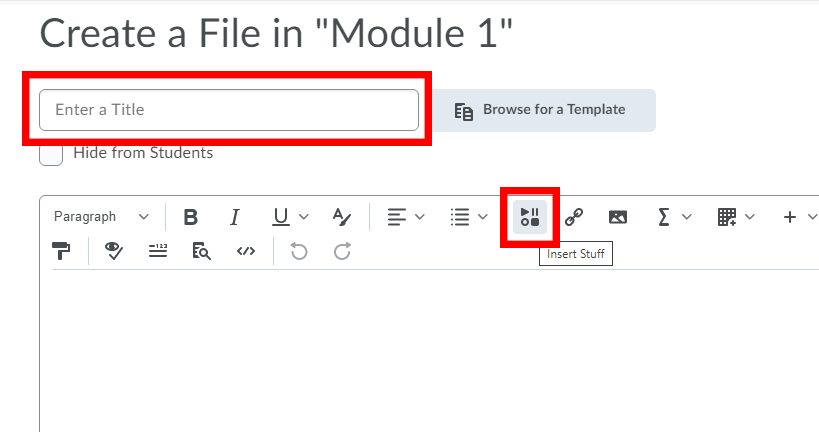
- Enter a title for the HTML file.
- Click on the page and click on the Insert Stuff button.
- Select Panopto from the list of options on the left side of the page.
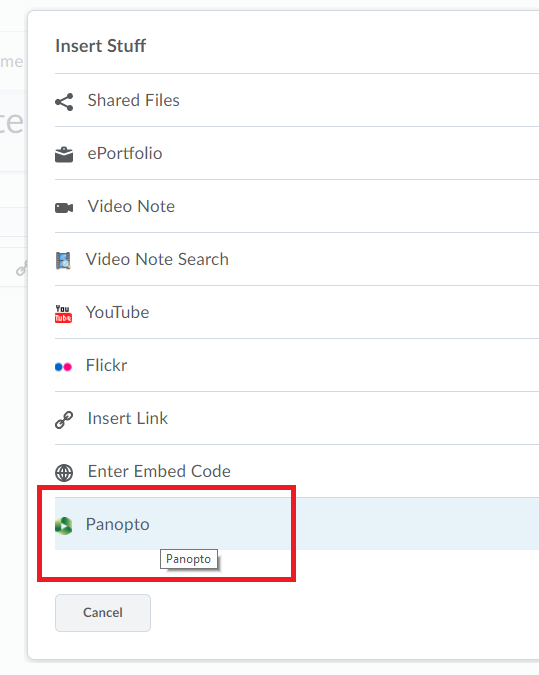
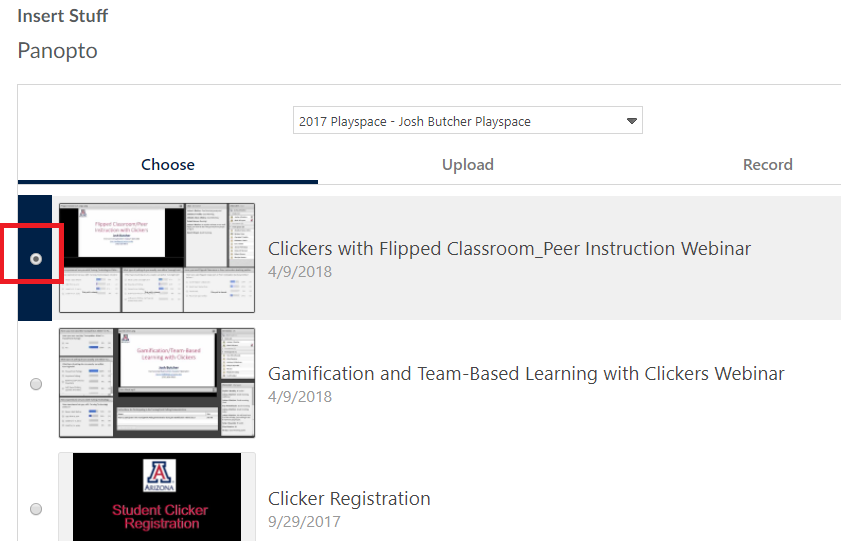
- Select the Panopto video you would like to embed by clicking the check box to the left of the video.
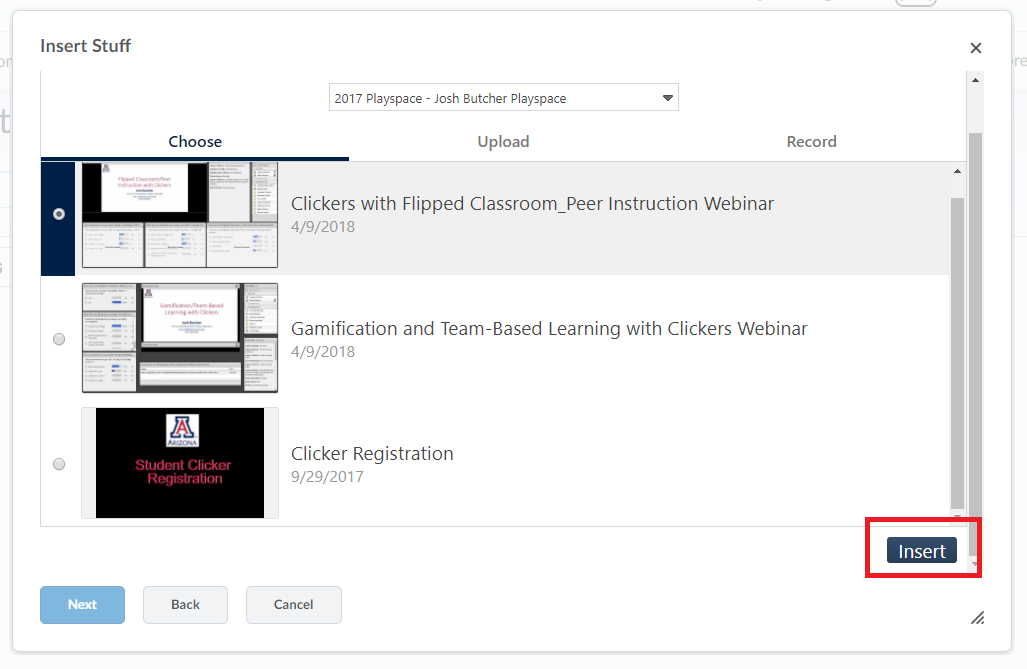
- Click on the Insert button. If you can't see the Insert button you may have to scroll all the way down or increase the size of the "insert stuff" window by dragging downwards from the bottom right hand corner. Note: You will only be able to select one video at a time. If you want to insert more than one on a page you will need to go through the steps again for each additional video.
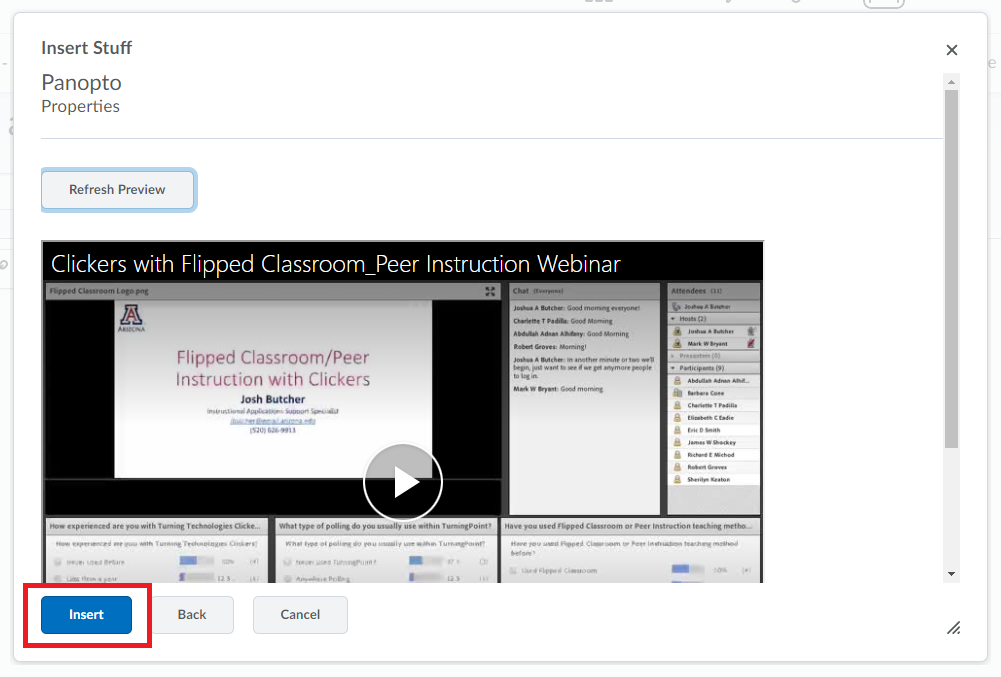
- You now have a preview of the embedded video. Click Insert button.
- Click Publish to finish.
14. Auto Record Lecture in Classroom with Panopto Remote Recorder
Learn how to setup your lectures in your classroom to automatically record with Panopto.
With every new semester there comes a lot of prep and planning several month's worth of lectures. Most certainly you have pondered the idea of recording your lectures, but maybe decided against the idea because it required too much setup at the beginning and end of the class.
Worry no more with the Panopto Remote Recorder software! This software takes all the setup out of your hands. So what is this Panopto Remote Recorder software? It is an application that, by request, can be installed on a classroom computer and can automatically record a single event or a weekly recurring lecture. Once you have filled out the proper request form, a UA campus Panopto admin can schedule your recordings based on the location, date, and time of your lectures. The recordings will then be automatically uploaded to the Panopto folder of your choice. Depending on the specific technology in the classroom the software can record audio from a microphone source, video if a webcam is installed, as well as anything that occurs on the instructor computer screen.
The only thing that is required from the instructor is to show up to the classroom, login to the instructor computer, and teach their class as they normally do. The recording will automatically start and end at the date/time it was scheduled. Once the class is over it automatically uploads to the appropriate Panopto folder. If you are interested in scheduling your lectures to automatically record with Panopto, click on the link below to make your request today! For questions, contact acadtech@arizona.edu .
15. Content Retention Policy
Learn about our campus Panopto content retention policy.
The University of Arizona’s Panopto account has a content retention (archival) policy in place to archive videos that haven’t been viewed for a certain time period. Archived videos are not available for immediate viewing, but creators or viewers of the videos can still restore them from archive for viewing access. It’s important to note that this is NOT a deletion policy. No videos are being deleted with this policy. They get placed in an archived status. Videos in an archived status are not able to be viewed until they are restored.
What is the policy?
Any Panopto video that has not been viewed in the last 13 months will be put in an archive status. If a video has never been viewed then the policy looks at the video’s creation date.
What Panopto content does this policy apply to?
This content retention policy has been applied to all content that resides inside a D2L course Panopto folder as well as content that resides in a user’s personal “My Folder”.
Why is there a need for this content retention policy?
The University of Arizona has created more than 1,000,000 videos focused on helping students with course materials and concepts. To help ensure we are both meeting the needs of faculty and students along with fiscal responsibility, we have begun leveraging Amazon Web Service’s Glacial Storage through Panopto’s archiving process. When no one has viewed a video for 13 months, it will be archived. If at any point a student, staff, or faculty member wants to view an archived video then they can simply click a “restore” button and the video will be available for playing within 24-48 hours.
How does an individual restore a Panopto video from the archive?
There are several ways that a Panopto video can be restored and Panopto’s How to Restore Archived Content support page goes into great detail about those methods.
The main two ways that most would restore a Panopto video is from within the Panopto folder itself, or from attempting to view an archived video from within the Panopto Viewer or the Panopto Embedded Viewer.
Restore Archived Content from Panopto Folder
Learn how to restore an archived video from within a Panopto folder.
You can individually or do a bulk restore of videos that have been archived within a Panopto folder.
- Individually Restore Archived Content from within a Panopto Folder
When accessing a Panopto folder that has videos that have been archived you will see two new buttons near the top that are labeled “Ready to view” and “Archived”. To see the videos that have been archived select the Archived button. When this button is selected, only archived videos will appear.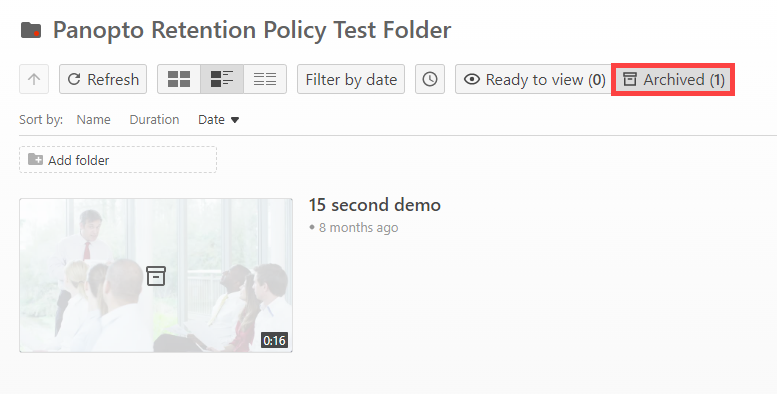
Hover your mouse over the video you want to restore and select the button Restore from Archive.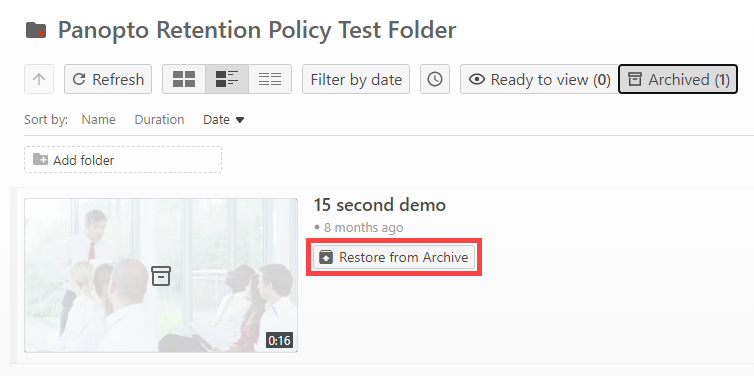
- Bulk Restore Archived Content from within a Panopto Folder.
When accessing a Panopto folder that has videos that have been archived you will see an Archive icon in the upper right near the folder settings icon.
Select this Archive icon.
Select one of the videos by placing a check mark in the upper left corner of the video thumbnail.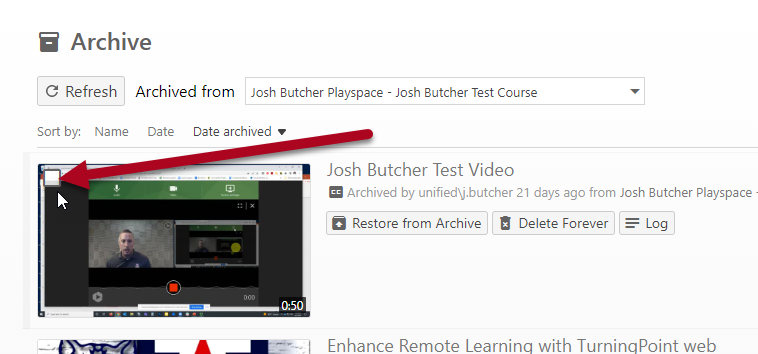
Select ALL of the videos in the folder by placing a check mark in the top level checkbox. Alternatively, if you did not want to select all of the videos you can manually select the other videos you desire.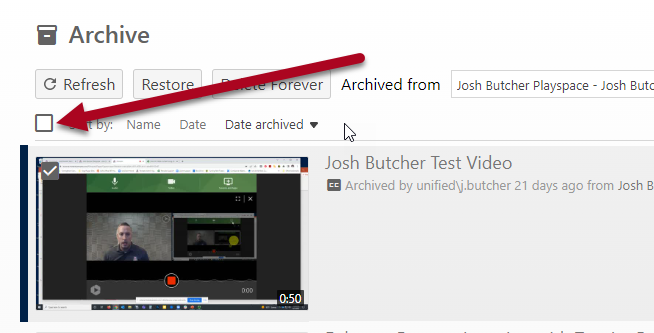
Select the Restore button to restore all selected videos within this course's archive folder.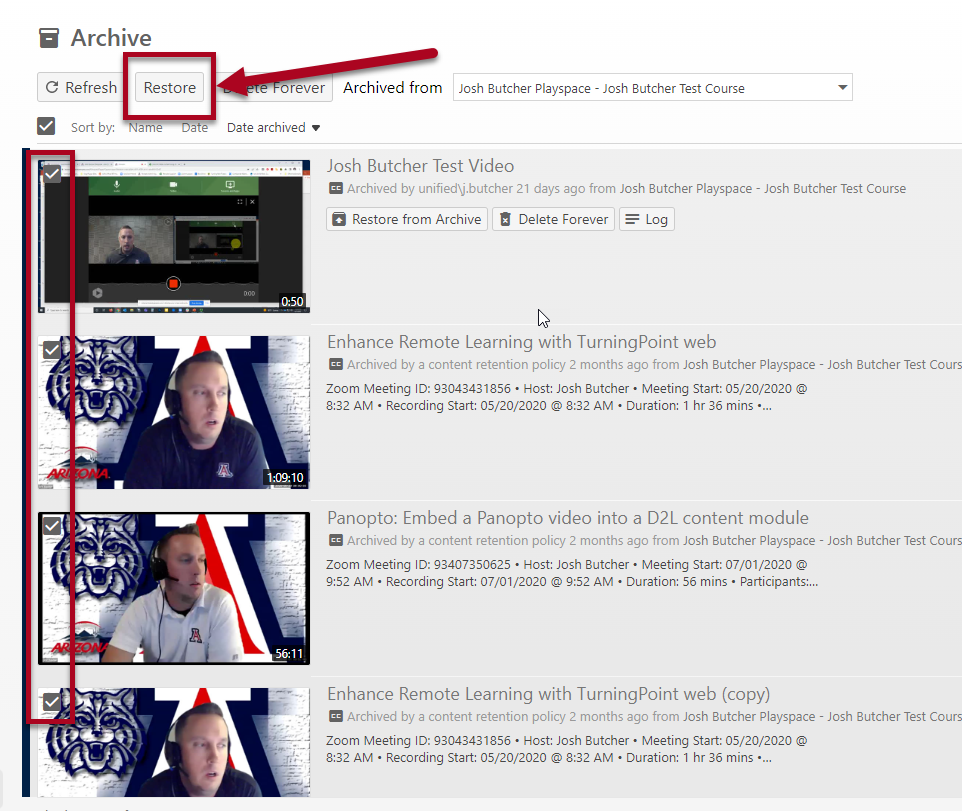
Restore Archived Content from Panopto Viewer or Embedded Viewer
Learn how to restore an archived video from the Panopto video player interface.
- Restore Archived Content from the Viewers
If you attempt to view an archived video from either the Panopto Viewer or Embedded Viewer, the following message will appear: This video has been archived and must be restored from the archive before it can be viewed. Restoring the video may take up to 48 hours.
Restore from the Panopto Viewer
This viewer will display the video’s thumbnail on the left and the message on the right. Select the Restore from Archive button to restore the video.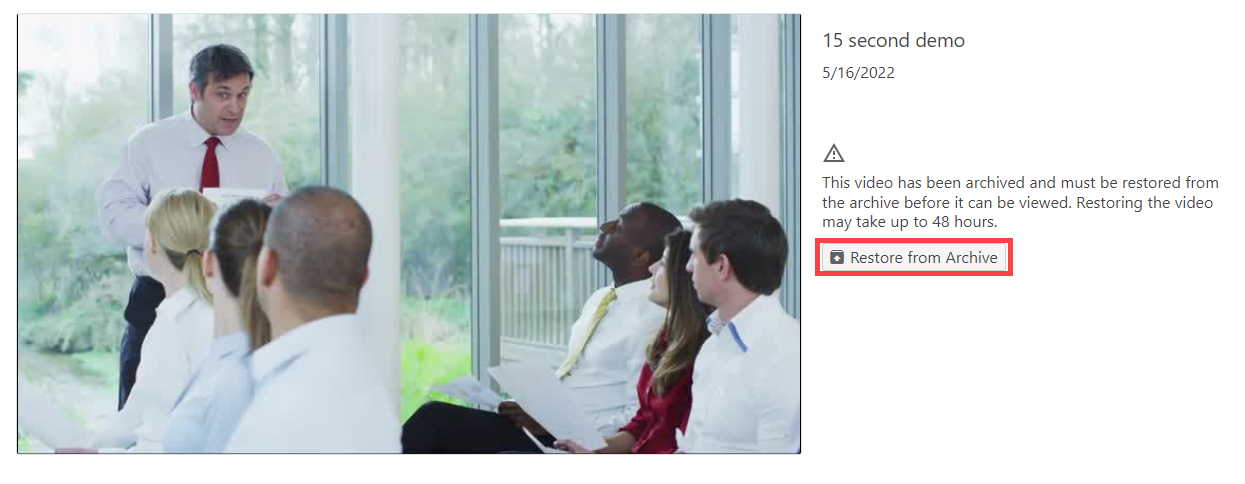
Restore from the Panopto Embedded Viewer
This viewer will appear greyed out with the message displayed over top of it. Select the Restore from Archive linked text to restore the video.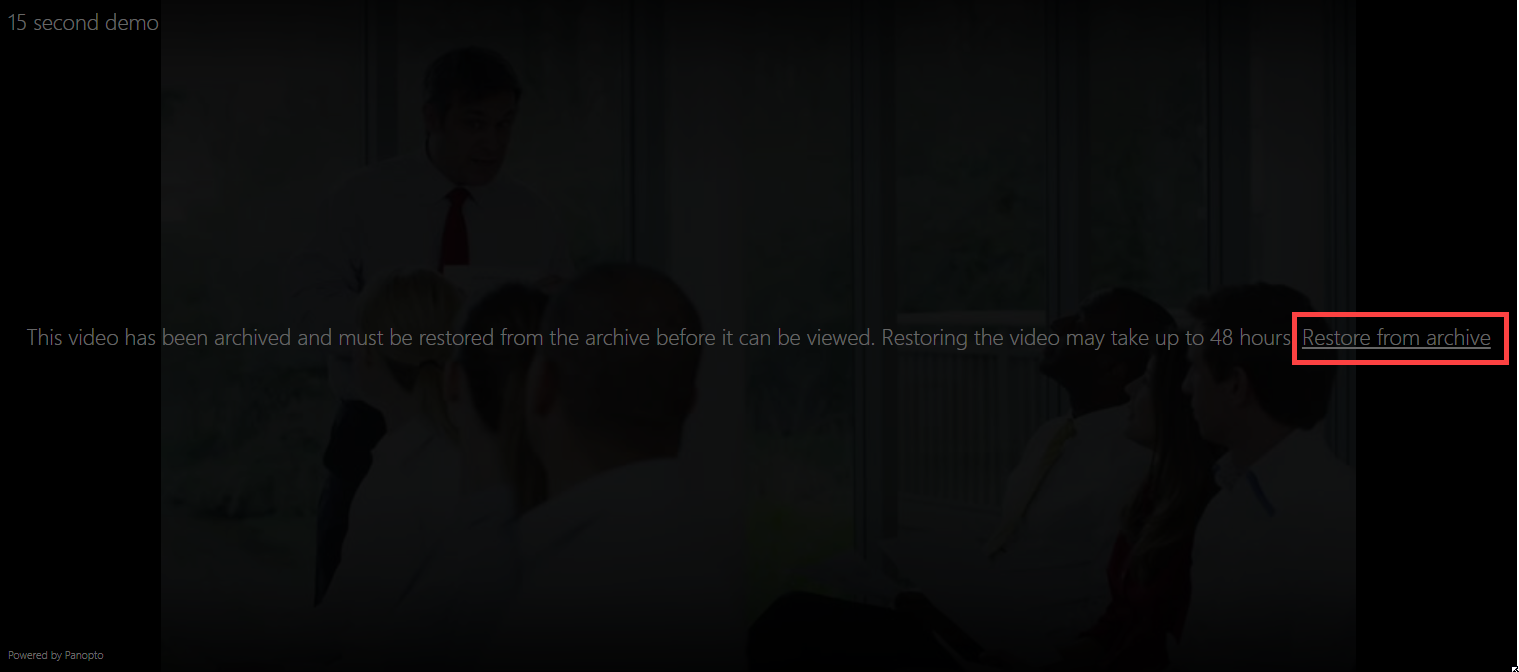
Important Points of Note
- When a video is archived, the permissions are kept intact, and as such, Viewers will only be able to see the archived videos they have access to and must be authenticated in order to view them.
- Archived videos can remain in the Archive indefinitely but must be restored before they can be viewed.
- Restoration of an archived video can take up to 48 hours (our experience is that it restores much quicker than this).
- All users can restore a video for viewing, as long as they have appropriate permissions to the video.
- Archived videos will no longer appear when browsing the library, but will still appear in search results.
- Archived videos will still be associated with a folder, but will not display within that folder list view.
- If a video is restored, it will appear in its associated folder once it is ready to view.
- Archived videos will appear in search results for any user who has been given access to the videos per the sharing setting in Panopto. Note: This means that archived videos that were shared publicly will be searchable by unauthenticated users.

