Learn how to manage Zoom meeting rooms efficiently and effectively.
Along with offering technical support for Zoom, this page offers you ideas on how to use some of the features of Zoom in your courses and academic life.
1. Suggestions to Improve Your Zoom Connection
Suggestions to help improve your connection when you are within a Zoom meeting.
You might at some point experience the audio or video in Zoom become choppy or distorted. What can you do to improve your Zoom experience?
- Use the best Internet connection you can.
Plan ahead for your Zoom meetings, and as often as possible, join Zoom meetings from a location where you can use a fast, reliable, wired Internet connection. Zoom recommends an internet speed of 1.5 mbps (megabits per second). You can test your internet speed by going to http://www.speedtest.net. The more devices you have using your internet at home the slower your speed will become. So if possible, limit the amount of other activity on your internet connection during your Zoom meetings.
In general:
- Wired connections are better than wireless (WiFi or cellular) connections.
- WiFi connections are better than cellular (3G/4G/LTE) connections.
- Mute your microphone when you are not speaking.
When your microphone is on, Zoom will devote part of your Internet connection to an audio stream for you, even if you are not speaking. Mute your microphone when you do not need it, and you will allow Zoom to use your internet connection more effectively.
- Stop your webcam video when you don't need it.
Start your video only when you need to show yourself on the webcam, and stop your video when it isn't needed. Instructors may want to use the camera feed the whole time and that is fine but for students it may not be as necessary to have their video feeds turned on the entire time.
- Disable HD webcam video.
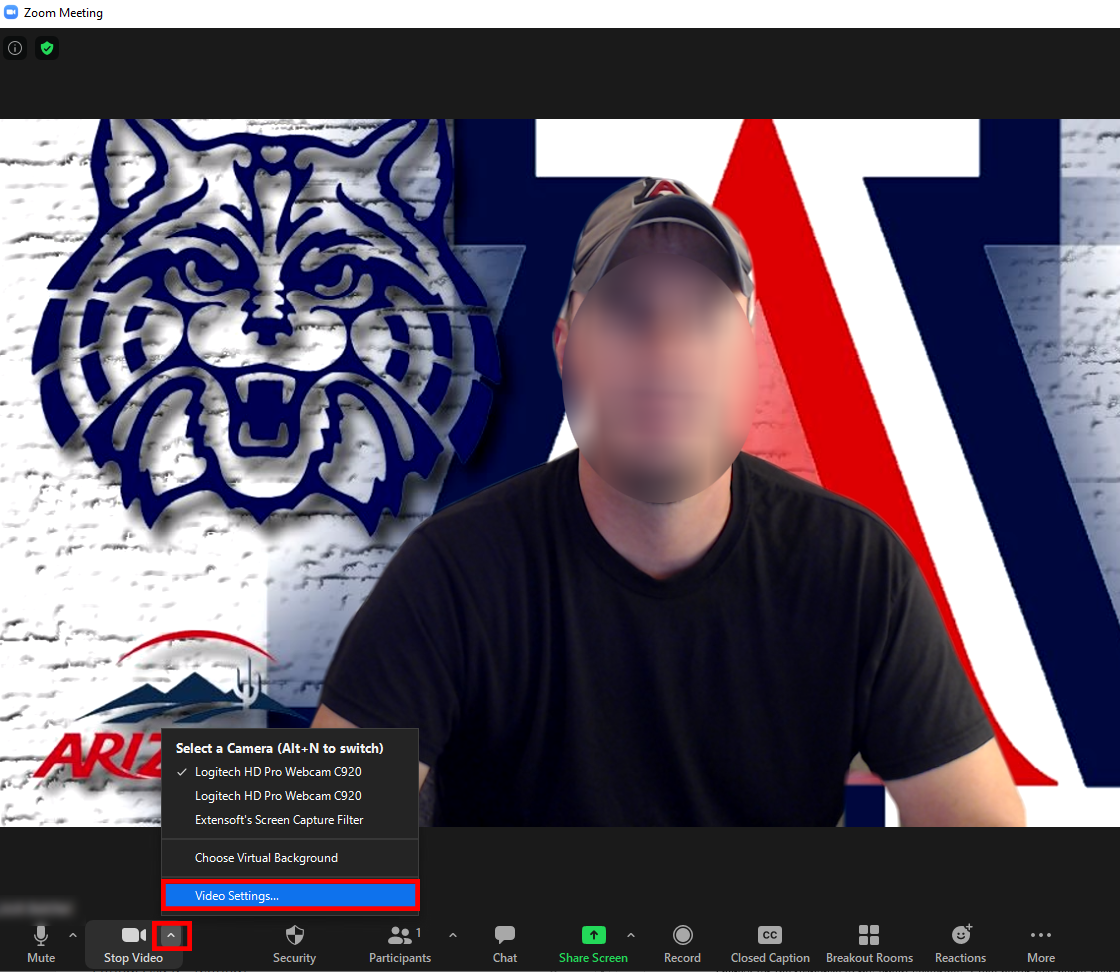
Sending high definition (HD) webcam video requires more bandwidth than sending non-HD video. Disabling HD video will free up your internet connection for other parts of your Zoom meeting. Here is how to disable your HD video:
- When you are within a Zoom meeting select the up arrow ^ next to the video icon and then select Video Settings...
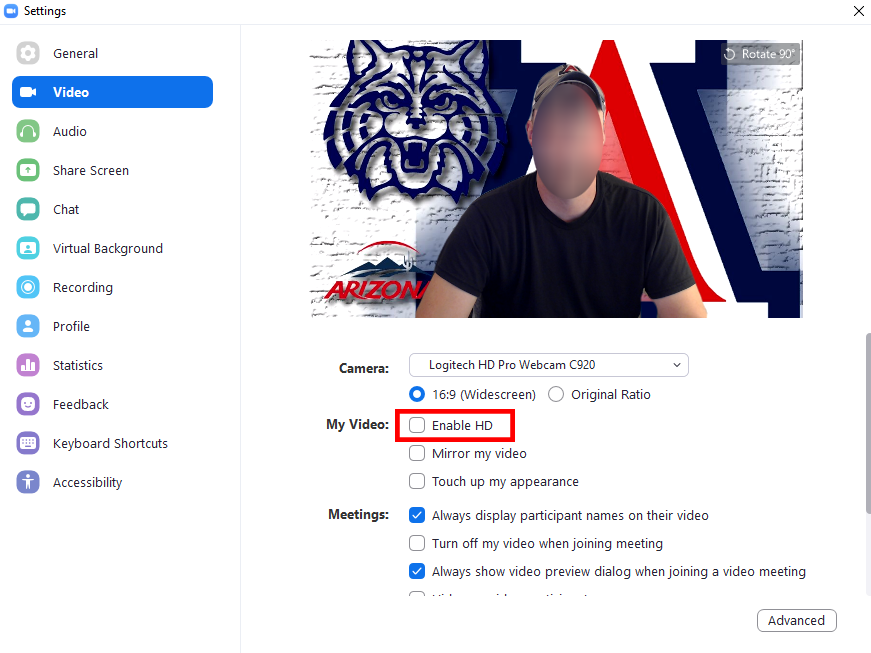
- Ensure that the Enable HD checkbox is unchecked.
- When you are within a Zoom meeting select the up arrow ^ next to the video icon and then select Video Settings...
- Close other, unnecessary applications on your computer.
Zoom meetings can demand significant memory and processing power from your computer. Closing other applications, ones you do not need during the session, will help Zoom run better.
- Avoid other activities that will take up bandwidth.
Don't start other bandwidth-intensive activities just before, or during, a Zoom meeting. On your Zoom device and on other computers and devices that share your internet connection avoid:
- large downloads
- large uploads
- streaming video (e.g. Netflix, Hulu, YouTube)
- cloud backups
- cloud file syncronizations
- other high-bandwidth activities
2. Using Touch Screen Devices to Annotate on Shared Content or Whiteboard
This section covers tips on using touch screen devices for annotation on shared content or whiteboard in Zoom.
If you weren't aware, you can share your screen or a share a whiteboard within your Zoom meeting and annotate on top of that shared screen or whiteboard.
Often times it can be difficult to annotate or draw using a regular computer and a mouse. Unless you are extremely talented, drawing or writing with a computer mouse is very difficult and not ideal. This is where having a touch screen device can come in very handy. Devices such as iPads, Android phones or tablets, or 2-in-1 computer touch screen devices can make annotating and drawing on a screen much easier within a Zoom meeting.
Essentially, if you have a touch screen device and you can install the Zoom application on it then you are good to go! What can be even more beneficial is to have a stylus for your device that you can use to draw or write with instead of your finger.
Here are the basic steps to sharing specifically a whiteboard during a Zoom meeting and annotating on that whiteboard.
- If not already installed, install the Zoom application on your device by visiting https://zoom.us/download. Locate the appropriate download file for your device and download and install it.
- Start or Join a Zoom meeting.
- Once in the meeting, select the Share button in the Zoom toolbar. On various device platforms it may say "Share Screen" or "Share Content".
- Select Whiteboard to share a blank whiteboard.
- Then to annotate, select the pencil icon to show/hide the annotation tools.
- Use either your finger or stylus to begin drawing on your device's screen and on the whiteboard.
3. Setting Up Virtual Office Hours
Use the Personal Meeting Room to set up Virtual Office Hours.
Scheduling lots of meetings in Zoom for regular office hours can be tedious and will clutter up your D2L calendar. The better way to set up Office Hours is to set up your Zoom Personal Meeting Room to mirror the way students access you during regular face to face time and then just provide a link to that Room. Just as with a physical office, once your Zoom Personal Meeting Room is set up correctly, you can use the same room for multiple courses.
- Access the UA Zoom Portal with this URL: https://arizona.zoom.us.
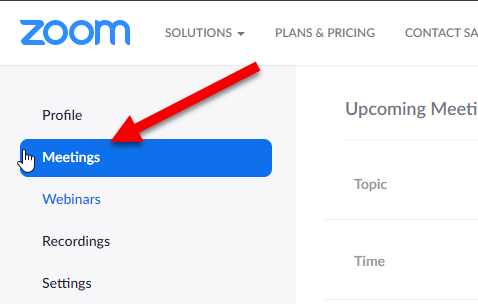
- Click Meetings on the left-hand side of the screen.
- Click Personal Meeting Room at the top of the screen.

- Locate the button Edit this Meeting at the bottom of the screen and click on it.

- We’ll be making some changes to the Meeting Options. Scroll down to the bottom of the page until you see the Meeting Options on the left.

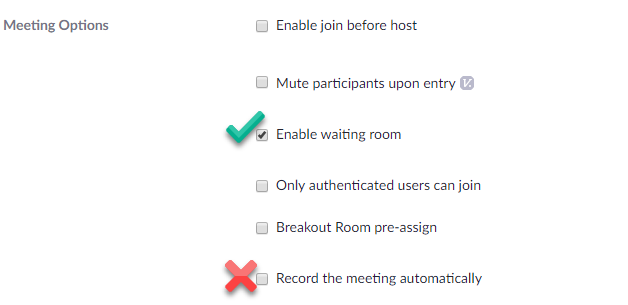
- You’ll first want to CHECK the box to the left of Enable waiting room. Think of this as the door to your office. You want it closed until you are ready to let the person outside in. This protects both your privacy and the privacy of any student you might be working with. When you are ready for the student, you can admit them to your Meeting.
- The second option you’ll need to check is the last. Ensure that Record the meeting automatically is UNCHECKED, again to protect privacy. You could always start recording in a meeting if you felt a need to, but this should be off by default.
- Save your changes which will return you to your Personal Meeting Room page.
- Now that your room is ready to use, you just need to share the access information with students. Find the line that starts with Join URL: and then use either of two options.

- Click the Copy the Invitation link and email this to individual students with whom you are setting up personal time.
- Copy the URL and create a link in your course Content to direct students to the room during your regularly scheduled office hours. With the Waiting Room option selected, you don’t have to worry that they’ll crash in if you are already with another student. Using this option you also don’t have to email students with the URL all the time, either.
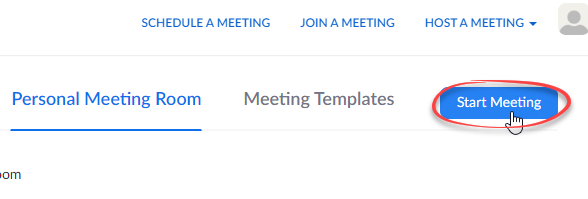
- Now all that is left to do is to start your meeting at the time you had scheduled. Simply open the UA Zoom Portal (http://arizona.zoom.us), click Meetings → Personal Meeting, and click the button to Start the Meeting.
4. Using the Waiting Room in Zoom
Use the Waiting Room option as a virtual door to your Zoom meeting room.
Waiting rooms allow you to hold a student outside your Zoom meeting room until you are ready to let them in. This is especially useful for office hour type meetings where you only want one student at a time but you don’t want to schedule students.
To enable office hours, edit your meeting in Zoom. Scroll down to the Security area and check the box to the left of Enable waiting room.

To use the waiting room, simply start the meeting as usual and be ready for the first person to join your meeting. You’ll know when a person is in your meeting’s Waiting Room because you’ll hear a chime and a message will pop up in the lower portion of your Zoom meeting room window.
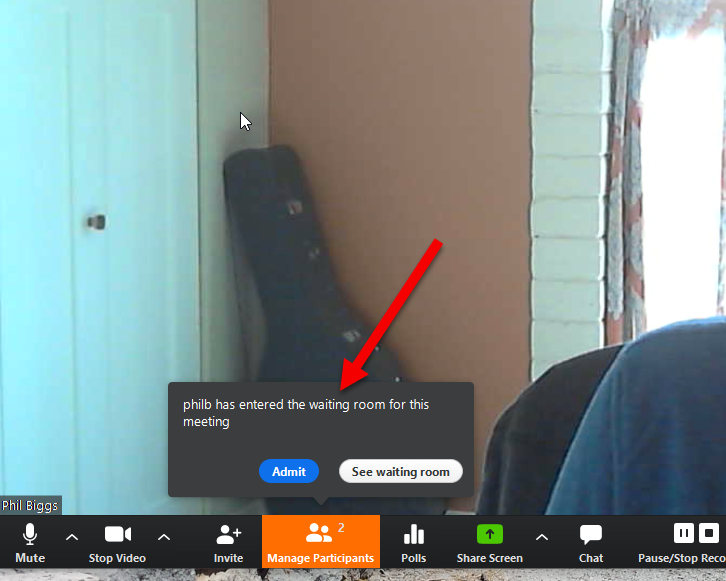
If you are ready to let the person into your room, simply click Admit. If, however, you are already with someone and want the person to continue waiting, click See waiting room.
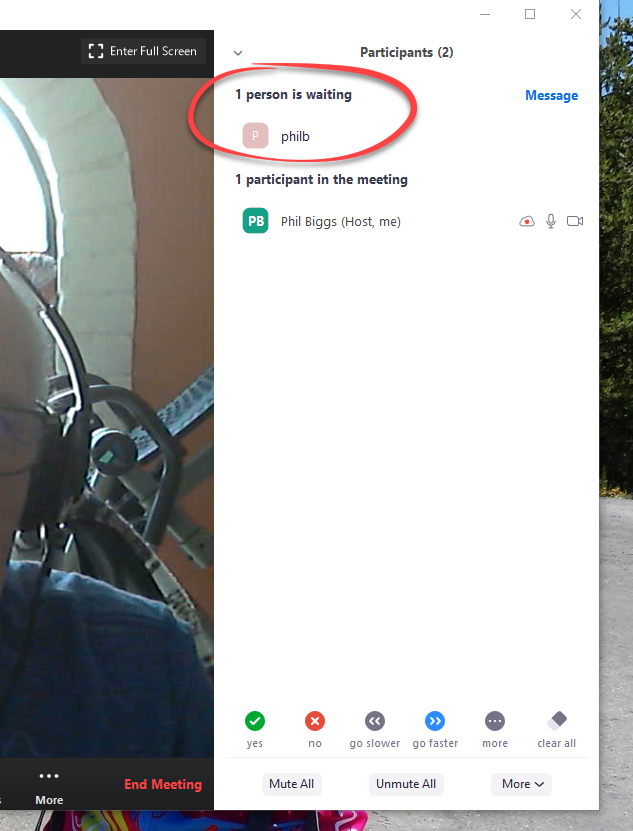
This will open a side pane next to your regular Zoom meeting with all the people in the waiting room.
 />
/>
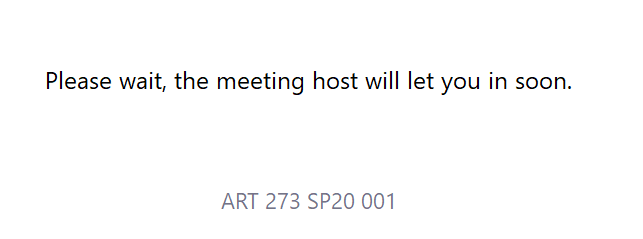
The person in the waiting room will see this message on their computer screen while you are waiting.
 />
/>
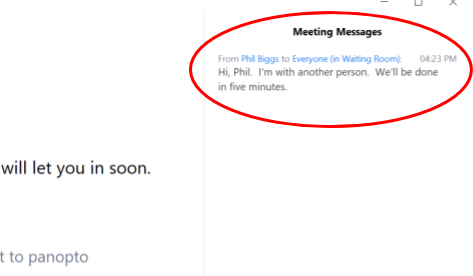
If you would like to send the person a message to let them know you see them, or giving them an approximate wait time, click the word Message to the right of their name.
 />
/>
This opens up a chat box at the bottom-right area of the Zoom window where you can send a message out to the people in the Waiting Room.
 />
/>
 />
/>
This makes it easy for the person who is waiting to plan their time as well.
When you are ready to admit the person to your meeting, just move the cursor over their name. Two options will appear to the right. Click Admit and they be allowed to enter the room.

5. How to Manage a Zoom Meeting Like a Webinar
Learn how to run a Zoom meeting to replicate the features of a webinar.
Our campus Zoom account comes with a minimal supply of Zoom webinar licenses and thus we cannot grant every request for use of a webinar. There are ways that you can manage your Zoom meetings to replicate that of a webinar while also providing security from your meeting getting overrun by unwanted attendees. For more security recommendations, visit our Zoom Security and Privacy help page.
Additionally, there are many that believe to use breakout rooms you need to use a webinar. That is not the case. The breakout room feature is only available in regular Zoom meetings and not webinars. To learn more about breakout rooms, please review Zoom’s support page on Managing Breakout Rooms.
Security Options for Meeting Access
Learn what security settings to apply to your meetings to ensure your meetings are as secure as possible.
Password protect your meetings
This feature requires participants to enter a password before being allowed access to your meeting.
Step 1 - Changing your default password settings
- In an internet browser navigate to the UA Zoom web portal at https://arizona.zoom.us.
- Select the Sign In button and sign in with your UA NetID and password.
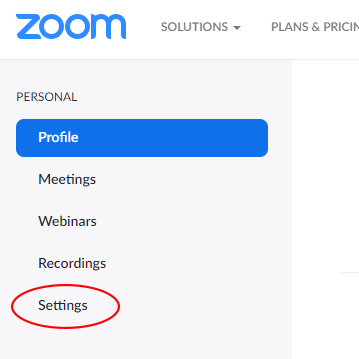
- Select the Settings button in the navigation panel on the left hand side.
- Toggle Embed password in meeting for one-click join to OFF.

Step 2 - Password protect your meetings during scheduling
- When scheduling your meeting select Require meeting password.

- Enter a password or use the password generated automatically.
Use the waiting room feature
Waiting rooms allow the host to control who enters their current meeting. By default this feature is off for UA campus Zoom users but can be enabled for meetings.
- To enable a waiting room for your meeting select the Enable waiting room option in the Security section when scheduling your meeting.

Use the registration feature
This feature will require your students to register to attend your class meeting.
Step 1 - Enable require registration for your meeting
- When scheduling your meeting locate Registration and select Required.

- Save your meeting.
Step 2 - Manage meeting registration
- Once your meeting is saved, you can edit registration options at the bottom of the page.
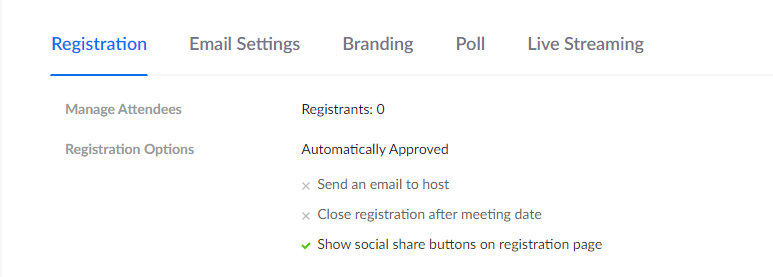
- It is recommended that you select Manually Approve and deselect Show social share buttons on registration page.
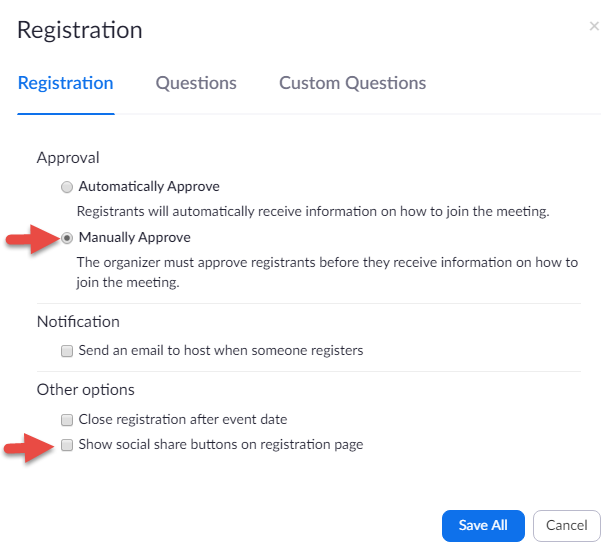
- Your meeting registration link will be found under Invite Attendees.

Remove problem participants during meeting
If a participant of your Zoom meeting is being disruptive, you can remove them from the meeting.
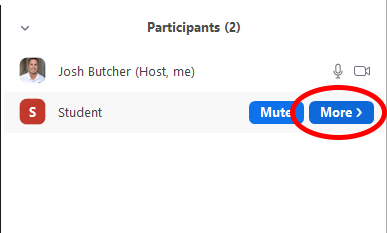
- Within the Zoom toolbar, select the Participants button.

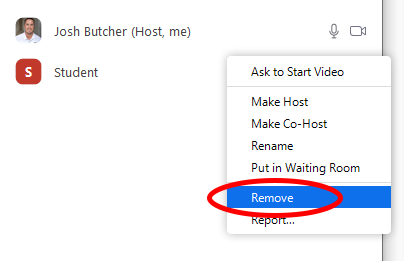
- Locate the participant from within the participant list and select the More button for that participant. Select Remove.
- You will see a window prompt asking if you are sure you want to remove the participant. Select Remove.
Prevent removed participants from rejoining your meeting
You can prevent participants who have been removed from your meeting from rejoining your meeting. This will only affect users who are removed by the host or co-host. Users who lose connection will be able to rejoin as normal. To change this setting, follow these steps:
- In an internet browser navigate to the UA Zoom web portal at https://arizona.zoom.us.
- Select the Sign In button and sign in with your UA NetID and password.
- Select the Settings button in the navigation panel on the left hand side.
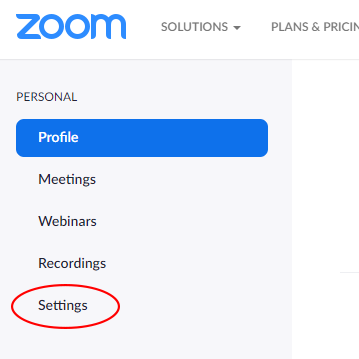
- Under Allow removed participants to rejoin, toggle the feature to OFF.

Limit Participant Interactions - Pre Meeting
Learn about what settings you can adjust prior to your meeting to limit participant interactions.
The following settings can be adjusted prior to your meeting from within your account profile in the UA Zoom Web Portal at https://arizona.zoom.us/profile/setting. You will need to sign in with your UA NetID and password.
Disable File transfer
This will prevent participants from posting inappropriate images or files into the Chat section, which can be very disruptive.
- Disable the File transfer option.

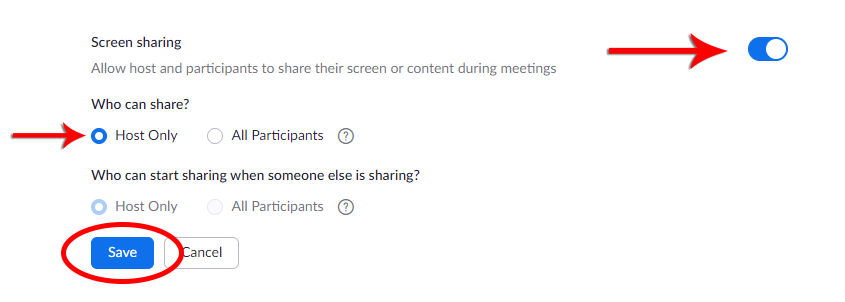
Screen sharing for Host Only
This will prevent participants from sharing their screen at any time during the meeting. Hosts and Co-Hosts will be able to share their screen when this is enabled. This will prevent unwanted attendees from sharing inappropriate content in the event that they gain access to your meeting.
- Enable the Screen sharing option and then select Host Only for Who can share? Select Save.
Disable Annotation
This will prevent participants from interacting with anything that is being shared by a Host or Co-Host. This is important as it also prevents unwanted attendees from drawing or writing inappropriate things on your shared screen in the event that they gain access to your meeting.
- Disable the Annotation option.

(Optional) If you want to leave the Annotation enabled, you can select the checkbox to allow Only the user who is sharing can annotate.
Limit Participant Interactions - In Meeting
Learn about what settings you can adjust during your meeting to limit participant interactions.
Once you are inside your Zoom meeting, you should change these settings to provide better control over the participants.
Mute All, Uncheck Allow Participants to Unmute Themselves
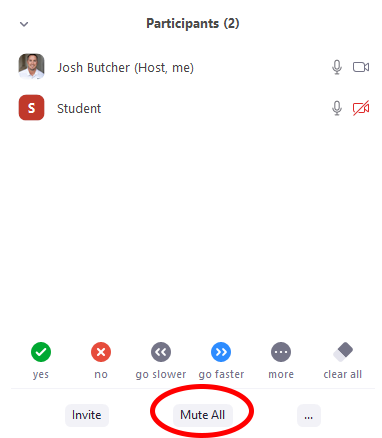
When you select the Mute All button, which can be access when the Participants button is selected in the Zoom toolbar, you can mute all of the participants that are in the meeting and those that might join later.
- Within the Zoom toolbar, select the Participants button.

- When the Participants window appears, select the Mute All button.
- In the pop-up window that appears, deselect the Allow participants to unmute themselves option and select Yes. Note: This option is important to deselect as it prevents participants from unmuting at any time.
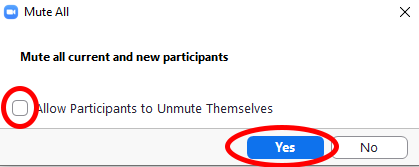
Any co-host will be able to unmute themselves and the host and/or co-hosts can unmute any participant that they would like to permit to speak in the meeting.
Set Chat to Host Only
This is meant to replicate the Q&A feature of a webinar, as well as provide a more secure chat during your meeting. Quite often in a webinar the Q&A is private, and participant questions are only viewable to the host. Adjusting your chat settings in the meeting to "Host Only" will prevent all chat messages from being public to replicate the Q&A capability. Additionally, for meeting security, the chat can be used inappropriately by unwanted attendees to display foul and disrespectful language that would be visible to everyone. This would be more likely to occur in a publicly accessible meeting, however, it is always relevant.
- Within the Zoom toolbar, select the Chat button.

- In the bottom right corner of the chat window, select the three dots (...) and select Host Only.
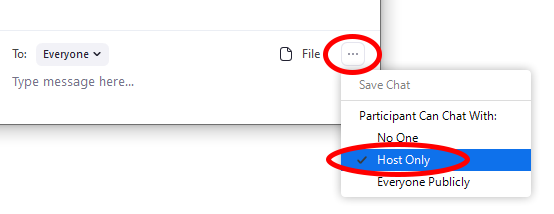
Messages from participants will be sent to the host and nobody else. If there are co-hosts in the meeting, participants will be able to select whether to send their message privately to either the host or co-host and not both.
Limitations on Video Control
Learn about what limitations you have for controlling participant's video feeds during your meeting.
Here is where the Zoom meeting format has control limitations. You aren't able to forcibly disable ALL participant video feeds at once and keep them disabled like you can with microphones. If video from participants needs to be managed, here is what we suggest:
- In the meeting invitations you send out, or wherever you post your meeting link for people to access, clarify that participants should have their video feed turned off when they are in the meeting.
- Set Participant Video to OFF when scheduling the meeting. This means that when a participant joins your meeting, their video feed will be OFF by default but they are still able to manually turn it on once they are in the meeting.

- Announce at the beginning of the meeting that everyone should have their video feed turned off.
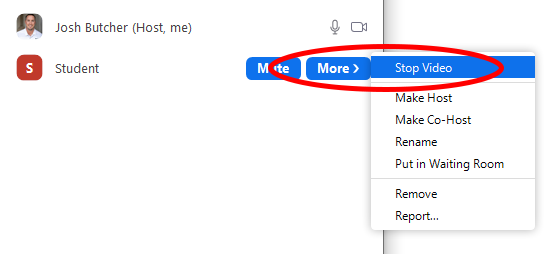
- Hosts and Co-Hosts can disable video for individual participants as needed from within the participant list by selecting the More button for a particular participant and selecting Stop Video. For large meetings this can be challenging so this is where having multiple co-hosts to help you manage the participant list is recommended.
