Prevent Zoombombing - someone hacking into your web meeting to share lewd and offensive content. This page provides a number of options, in order of importance. Note,
- If you experience Zoombombing, report it to UA's Information Security Office
- Make sure you install updates
- Never put a Zoom link to a regular meeting on a public webpage or social media. A Zoom webinar license on a public page is okay as it has much tighter controls on what participants can do
- Use D2L to access meetings because it keeps links off of public webpages and standardizes how students can find links for all of their courses
- If you are teaching, take time to socialize your expectations for students and for yourself
- If you need help with Zoom or if something isn't behaving like it says it should in the instructions, email d2l@arizona.edu.
It's important to have a plan for if Zoombombing happens despite your best efforts. This is violent behavior, even online, and people in the meetings will be affected by it. Once you have expelled the hackers or locked down the meeting, remember to take time to acknowledge the violence in the moment (racist, sexist, etc), and possibly give people time or space to recover either after the meeting or after the attack.
Security settings may affect accessibility for students in your class, so please review these guidelines for accessible Zoom meetings before making any changes.
1. Password protect your meetings
Require that participants enter a password before they are allowed to join your meeting.
Note: If you do password protect your meetings, make sure you provide the password through a secure means. For example, you can post it to D2L where only students who are logged in with their NetID and password can see it.
There are two steps that you must complete before you start your meeting.
Step 1: Change password defaults
- Login to the Zoom webportal at arizona.zoom.us
- Sign in with your NetID (ending in @arizona.edu) and password
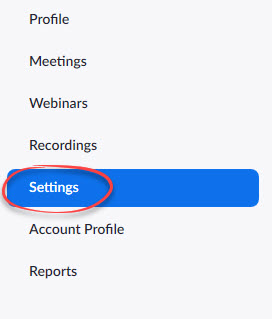
- Click Settings in the navigation panel
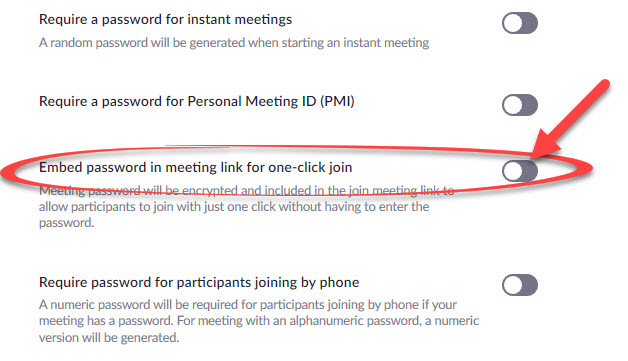
- Toggle the Embed password in meeting link for one-click join to off.
- Toggle Require password for participants joining by phone to on.

Step 2: Password protect your meeting
Add a password when you create your meeting either through the the Web Portal or via D2L.
- Click the setting for Require meeting password.

- Zoom will automatically generate a password or you can create your own.

2. Use a waiting room
Small meetings: Control when students enter a meeting.
Note: A waiting room may be unwieldy for meetings with 10 or more participants. Consider locking your room instead.
When you turn this setting on, students will be taken to a waiting room once they click the Zoom link, where they linger until the host gives them access to the actual meeting. Hosts can use this feature to meet with one person at a time, such as for office hours. They can also use this feature to add security to the meeting, since they must approve all participants. This takes two steps, one before and one during the meeting.
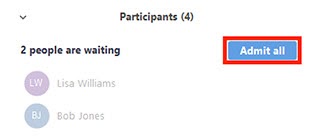
Note: It is possible to "admit all" people in a waiting room at once.
Set up a waiting room
You can do this when you create your meeting or, if you enter the meeting early, you can do it in the meeting before other participants arrive.
When you Create the Meeting
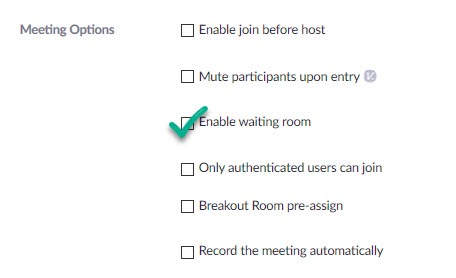
When you create a new meeting, which you can do by either 1) logging into Zoom via the web; or 2) navigating to it through your course site, you are given a set of meeting options. Check the option to Enable waiting room.
During the Meeting
- Click the Security icon.

- Select Enable waiting room
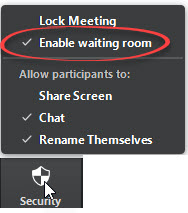
Step 2: Admit participants who are in the waiting room
When someone enters the waiting room, the host gets a message at the bottom of the screen.
To allow entry, click either,
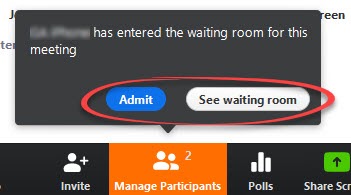
- Admit: to allow the participant to enter, or
- See waiting room: for the full list of people waiting to enter and to Admit all
3. Lock your meeting
Large meetings: Lock your meeting after it starts to prevent new people joining.
Note: If you use a waiting room, you do not need to lock your meeting.
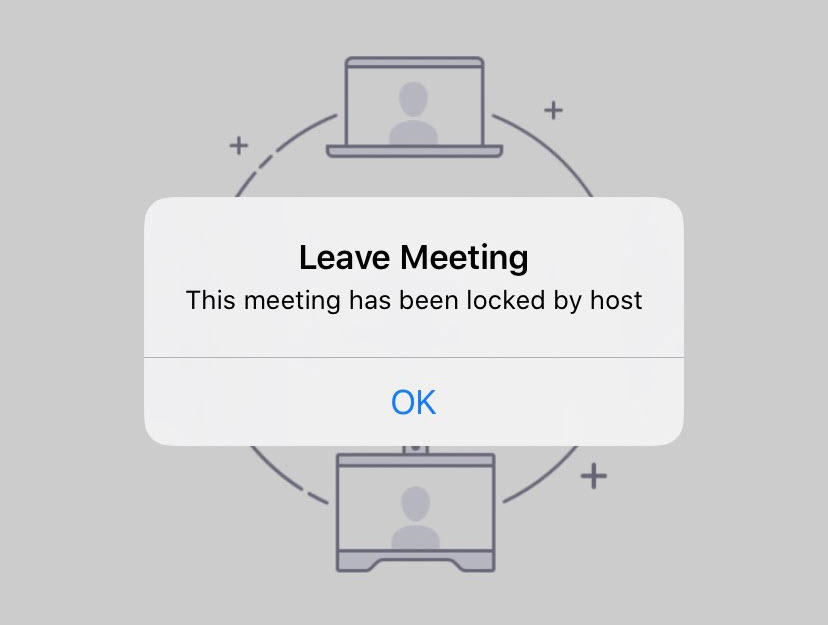
Once your students are logged into the Zoom meeting, you can "lock" it. This prevents anyone else from joining through the link or meeting ID. If they do attempt to join, they will be shown the following message:
To lock your meeting:
- In the meeting, click the Security icon.

- Check Lock Meeting.
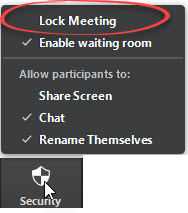
To unlock a meeting and allow people to join:
- In the meeting, click the Security icon.

- Uncheck Lock Meeting.

4. Permanently remove problem participants
Remove disruptive people from your meeting.
This takes two steps, one before and one during your meeting. First, you need to change a setting to prevent them from simply rejoining, then you'll be able to remove them permanently during the meeting.
Step 1: Bar ejected participants from returning
- Login to the Zoom webportal at arizona.zoom.us.
- Sign in with your NetID (ending in @arizona.edu) and password.
- Click Settings in the navigation panel.

- Toggle "Allow removed participants to rejoin" to off.
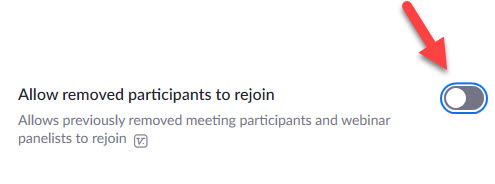
Step 2: Remove participants during a meeting
- Click the Manage Participants icon.

- Hover your mouse over the person's name.
- Click the More button that appears.
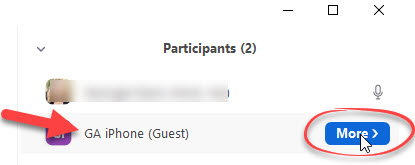
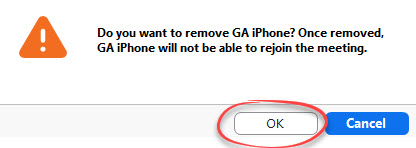
- Select Remove.
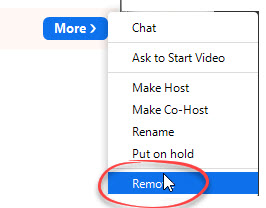
- Click Okay.
5. Limit screen sharing
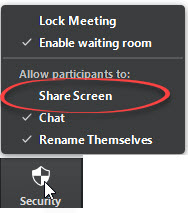
Prevent hackers from taking over the screen by limiting screen-sharing to hosts only.
- In the meeting, click the Security icon.

- Uncheck Share Screen
6. Limit screen annotation
Turn off annotations to prevent offensive content on the main screen.
Annotations allow you and participants to virtually write on the shared screen or whiteboard. However, they can be used by malicious actors to put offensive content in the meeting. You can turn this feature off for participants by following these steps.
- Login to the Zoom webportal at arizona.zoom.us.
- Sign in with your NetID (ending in @arizona.edu) and password.
- Click Settings in the navigation panel.

- Click In Meeting (Basic) on the left side.
- Toggle "Annotation" to off.

7. Mute microphones
Zoombombers are using microphones to shout out obscene and offensive things.
Note: You can use these steps mid-meeting if someone breaks into your meeting and takes over the microphone. You can also use these settings to secure your meeting from the start.
Step 1: Mute all microphones on-the-fly
- Click the Manage Participants icon.

- Click Mute all
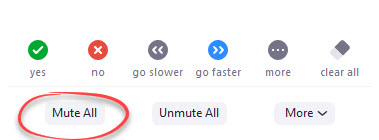
- Uncheck Allow participants to unmute themselves
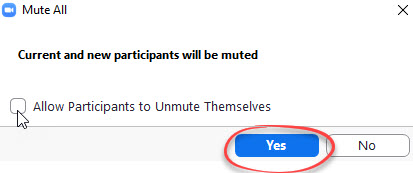
- Click Yes
Step 2: Option 1 - Lock the meeting & then give participants control of their microphones
Once the meeting is underway, you can lock it (see section 3 above) so no one new can join. If you have muted microphones, it is now safe to unmute them. Repeat the steps above, this time selecting Allow Participants to Unmute Themselves.
Step 2: Option 2 - Enter the meeting early, and mute all participants upon entry
If you enter the meeting before everyone else (a waiting room helps with this), you can mute everyone as they enter the room
- Click the Manage Participants icon.

- Click the three dots in the lower right corner.
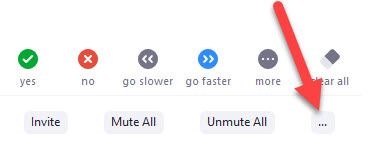
- Select Mute Participants Upon Entry.

- At this point, you can decide if you want participants to be able to unmute themselves (check the option) or not (uncheck the option).

Note: A If you prevent participants from unmuting themselves, you may want to direct them to click the Participants icon and use the Raise Hand option. You can mouse over the student's name and unmute them to allow them to speak. When they are finished you can remute them the same way.
8. Limit chats
You can control whether participants are able to chat (via text) during your meeting.
Hosts can still use the chat function even though it is disabled for participants.
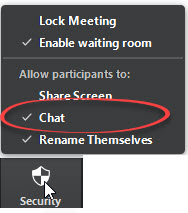
- In the meeting, click the Security icon.

- Uncheck Chat
9. Limit the whiteboard
Turn off the whiteboard to prevent offensive content on the main screen.
The whiteboard allows you to write or draw on a virtual whiteboard shared with the whole meeting. However, it can be used by malicious actors to put offensive content in the meeting. You can turn the whiteboard sharing feature off for participants by following these steps.
- Login to the Zoom webportal at arizona.zoom.us.
- Sign in with your NetID (ending in @arizona.edu) and password.
- Click Settings in the navigation panel.

- Click In Meeting (Basic) on the left side.
- Toggle "Whiteboard" to off.

10. Privacy: Hide participant names in recordings
Change recording settings so participants are not identified in the video.
- Login to the Zoom webportal at arizona.zoom.us.
- Sign in with your NetID (ending in @arizona.edu) and password.
- Click Settings in the navigation panel.

- Click Recordings at the top.
- Uncheck the box next to "Display participants' names in the recording".
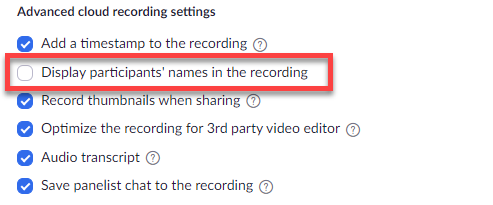
- Click Save.
11. Protect your meeting IDs
Protect the meeting IDs and links from easy access by hackers.
Zoom's simplicity means that a meeting ID is often the only thing someone needs to join (and disrupt) your meetings. While the steps above can mitigate this, protecting your meeting IDs will also help protect participants and hosts. Here are some suggestions:
- Avoid using your personal meeting ID (PMI) to host any kind of public meeting. While this meeting ID can be changed if necessary, it's recommended to use this only when a quick one-one meeting is required.
- If possible, schedule a new meeting for each Zoom session to create individual IDs.
- Don't publish your meeting ID on social media or public websites. Instead, collect emails from the people who want to attend, and send them the meeting information directly.
- If you do need to share the meeting ID publicly, require passwords or registration (see above) as well to protect your participants and presenters.
12. Use Authentication for your meeting
Use authentication for your meeting so that only UA users can join.
Authentication allows the host to restrict participants who can join a meeting to those who are logged into Zoom with their UA Zoom account. Anyone outside of the university who doesn't have a netID and access to a UA Zoom account would not be able to join your meeting. This could affect outside guest speakers that you might want to join your meeting. So if you are wanting outside guest speakers to join do not use this option for your meetings.
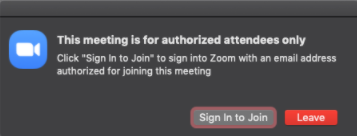
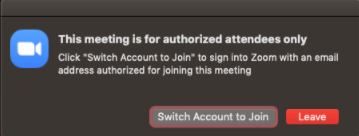
If a participant tries to join a meeting or webinar and is not logged into Zoom with their UA Zoom account, or they are logged in with some other Zoom account besides their UA Zoom account, they will receive one of the following messages:
- If they are NOT logged into Zoom with their UA Zoom account:
-
If they are logged in with the wrong email domain or Zoom account:
How Do Students Join a Meeting That Has Authentication Required?
You can review and provide the following PDF document to your students that will instruct them how to join a meeting that has authentication required.
Sign In to a Zoom Meeting that Requires Authentication
12a. Enable Authentication for your Zoom Account
Learn how to enable authentication for your meetings on your Zoom account.
First we need to enable the authentication setting on your Zoom account. This will allow you to choose the option when you are scheduling your meeting. To enable Only authenticated users can join meetings on your Zoom account do the following:
- Sign in to the UA Zoom Web Portal.
- In the navigation panel on the left, click Settings.
- Under the Security section, verify that Only authenticated users can join meetings is enabled. The toggle will appear blue if it is enabled.
- If the setting is disabled, click the toggle to enable it.

- Under Meeting Authentication Options select "Hide in the Selection" for the Sign in to Zoom option to turn off this option. You only want the University of Arizona Only option to be an option during scheduling.

12b. Turn On Authentication While Scheduling a Meeting
Learn how to turn on authentication while scheduling a meeting.
Turn On Authentication While Scheduling a Meeting
- If you are scheduling your meeting from within your D2L course then go to UA Tools > Zoom in the course navigation bar. If you are scheduling your meeting from within the UA Zoom Web Portal then click on Meetings in the navigation panel on the left.
- Select the Schedule a New Meeting button.

- Under Meeting Options select Only authenticated users can join.
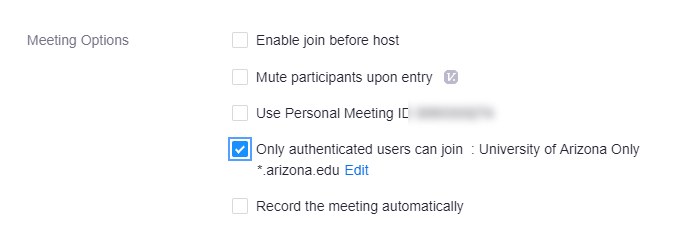
- Click Save to save your meeting.
12c. Adding Exceptions to Authenticated Users Requirement
Learn how to add exceptions to authenticated users requirement.
For instances where a guest needs to be brought into a University of Arizona Zoom meeting but the security standard of requiring authentication is desired, users can add exceptions to the authentication requirement. Adding these exceptions thus allows non-UA Zoom users to participant in a Zoom meeting that requires UA Zoom authentication.
Note: Exceptions can only be added from within the Zoom web portal (https://arizona.zoom.us). If you are creating or editing a meeting within D2L you will not be able to add an authentication exception. Access that meeting through the Zoom web portal to add the exception.
Adding exceptions when scheduling a meeting from https://arizona.zoom.us
- From your Zoom profile page, select the Meetings option on the left.
- Select Schedule a Meeting.

- In the security settings, turn ON Require authentication to join.

- Enabling this setting will open a new option: Authentication Exception. Select the Add option.

- Fill out the Name and Email fields on the exception window. You can select the + Add Participant option to add more than one exception. Once you have added your guests, select the Save option.
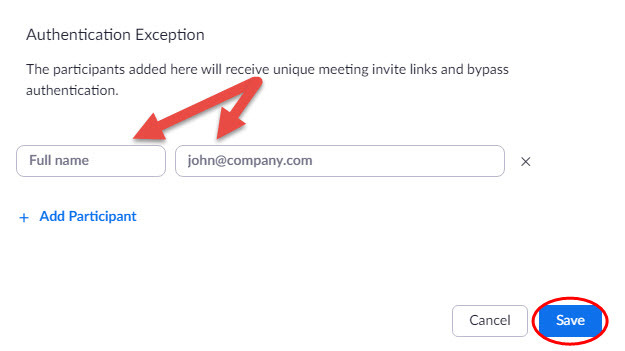
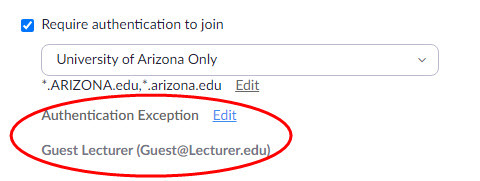
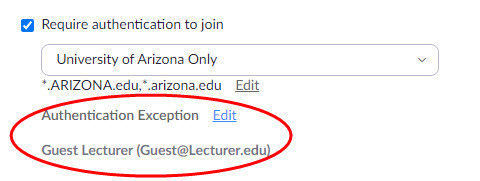
- Your exceptions will be listed under the authentication requirement. Double check that the exceptions appear and save your meeting.
Adding exceptions to an existing meeting or a meeting that has been created within D2L
If you have a meeting requiring authentication that has already been scheduled using the University of Arizona Zoom web portal, the Zoom desktop application, through a D2L course site, or from an Outlook invitation, you can add exceptions as well.
- Open a browser and navigate to https://arizona.zoom.us and Sign In.
- Select the Meetings option on the left.
- Locate the meeting you need to add an exception to, hover your cursor over the meeting, and select the Edit button that appears.
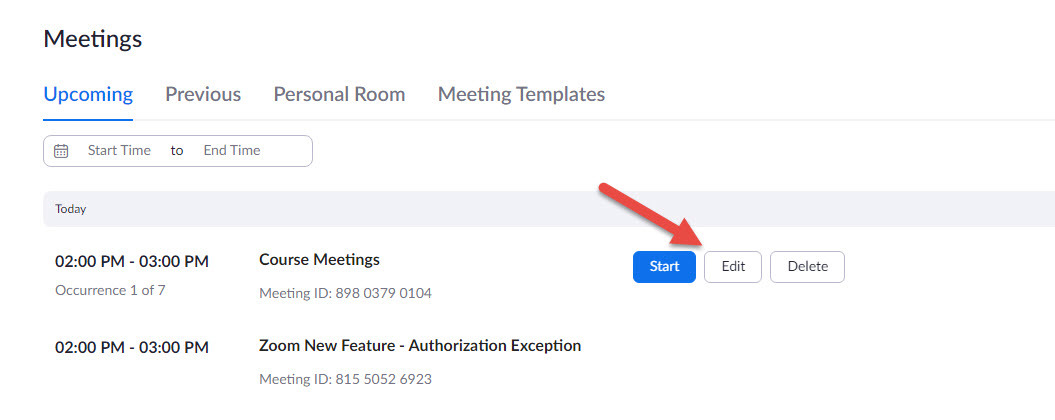
- On the edit page, locate the Require authentication to join option and enable it if it isn't already enabled. Then select the Add option for Authentication Exception.

- Enter the Name and Email of your guest and save once you have finished adding exceptions.
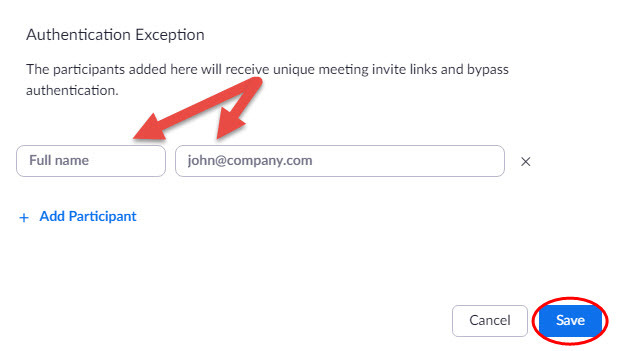
- Confirm that the exception is listed and save your meeting.
