Zoom is an online meeting tool with microphones, cameras, screen sharing, and a whole lot more that can create an opportunity for active learning with real time conversations.
Because Zoom consistently releases updates these instructions will be fluid and can change as we discover issues, new features are added, etc. We would love your help with keeping these pages as accurate as possible. If you notice an issue or something isn't behaving like it says it should in the instructions please let us know by emailing intech@arizona.edu.
For student Zoom support please contact the 24/7 IT Help Desk at (520) 626-TECH.
1. Join a Meeting within D2L
Learn how to join a Zoom meeting from within a D2L course.
There are a few ways you can locate and find your D2L course Zoom meetings. You can find them through the D2L course calendar or through the UA Tools > Zoom link.
Meetings in D2L Course Calendar
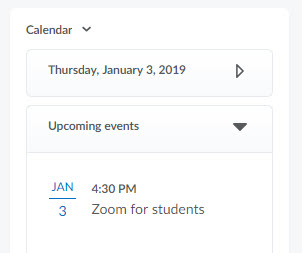
If you are joining a meeting that your instructor created you will find the meeting in the Calendar widget of that particular D2L course. When you click on the event in the Calendar widget you will be taken to the event information page that will have a link that says “Click here to join Zoom Meeting”. Clicking that link will join you to that meeting.

UA Tools > Zoom Link
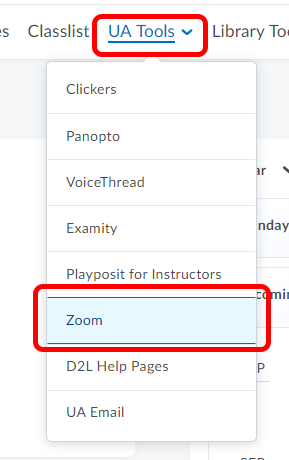
The other method for finding your D2L course Zoom meetings is through the UA Tools > Zoom link.
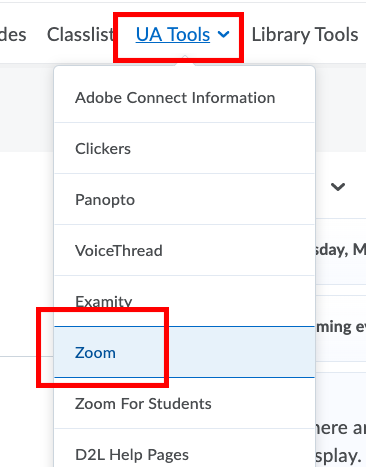
- Once within one of your D2L courses click on the UA Tools menu in the navbar and choose Zoom. (Note: If you are within an Eller course you likely won't have the UA Tools menu icon in your D2L course. You will need to locate the Zoom link that your instructor has placed in a D2L content module)
- The list of upcoming Zoom meetings for the course will appear. Find the meeting you need to join and select the Join button.
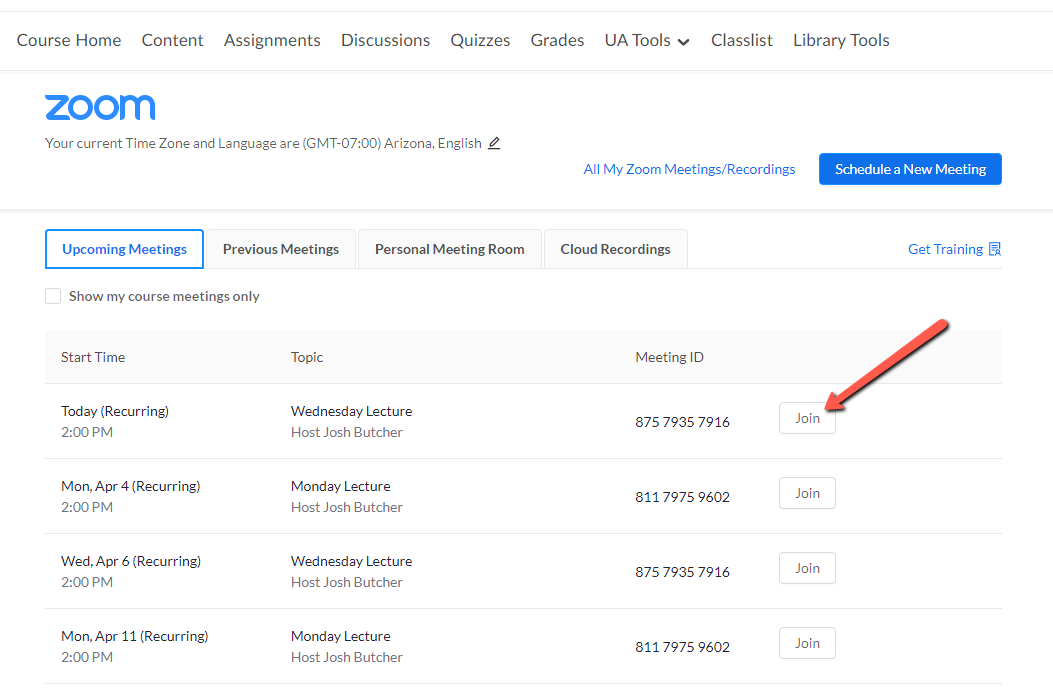
The Zoom client (desktop app) should then launch and join you to that meeting.
For additional help or instructions visit Zoom's support page on Joining a Zoom Meeting.
2. Suggestions to Improve Your Zoom Connection
Suggestions to help improve your connection when you are within a Zoom meeting.
You might at some point experience the audio or video in Zoom become choppy or distorted. What can you do to improve your Zoom experience?
- Use the best Internet connection you can.
Plan ahead for your Zoom meetings, and as often as possible, join Zoom meetings from a location where you can use a fast, reliable, wired Internet connection. Zoom recommends an internet speed of 1.5 mbps (megabits per second). You can test your internet speed by going to http://www.speedtest.net. The more devices you have using your internet at home the slower your speed will become. So if possible, limit the amount of other activity on your internet connection during your Zoom meetings.
In general:
- Wired connections are better than wireless (WiFi or cellular) connections.
- WiFi connections are better than cellular (3G/4G/LTE) connections.
- Mute your microphone when you are not speaking.
When your microphone is on, Zoom will devote part of your Internet connection to an audio stream for you, even if you are not speaking. Mute your microphone when you do not need it, and you will allow Zoom to use your internet connection more effectively.
- Stop your webcam video when you don't need it.
Start your video only when you need to show yourself on the webcam, and stop your video when it isn't needed. Instructors may want to use the camera feed the whole time and that is fine but for students it may not be as necessary to have their video feeds turned on the entire time.
- Disable HD webcam video.
Sending high definition (HD) webcam video requires more bandwidth than sending non-HD video. Disabling HD video will free up your internet connection for other parts of your Zoom meeting. Here is how to disable your HD video:
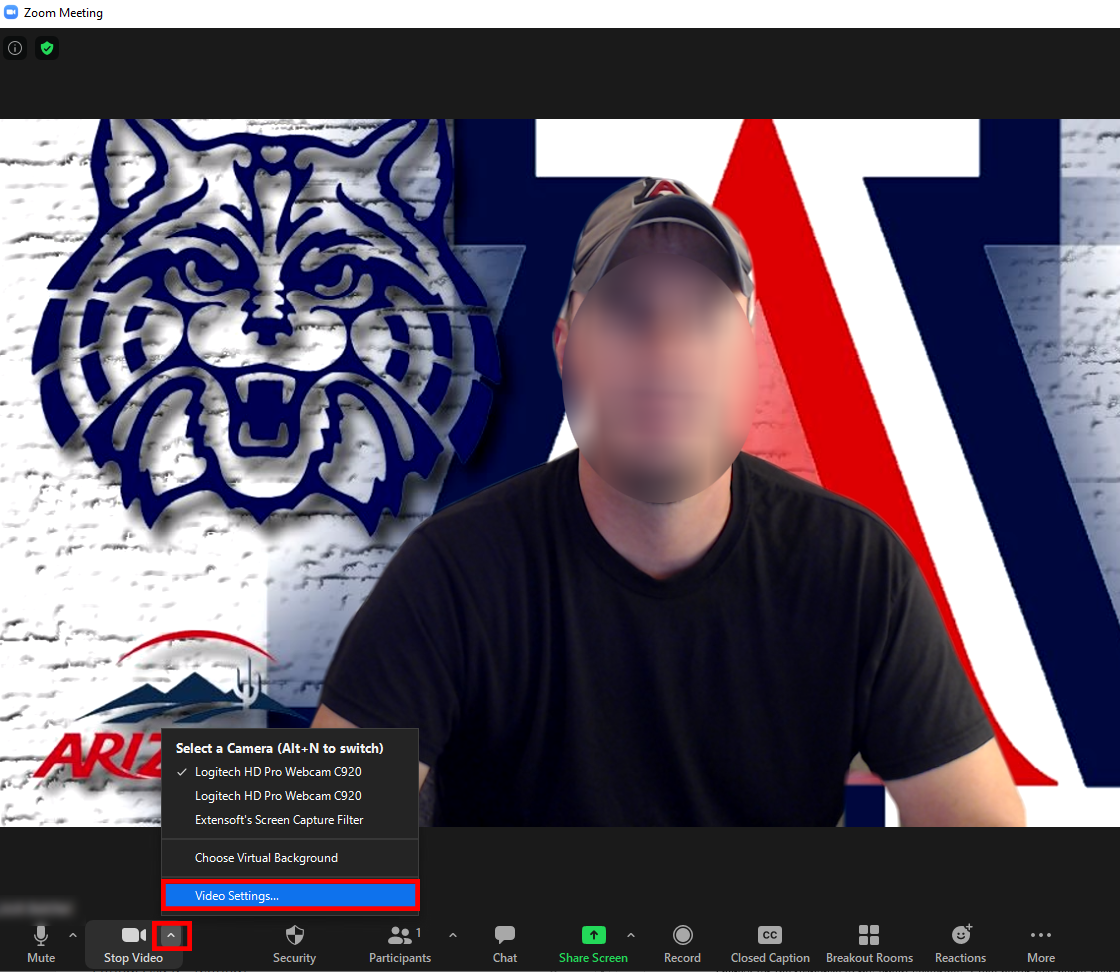
- When you are within a Zoom meeting select the up arrow ^ next to the video icon and then select Video Settings...
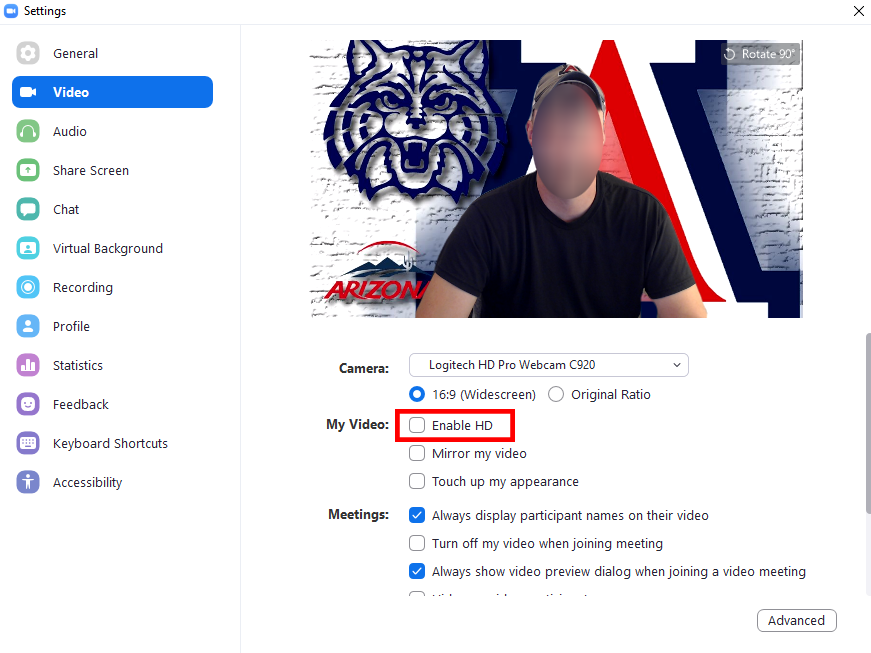
- Ensure that the Enable HD checkbox is unchecked.
- When you are within a Zoom meeting select the up arrow ^ next to the video icon and then select Video Settings...
- Stop ALL incoming video
If you need to preserve bandwidth for shared content, or want to avoid mental fatigue from viewing multiple, active video participants, you can easily stop all incoming videos. This will only affect your view of the meeting, while others are unaffected and unaware.
- Start or join a meeting.
- Click View
 in the top-right corner, and then click Stop Incoming Video.
 - To resume videos, click View
 again and select Start Incoming Video.
- Close other, unnecessary applications on your computer.
Zoom meetings can demand significant memory and processing power from your computer. Closing other applications, ones you do not need during the session, will help Zoom run better.
- Avoid other activities that will take up bandwidth.
Don't start other bandwidth-intensive activities just before, or during, a Zoom meeting. On your Zoom device and on other computers and devices that share your internet connection avoid:
- large downloads
- large uploads
- streaming video (e.g. Netflix, Hulu, YouTube)
- cloud backups
- cloud file syncronizations
- other high-bandwidth activities
3. Access and View a Course Recording within a D2L Course
Learn how to access and view a recording of a previous course Zoom meeting that has been recorded to the cloud.
- Once within one of your D2L courses click on the UA Tools menu in the navbar and choose Zoom. (Note: If you are within an Eller course you likely won't have the UA Tools menu icon in your D2L course. You will need to locate the Zoom link that your instructor has placed in a D2L content module)
- Click on the tab that says Cloud Recordings.

- Click on the title of the meeting of which you want to view a recording.

- Click on the thumbnail image of the recording. You may see more than one option to choose from. Often times an audio-only file will get recorded.

- When the recording displays, click the Play button.

4. Zoom Toolbar
Learn all the features of the various tools in the Zoom meeting toolbar.
Below you will learn about the different options you have within the Zoom toolbar that a participant would see when you are in a Zoom meeting.
At some point as a student you might create your own study group meetings and you would then be the host of the meeting. You can find more information about the host control toolbar within a meeting at https://support.zoom.us/hc/en-us/articles/201362603-Host-Controls-in-a-Meeting.
- Mute/Unmute: This button will Mute and Unmute your microphone. Also if you click the up arrow next to the mic icon you will have options to choose which microphone you want to use and which speakers you want to use. You will also have the option to leave the computer audio if you no longer want to use your computer audio for the meeting. You would then click the Join Audio button that appears and choose to rejoin via computer audio or you could change to join by phone call. You can also pull up Audio Options from here if you want to test your microphone or speakers.
- Start/Stop Video: This will start and stop your video camera feed if you have a video camera connected to your computer or through your smartphone or tablet. If you click the up arrow next to the video icon you can choose which camera you want to have selected (if you have multiple cameras connected) as well as choose other video settings.
- Participants: Clicking will open and close the participant window that shows you the list of participants who have joined the meeting. You have lots of other options within the participant list that will be covered in the Participant List section.
- Chat: Clicking will open and close the chat window where you can chat with all participants or to specific people. See the Chat Tool section for more information.
- Share Screen: This is where you can share your computer screen (if host has enabled) to the participants in the meeting. You will have the option to share your entire desktop screen, a whiteboard, an iPhone/iPad that you may have connected, or a specific window, document, or application that you may have open on your desktop. See the Sharing Your Screen section for more information.
- Record: Clicking this button will allow you to choose to record (if the host allows) the meeting locally to your computer. See the Recording section for more information.
- Live Transcript: This allows you to request that the host enable Live Transcription for the meeting. You can choose to make the request using your name or anonymously.
- Reactions: This area allows you to provide nonverbal feedback as well as emoji reactions to the host or presenter. These reactions will appear in the participant list for all to see as well as in your video panel.
- Apps: Allows you to open and run approved 3rd-party Zoom apps within a meeting.
- Leave: Clicking this will prompt a message asking if you want to leave the meeting. Click Leave Meeting to exit the meeting.
5. Participant List
Learn about what options you can control and change within the participant list.
As a participant here are the options within the participant list
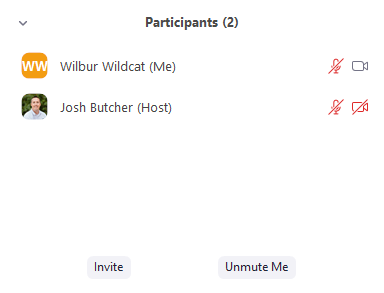
Mute Me: This button will mute your microphone.
Unmute Me: This button will unmute your microphone.
To the right of your name in the list you will see a microphone icon and a video icon. These icons allow you to turn on/off your microphone or video camera.
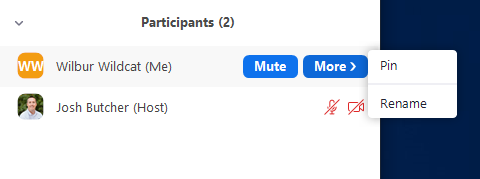
If you hover over your name you will see options to Mute/Unmute your microphone as well as a More button button. Selecting the More button gives you options to Pin your video panel as well as Rename. The Rename option allows you to change your name in the meeting.
6. Sharing Your Screen
Learn how to share your screen or document within a Zoom meeting.
For detailed information visit Zoom's Support Page on "How Do I Share My Screen".
Here you'll be shown the basics of sharing your desktop screen, a document, or a specific window or application that you have open on your computer. As a participant you will be able to share your screen as long as the host has enabled that feature for the meeting.
- To share your screen, click the Share Screen button located in your meeting toolbar.
- Select one of these screen share options:
- Basic: Share your entire desktop, specific applications windows, whiteboard, or iPhone/iPad screen.
Note: Users can select multiple desktop programs at once instead of sharing their entire desktop, but all selected programs must be on the same screen to be visible. Hold the Shift key on macOS or the Ctrl key on Windows to select more than one application. - Advanced:
- Slides/PowerPoint as Virtual Background: Allows you to utilize a slideshow presentation as your virtual background, providing a more immersive presentation.
- Portion of Screen: Share a portion of your screen represented by a green border. The border can be adjusted as needed during the share by clicking and dragging any side or corner.
- Computer Audio: Only share your computer's audio (your selected speaker in your audio settings). Select the down arrow to the right of Computer Audio option to view audio options and switch between Mono and Stereo (high fidelity) audio options.
- Video: Share locally stored video content through Zoom's native video player.
- Content from 2nd Camera: Share a secondary camera connected to your computer; for example, a document camera or the integrated camera on your laptop.
- Basic: Share your entire desktop, specific applications windows, whiteboard, or iPhone/iPad screen.
- (Optional) Enable these features, located at the bottom-left corner of the share window:
- Share sound: If you check this option, any sound played by your computer will be shared in the meeting. Select the down arrow just to the right of the Share Sound option to switch between Mono and Stereo (high fidelity) audio options.
- Optimize for video clip: Check this if you will be sharing a video clip in full screen mode. Do not check this otherwise, as it may cause shared screen to be blurry.
- Click Share.
When the sharing process is started and 80% of devices acknowledge receiving the shared screen, you will see a notification banner stating Participants can now see your shared screen, or whatever you have chosen to share.
Notes:
- Zoom will automatically switch to full screen to optimize the shared screen view. To exit full screen, click Exit Full Screen in the top-right corner or press the Esc key.
- To disable automatic full screen when viewing a shared screen, adjust the Window size when screen sharing behavior in your desktop client settings.
- If you selected Content from 2nd Camera, click Switch Camera in the top-left corner to switch the shared camera.
Controls when screen sharing
When you start sharing your screen, the meeting controls will move into a menu that you can drag around your screen.
Note: Some of the options detailed below may not be visible due to account admin restrictions or the feature is only visible to the meeting host or co-host.

- Mute/Unmute: Mute or unmute your microphone.
- Start/Stop Video: Start or stop your in-meeting video.
- Security: Access in-meeting security options (only available to hosts/co-hosts)
- Participants: View or manage the participants (if you're the host).
- Click the down arrow
 to access Invite, where you can invite others to join the meeting.
- Click the down arrow
- Polling: (Only available to hosts/co-hosts) Allows you to create, edit, and launch your polls. The options to create or launch polls will open up the Zoom web portal in your default browser. When the poll closes, you can view the results and can download the full poll report. If a poll has already been created, both host and co-host can launch the poll, but only the host can edit or add polls to the meeting.
- New Share: Start a new screen share. You will be prompted to select which screen you want to share again.
- Pause Share: Pause your current shared screen.
- Annotate: Display annotation tools for drawing, adding text, and so on.
- More: Hover over More for additional options.
- Chat: Open the chat window.
- Record: Start recording locally or to the cloud.
- Meeting Info: Shows the current meeting's ID, host, passcode, invite link, your participant ID, and encryption status.
- Closed Caption / Live Transcript (only available to the host): If you have enabled closed captioning and live transcription for your account, click here to access those options.
- Breakout Rooms: Start breakout rooms.
- Enable annotation for others: Allow or prevent the participants from annotating on your shared screen.
- Show/Hide Names of Annotators: Show or hide the participants' name when they are annotating on a screen share. If set to show, the participant's name will briefly display beside their annotation.
- Hide / Show video panel
- Hide / Show Floating Meeting Control
- Share Sound
- Optimize for video clip
Note: Do not enable this setting if you are not sharing a full screen video clip, as it will blur your screen share. This should be enabled/disabled before and after the video you wish to play. - End Meeting: Leave the meeting or end the meeting for all participants.
To annotate over a screen share session click on the Annotate button in the screen share toolbar. You will then see the Annotate toolbar appear.
![]()
The different tools on the annotation toolbar are:
- Mouse
- Select
- Text
- Draw
- Spotlight/Arrow: Turn your cursor into a spotlight or arrow.
- Eraser
- Format: Change the formatting options of the annotation tools.
- Undo
- Redo
- Clear
- Save: This allows you to save all annotations on the screen as a screenshot. The screenshot is saved to the local recording location.
To stop a share screen session click the Stop Share button in the screen share toolbar.

7. Chat Tool
Learn how to use the chat tool within a Zoom meeting.
For detailed information visit Zoom's Support Page on "In-Meeting Chat".
The chat tool allows you to send chat messages to other users within a meeting. Depending on the host's chat settings, you can send a private message to an individual user or you can send a message to the entire group.
Chat with everyone
- While in a meeting, click Chat
 in the meeting controls.
 - In the To: drop-down menu, select Everyone.
- Enter your message in the chat window.
- Press Enter to send your message.
Send a private message
If the host has enabled private chat, participants can communicate with each other privately in the meeting. Hosts can't see private chats between participants.
- While in a meeting, click Chat
 in the meeting controls.
 - In the To: drop-down menu, select the participant you want to chat with directly.
- Enter your message in the chat window.
- Press Enter to send your private message.
Your message will appear in the chat window indicated by a (Direct Message) notification above the message.
Chat while screen sharing
While screen sharing in a meeting, click Chat in the meeting controls toolbar. A floating chat window will appear, which is not visible to other meeting participants.
If you receive new chat messages while screen sharing, a red icon will appear next to Chat ![]() indicating the amount of unread messages. Click Chat
indicating the amount of unread messages. Click Chat ![]() to open the chat window.
to open the chat window.
Use emojis in meeting chat
- When entering your message in the chat window, click
 Emoji to open the emoji panel.
 - Search for a specific emoji or scroll through the list.
Note: You can also easily add emojis to the message by typing : and at least two characters to find matching emojis to be included. For example, :jo will provide the :joy:, :joy_cat:, and :joystick: emojis. This requires version 5.8.0 for macOS and Windows.
Send a file in a message
If file transfer is enabled by the host, you can send files in chat.
When entering your message in the chat window, click ![]() File to choose the file source and send the file.
File to choose the file source and send the file.
Delete a chat message
- In the chat window, find the message that you typed in.
- Hover your mouse cursor over your message and click the ... and choose Delete.

8. Recording
Learn how to record a Zoom meeting.
For detailed information visit Zoom's Support Page on "Local Recording".
As a participant if you want to record your meeting you will have the option to record the meeting locally onto your computer ONLY if the host of the meeting has enabled you the option to record.
Record To Your Computer (Local Recording)
Local recording allows users to record meeting video and audio locally to their computer. The recorded files can then be uploaded to file storage websites like Box or Google Drive, and/or streaming servers such as YouTube or Panopto.
Start a Local Recording as a Participant
- As long as the host of the meeting has switched the setting to allow you to record, you will see a Record button in the meeting toolbar. Click the Record button.

- You will see the following recording indicator in the top left corner when the recording has started.

Other participants will see the following recording indicator in the top left corner when the recording has been initiated by you.
If the above icons are not visible in the meeting, the meeting is not being recorded.
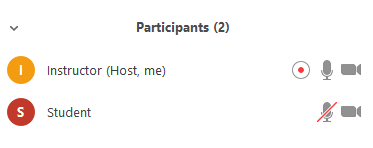
- In the participants window it will also display a recording indicator next to the user who is actively recording.
- In the meeting toolbar you will notice the record button has switched to a Pause/Stop Recording button. You can click the Pause or the Stop button separately to perform those actions. If you click Pause it will switch to a Resume button. Clicking Resume will then resume the recording of the meeting.


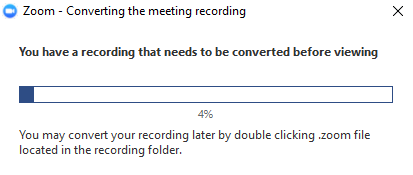
- Once the meeting has ended, a prompt will appear stating, "You have a recording that needs to be converted before viewing." Wait for the recording to convert before it can be accessed. If the meeting unexpectedly shuts down or the conversion process is interrupted, the recording files could become corrupted and non-recoverable.
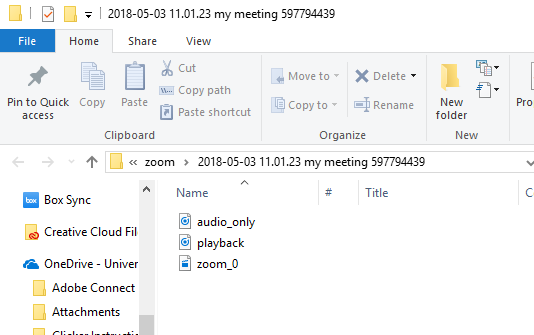
- Once the conversion process is complete, the folder containing the recording files will automatically open.
Recording File Formats
- MP4: Audio/Video format the Zoom recording uses. This is named "zoom_0.mp4" by default. Each subsequent recording is then in sequential order: zoom_0, zoom_1, etc.
- M4A: Audio format the audio-only file uses. This is named "audio_only.m4a" by default. Each subsequent recording is in sequential order: audio_only_0, audio_only1, etc.
- M3U: Playlist file to play/load all individual MP4 files (Windows only).
- Chat: Standard text or .txt file. This is named "chat.txt" by default.
The default location for locally stored Zoom recordings is:
- PC: C:\Users\User Name\Documents\Zoom
- MAC: /Users/User Name/Documents/Zoom
9. Participating in Breakout Rooms
Learn how to participate in breakout rooms during a Zoom meeting.
Breakout rooms are sessions that are split off from the main Zoom meeting. They allow the participants to meet in smaller groups, and are completely isolated in terms of audio and video from the main session. Breakout rooms can be used for collaboration and discussion of the meeting.
How to join a breakout room
- The host will need to invite you to join the breakout room.
- Click Join.
- If you choose Later, you can join by clicking Breakout Rooms
 in your meeting controls.
 - Click Join Breakout Room.
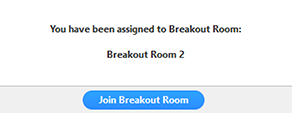
You will have access to full controls similar to the meeting.
How to self-select a breakout room
If the host has allowed participants to self-select and join breakout rooms of their choosing, participants will be able to view and select from a list of breakout rooms the host has created. They will be able to enter and leave breakout rooms freely.
Note: Participants not joined with the desktop or mobile app (version 5.3.0 or higher) will not be able to self-select a breakout room. The host will need to facilitate moving these participants manually.
- Click Breakout Rooms
 in your meeting controls.
This will display the list of open breakout rooms created by the host. - (Optional) Click Expand All to expand all available rooms and see which participants are in that particular room.
Note: The Expand All and Collapse All options require version 5.9.6 or higher. - Hover your pointer over the number to the right of breakout room you wish to join, click Join, then confirm by clicking Join.
- Repeat as necessary to join other breakout rooms, or click Leave Room to return to the main session.
How to ask for help
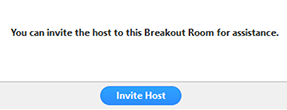
If you click Ask for Help, it will notify the meeting host that you need assistance and they will be asked to join your breakout room.
- Click Ask for Help
 in the meeting controls.
 - Confirm that you would like assistance by clicking Invite Host.
How to record while in a breakout room
- Ask the host for permission to record. The host needs to allow recording before opening the breakout rooms. If the host has already open the breakouts rooms, they can join your breakout room to allow you to record.
- Click Record in the meeting controls to start a local recording.
- Click the pause or stop icon in the meeting controls to pause or stop the recording.

The recording can also be stopped or paused by clicking the indicator in the top left corner.
Learn more about local recording.
How to leave the breakout room
You can leave the breakout room and return to the main meeting session at any time, or you can leave the meeting entirely from the breakout room.
- Click Leave Breakout Room.
- Choose if you want to leave the breakout room or the entire meeting.
- When the host ends the breakout rooms, you will be notified and given the option to return to the main room immediately, or in 60 seconds.
10. D2L: Zoom for Student Projects and Team Meetings
Learn how to create Zoom meetings for student projects and team meetings within D2L.
This D2L integration feature is not currently available at this time. We hope to have it available at some point in the future. For now students will need to create their own meetings outside of D2L by using the Zoom Web Portal. For instructions on that see the steps at the Access Zoom Web Portal page.


