This page will explain how you can use the Zoom web portal to create and share meetings as well as how to view meeting recordings within the Zoom web portal.
For student Zoom support please contact the 24/7 IT Help Desk at (520) 626-TECH.
1. Access Zoom Web Portal
Learn how to access Zoom to create meetings for use outside of D2L.
- Go to https://arizona.zoom.us.
- Click the Sign In button.
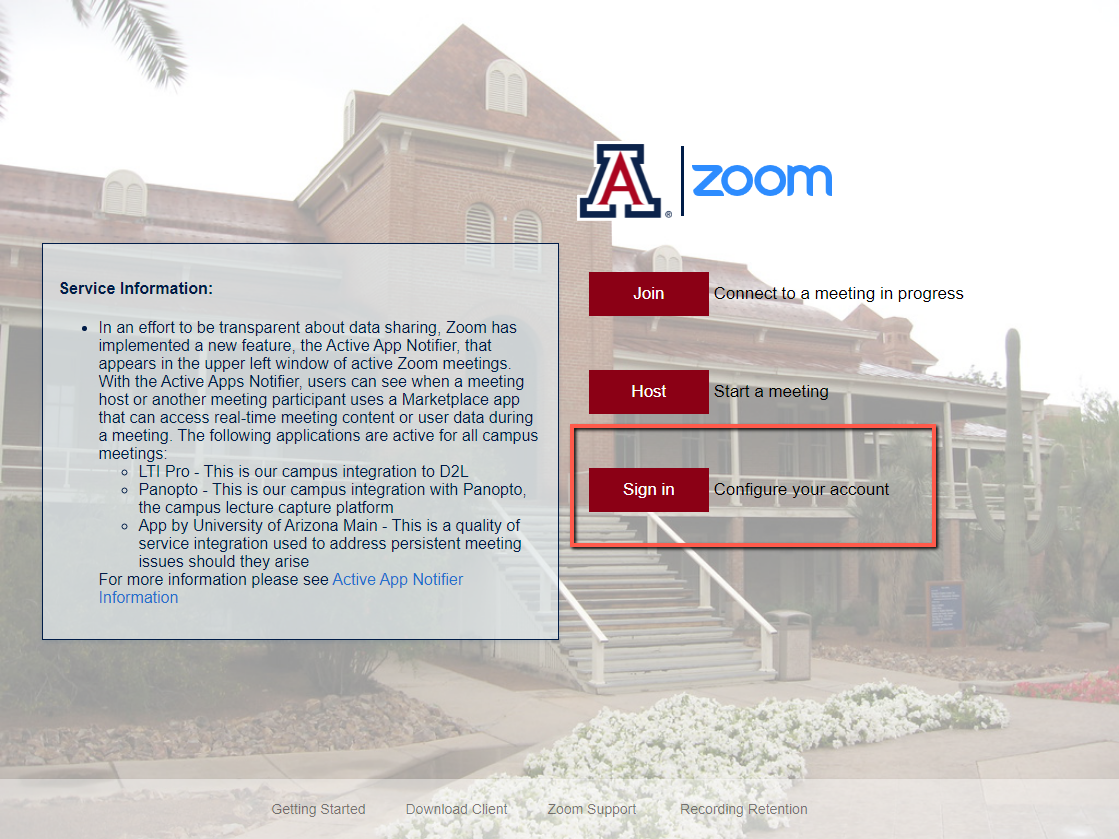
- Log in with your UA NetID and password.
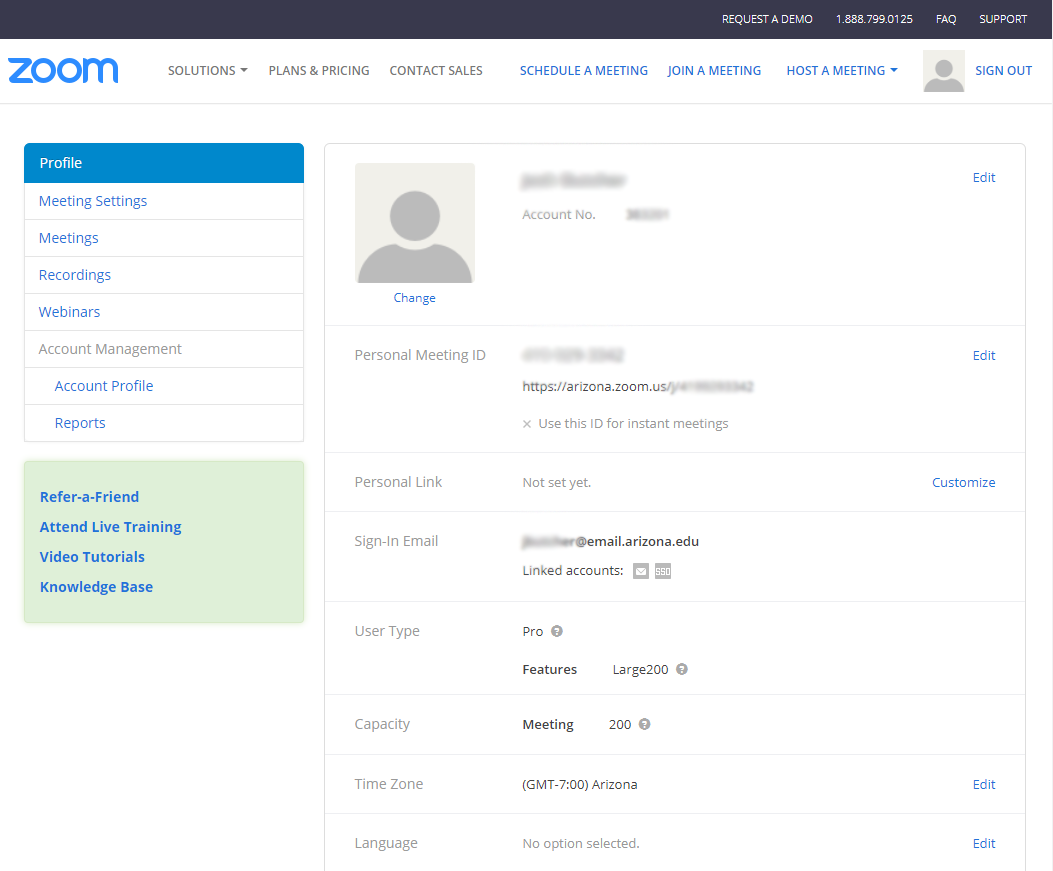
- You will then be taken to the Zoom Web Portal and to your profile page.
2. Create a Meeting in Zoom Web Portal
Learn how to create a meeting within the Zoom Web Portal.
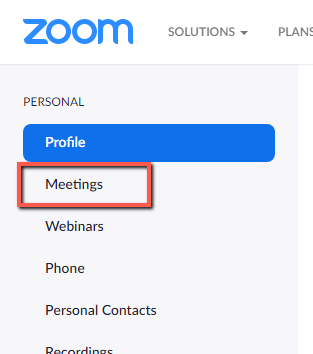
- Click on the Meetings button in the left-hand navigation.
- Click on Schedule a Meeting button.

- Select the meeting options. Note that some of these options might not be available if they were disabled and locked to the off position at the account or group level.
- Topic: Enter a topic or name for your meeting.
- Description: Enter in an optional meeting description.
- When: Select a date and time for your meeting. You can manually enter any time and press enter to select it. For example, you can enter 15 in the minutes field.
- Duration: Choose the approximate duration of the meeting. This is only for scheduling purposes. The meeting will not end after this length of time.
- Time Zone: By default, Zoom will use the time zone set in your profile. Click the drop-down menu to select a different time zone.
- Recurring meeting: Check if you would like a recurring meeting (the meeting ID will remain the same for each session). This will open up additional recurrence options.
- Recurrence: Select how often you need the meeting to recur: Daily, Weekly, Monthly, or No Fixed Time. Meetings can recur up to 50 times, so if you need more than 50 recurrences, use the No Fixed Time option.
- The other recurrence options will depend on how often the meeting recurs. You can configure the meeting to end after a set amount of occurrences or have the recurring meeting end on a specific date.
- Registration: Check this option if your meeting will require registration. Instead of a join link for your participants, you will be provided a registration link. If registration is required and the meeting is reoccurring, choose one of these options:
- Attendees register once and can attend any of the occurrences: Registrants can attend all of the occurrences. All dates and times of the meeting will be listed and the registrant will be registered for all occurrences.
- Attendees need to register for each occurrence to attend: Registrants need to register separately for each occurrence to attend. They can only choose one date and time on the registrant page.
- Attendees register once and can choose one or more occurrences to attend: Registrants register once and can choose one or more occurrences to attend. They will need to select which dates and times they would like to attend and they will only be registered for those occurrences. They can choose multiple options.
- Meeting ID
- Generate Automatically: Generate a random unique meeting ID.
- Personal Meeting ID*: Use your Personal Meeting ID.
- Use a template: Apply a meeting template.
- Security
- Passcode: Enter a meeting passcode. Joining participants will be required to input this before joining your scheduled meeting.
Note: The meeting passcode must meet complexity requirements set by your admin. - Waiting Room: Enable Waiting Room for the meeting.
- Require authentication to join: Restrict access to the meeting so that only signed-in users can join.
Note: If you select Sign in to Zoom with specified domain, you can't add any domains that are included on the domain block list.
- Passcode: Enter a meeting passcode. Joining participants will be required to input this before joining your scheduled meeting.
- Video
- Host: Choose if you would like the host's video on or off when joining the meeting. Even if you choose off, the host will have the option to start their video.
- Participants: Choose if you would like the participants' videos on or off when joining the meeting. Even if you choose off, the participants will have the option to start their video.
- Audio*: Allow users to call in using Telephone only, Computer Audio only, Both, or 3rd Party Audio (if enabled for your account).
- Dial in From: If Telephone or Both is enabled for this meeting, click Edit to select the dial-in countries to include in the invitation. By default, this includes your Global Dial-In Countries listed in your meeting settings.
- Meeting options
- Allow participants to join before start time: Allow participants to join the meeting without you or before you join. The meeting will end after 40-minutes for Basic (free) users if 3 or more people join the meeting. If enabled, you can also choose how far in advance of the scheduled start time you wish them to be able to join: 5 minutes, 10 minutes, 15 minutes, or Anytime.
- Mute participants on entry: If join before host is not enabled, mute participants as they join the meeting. Participants can unmute themselves after joining the meeting.
Note: To mute all participants currently in a meeting, see the options to manage participants. - Breakout Room pre-assign*: Pre-assign participants to breakout rooms.
- Automatically record meeting: Select if you want to record On the local computer or In the cloud.
- Approve or block entry to users from specific regions/countries: Allow users from specific regions to join your meetings; or block users from specific regions from joining your meetings. Users' region/country is determined by their IP address.
Note: You change the default regions/countries in your web portal settings. - Alternative hosts: Enter the email address of another UA Licensed Zoom user on your account to allow them to start the meeting in your absence. Non-UA users cannot be added as alternative hosts. If enabled, you can also select the check box to Allow alternative hosts to add or edit polls. This feature requires Zoom client version 5.8.0 or higher.
- Interpretation (only supported in Windows and macOS clients)*: Enable language interpretation for the meeting.
- Click the Save button when you are done creating your meeting.

3. Share a Meeting in Zoom Web Portal
Learn how to share a meeting link with other individuals who you want to attend your meeting.
Once you have created a meeting you will then need to send all of your participants a link to the meeting so that they can join the meeting.
- Click on the Meetings button in the left-hand navigation.
- This will show your list of upcoming meetings that you have scheduled. Click on the name or topic of one of your meetings.
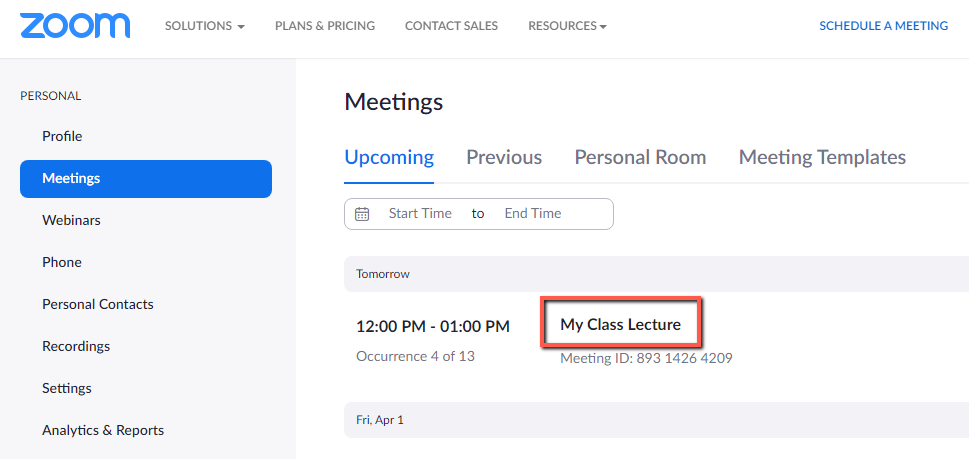
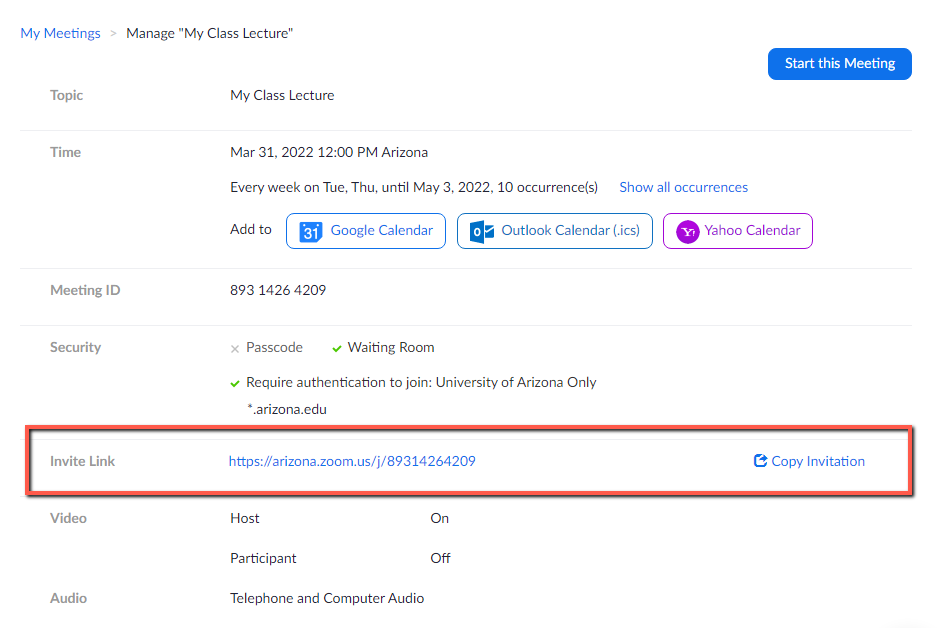
- Under Invite Link section you can copy and paste the URL of the meeting and send that to individuals who will be joining via their computer or smartphone/tablet. The Copy the invitation link will allow you to copy the full invitation to the meeting and send it to individuals. This will include options for joining via PC, Mac, Linux, iOS, or Android, options for joining via telephone or via an H.323/SIP room system.
4. View a Meeting Recording in Zoom Web Portal
Learn how to view a meeting cloud recording within the Zoom Web Portal and share the recording link with others.
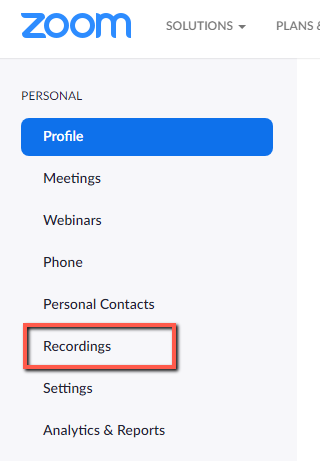
- Click on the Recordings button in the left-hand navigation.
- You will then see listed any cloud recordings from meetings that you have recorded.
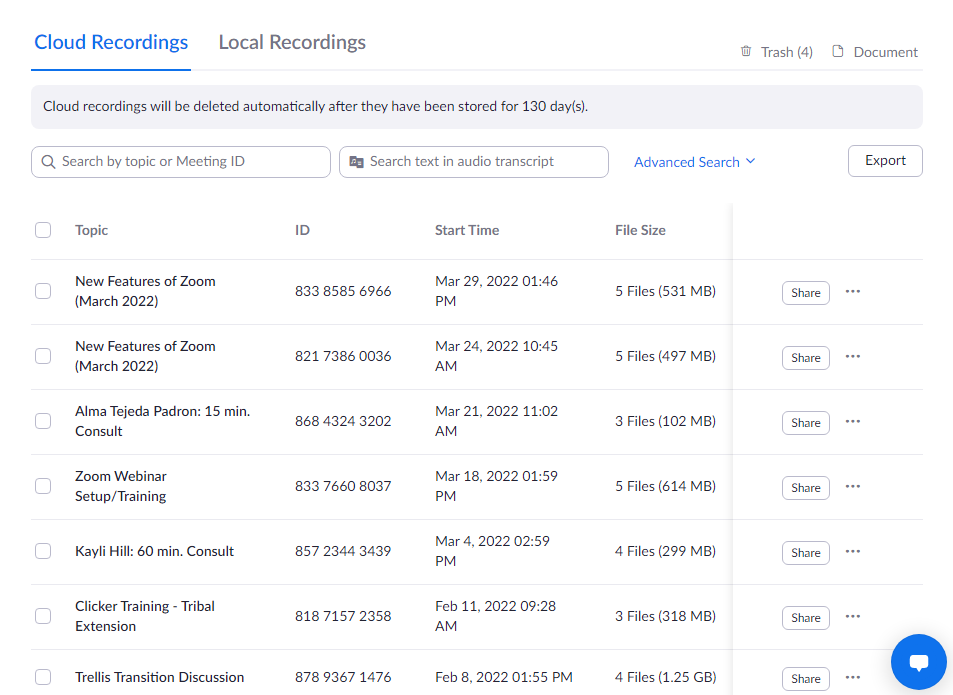
- To view a recording click on the name or title of one of your meeting recordings.
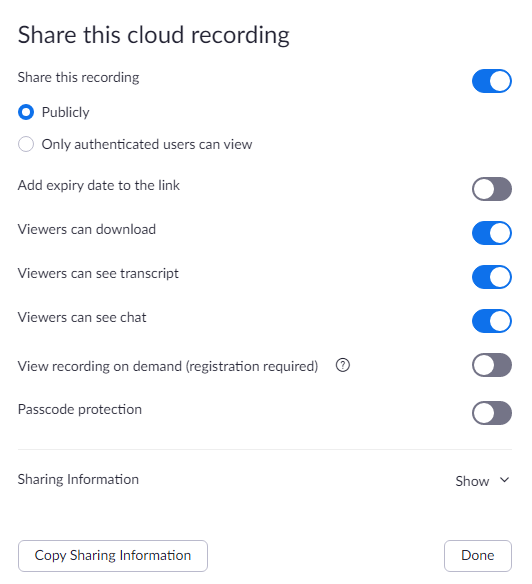
- To share the recording with others click on the Share button listed for that meeting. This will bring up a window to choose different share settings. Settings to choose from are:
- Share recording Publicly or Internally
- Add expiry date to the link
- Viewers can download
- Viewers can see transcript
- Viewers can see chat
- On-demand viewing, enabling this options requires invitees to register before watching the recording online.
- Password protect your recording
- Then you can copy the recording link information and send it to those that you want to view your recording.
- Or you can click the ... button listed for the meeting and choose to Download All of the recording files for that particular meeting or you can Delete the recordings of that meeting.
5. Zoom Toolbar
Learn about all the tools that are within the Zoom meeting toolbar.
Zoom Toolbar
Below you will learn about the different options you have within the host controls toolbar when you are in a Zoom meeting. You can also find more information about the host controls within a meeting at https://support.zoom.us/hc/en-us/articles/201362603-What-Are-the-Host-Controls-.

- Microphone: This button will Mute and Unmute your microphone. Also if you click the up arrow next to the mic icon you will have options to choose which microphone you want to use and which speakers you want to use. You will also have the option to leave the computer audio if you no longer want to use your computer audio for the meeting. You would then click Join Audio button that appears in the toolbar and choose to rejoin via Computer Audio or you could change to join by Phone Call. You can also pull up audio options from here if you want to test your microphone or speakers.
- Video: This will start and stop your video camera feed if you have a video camera connected to your computer or through your smartphone or tablet. If you click the up arrow next to the video icon you can choose which camera you want to have selected (if you have multiple cameras connected) as well as choose other video settings.
- Invite: Allows you to invite people into your meeting while the meeting is occurring. You can invite by email or you can invite a room system (H.323/SIP). You can also copy the URL of the meeting or copy the invitation of the meeting to send to someone.
- Manage Participants: Clicking will open and close the participant window that shows you the list of participants who have joined your meeting. You have lots of other options within the participant list that will be covered in the Manage Participant List section.
- Polls: Clicking this allows you to create, edit, and launch your polls. The options to create or launch polls will open up the Zoom web portal in your default browser. See the Polling section for more information.
- Share Screen: This is where you can share your computer screen to the participants in your meeting. You will have the option to share your entire desktop screen, a whiteboard, an iPhone/iPad that you may have connected, or a specific window, document or application that you may have open on your desktop. If you click on the up arrow next to the Share Screen icon you can choose to set it to only "One participant can share at a time" or "Multiple participants can share simultaneously". You can also go into advanced sharing options where you can choose who can share (only host or all participants) and who can start sharing when someone else is sharing (only host or all participants). See the Sharing Your Screen section for more information.
- Chat: Clicking will open and close the chat window where you can chat with all participants or to specific people. See the Chat Tool section for more information.
- Record: Clicking this button will allow you to choose to record the meeting locally to your computer or to the cloud. See the Recording section for more information.
- Breakout Rooms: Clicking this button will allow you to create breakout rooms to send your participants to for discussion and collaboration in smaller groups. See the Breakout Rooms section for more information.
- End Meeting: Clicking this will prompt options to end the meeting. You'll get an option to "End Meeting for All" or "Leave Meeting" where only you will leave the meeting.
Note: If you are the host, you will need to assign someone else as host before you click Leave Meeting.
6. Manage Participant List
Learn how to manage the participant list in a Zoom meeting.
Manage Participant List
As the host of the meeting, you have lots of options regarding managing your participants.
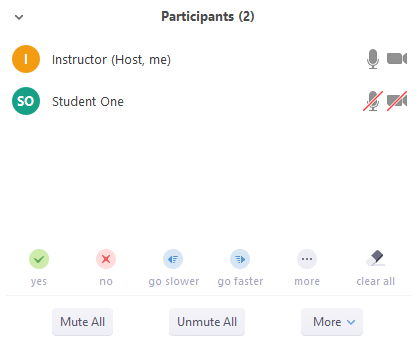
- Mute All: This button will mute all of the participants in the participant list.
- Unmute All: This button will unmute all of the participants in the participant list.
- More: This button will give you more options such as
- Mute participants upon entry
- Allow participants to unmute themselves
- Play enter/exit chime
- Lock Meeting: Lock meeting will prevent anyone new from joining the meeting.
To the right of each participant's name you will see a microphone icon and a video icon. These icons will allow you to turn on/off individual participants microphones or video cameras.
If you hover over an individual participant you will see options to Mute/Unmute their microphone as well as a More button.
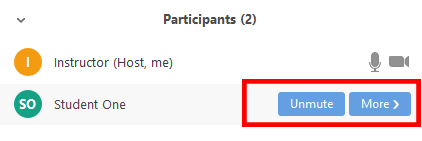
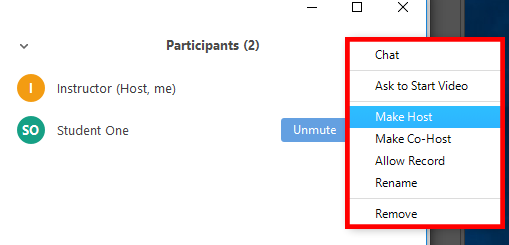
If you click on the More button you will have options to:
- Chat: Starts a private chat with that participant.
- Ask to Start (or Stop) Video: You can ask the participant to start or stop their video camera feed.
- Make Host: Makes the participant the host of the meeting.
- Make Co-Host: Makes the participant a co-host of the meeting.
- Allow Record: Allows the participant the ability to record the meeting locally.
- Rename: Allows you to rename the participant's name.
- Remove: Removes the participant from the meeting.
As a participant or host you have the ability to give nonverbal feedback to the host of the meeting and to each other. Everyone in the participant list will be able to see the nonverbal feedback that you select. At the bottom of the participant list you will see the different nonverbal feedback icons that you can choose from which are:
- Raise Hand (Participant Only)
- Yes
- No
- Go Slower
- Go Faster
- Agree
- Disagree
- Clap
- Need a Break
- Away
- Clear All (Host Only)
![]()
7. Sharing Your Screen
Learn how to share your screen and documents in a Zoom meeting.
Sharing Your Screen
For detailed information visit Zoom's Support Page on "How Do I Share My Screen".
Here you will be shown the basics of sharing your desktop screen, a document, or a specific window or application that you have open on your computer.
- To share your screen, click the Share Screen button located in your meeting toolbar.
- Select the screen you want to share. This is where you can choose from several options. You can choose to share the entire Desktop screen, a whiteboard, an iPhone/iPad screen, or an individual application, window, or document that is already open on your computer. So to share a PDF, Word document, PowerPoint document, etc., you would open that document on your computer and then choose to share your screen and select that document to share.
- Optional additional settings you can choose are to "Share computer sound" and "Optimize for full screen video clip". Sharing the computer sound will share any sound played by your computer. The optimize for full screen video clip should be selected when you want to share a video clip in full screen mode.
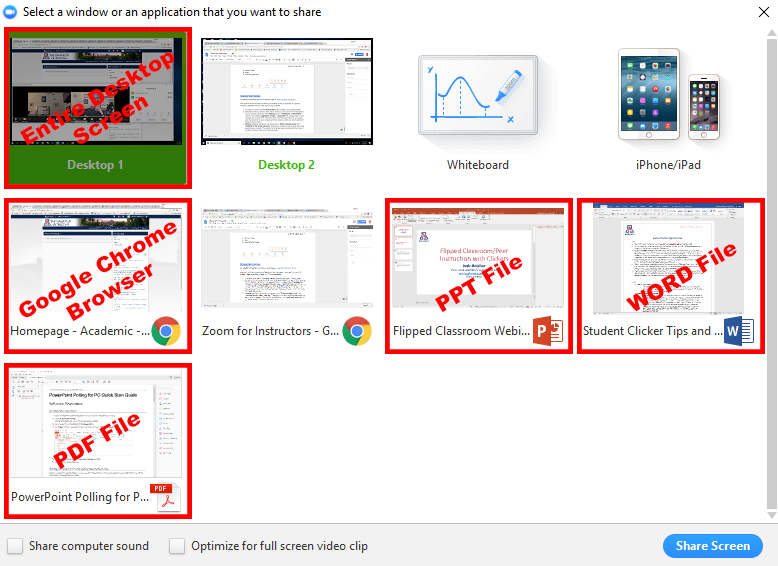
Once you have chosen what you want to share, the meeting controls will move into a window that you can drag around your screen. You can see in the example below I chose to share a Word document that was open.
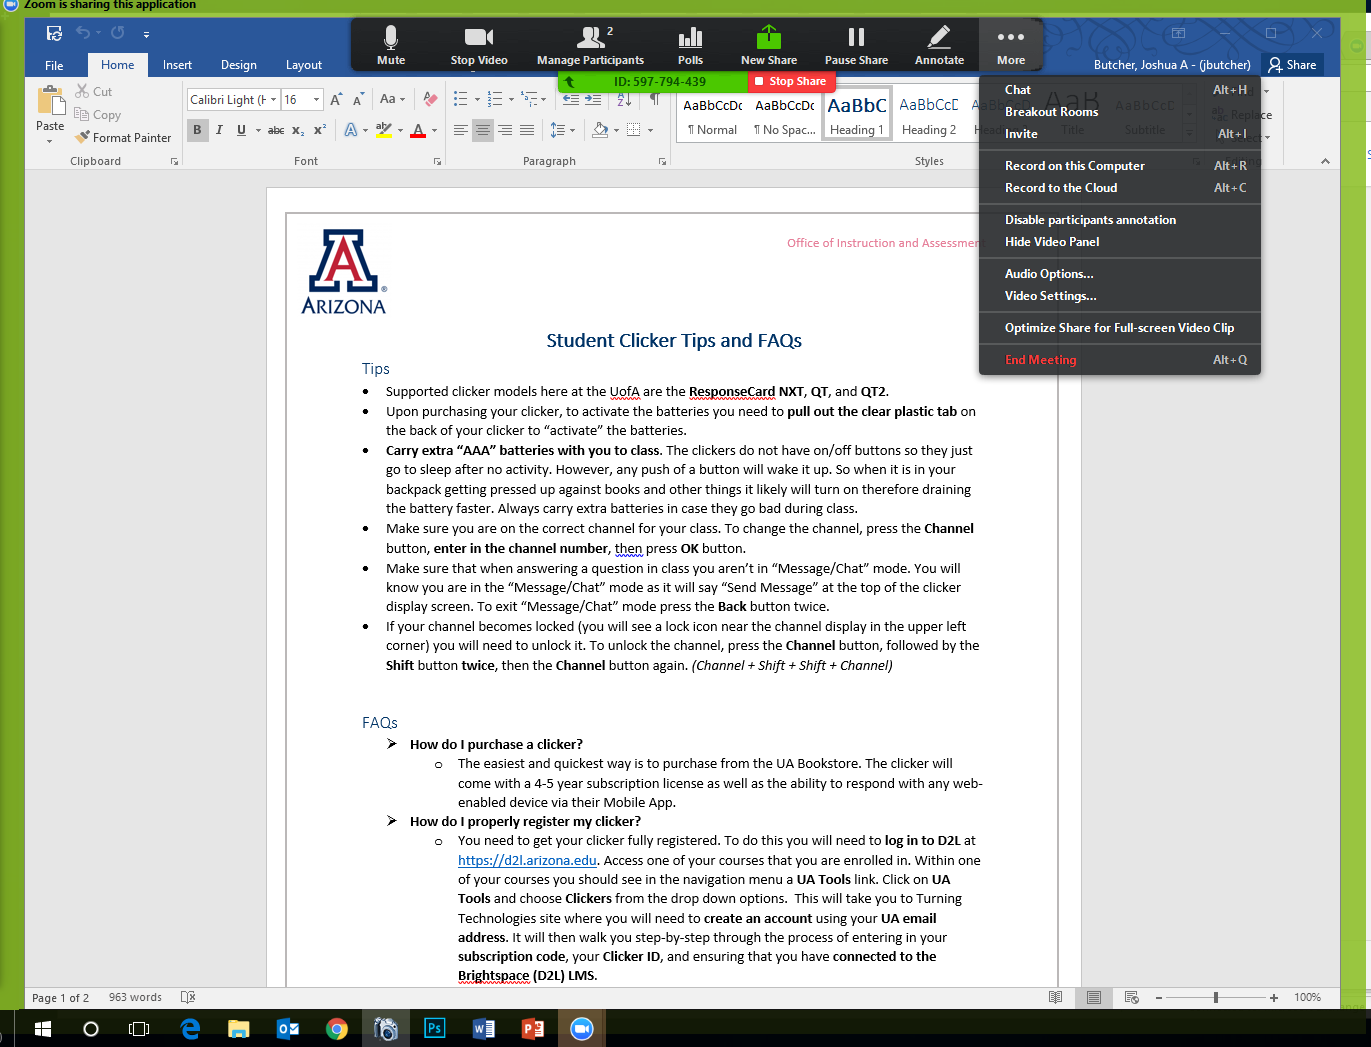
The meeting controls toolbar has the following options during a screen share session:
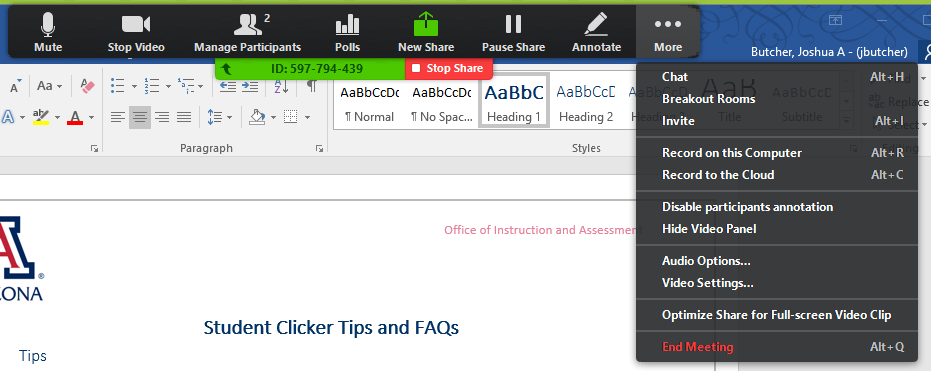
- Mute/Unmute: Mute or unmute your microphone.
- Start/Stop Video: Start or stop your in-meeting video camera feed.
- Manage Participants: View or manage the participants (if you are the host).
- Polls: Create, edit or launch your polls.
- New Share: Start a new screen share. You will be prompted to select which screen/application you want to share again.
- Pause Share: Pause your current screen share.
- Annotate: Use screen share tools for drawing, adding text, etc.
- More: Hover over this button for additional options such as:
- Chat
- Breakout Rooms
- Invite
- Record on this computer
- Record to the cloud
- Disable participants annotation
- Hide Video Panel
- Audio Options...
- Video Settings...
- Optimize Share for Full-screen Video Clip
- End Meeting
To annotate over a screen share session, click on the Annotate button in the screen share toolbar.

You will then see the Annotate toolbar appear.
![]()
The different tools on the annotation toolbar are:
- Mouse
- Select
- Text
- Draw
- Spotlight/Arrow: Turn your cursor into a spotlight or arrow.
- Eraser
- Format: Change the format options of the annotation tools.
- Undo
- Redo
- Clear
- Save: This allows you to save all annotations on the screen as a screenshot. The screenshot is saved to the local recording location.
To stop a share screen session, click the Stop Share button in the screen share toolbar.

8. Chat Tool
Learn how to use the chat functions in a Zoom meeting.
Chat Tool
For detailed information visit Zoom's Support Page on "In-Meeting Chat".
The Chat tool allows you to send chat messages to other users within a meeting. You can send a private message to an individual user or you can send a message to the entire group. As the host, you can choose who the participants can chat with or to disable the chat entirely.
Access the Chat Tool
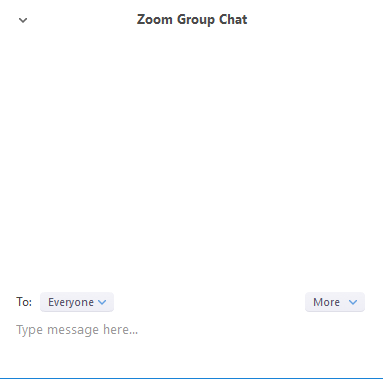
Click on the Chat button in the meeting toolbar.

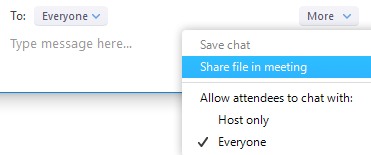
The chat window will then open on the right. You can type a message into the chat box at the bottom or click on the drop down next to To: if you want to send a message to a specific person. As a host the More drop down will give you options to save the chat, share a file in the meeting, and you can choose who attendees can chat with (host only or everyone).
Share a File in Chat
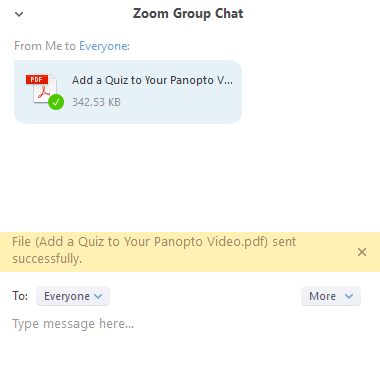
To share a file in the chat window, click on the More button and choose Share file in meeting.
You will then need to browse to the location of the file you want to share, select it and choose to open it. Your file will then upload to the chat and will give you a message that it sent successfully. The participants of the meeting will then see the option in their chat window to download the file locally to their computer.
Every time you receive a new chat message and the chat window is closed or not visible, the chat button in the toolbar will flash orange and remain orange until you view the chat.

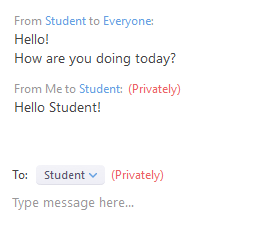
When you create a private chat message with just one person it will have the word "Privately" in red and parenthesis within the whole chat window and it will say who it is from and who it is to.
9. Polling
Learn how to create and run polls in a Zoom meeting.
Polling
For detailed information visit Zoom's Support Page on "Polling for Meetings".
The polling button in the meeting toolbar allows you to create multiple choice polling questions for your meetings. You will be able to launch the poll during your meeting and gather the responses from your attendees. You also have the ability to download a report of polling results after the meeting.
Note: Currently during the meeting you are not able to see how each individual responded to the poll. You can see it in the reports after the meeting is over. This request to see how individual responded during a meeting has been made and will be a feature in the near future.
When you are in the meeting, to create and add a poll, click on the Polls button in the meeting toolbar.

The poll window will appear. Click on Add a Question button.

This will launch the Zoom web portal in a browser where you can create your poll.
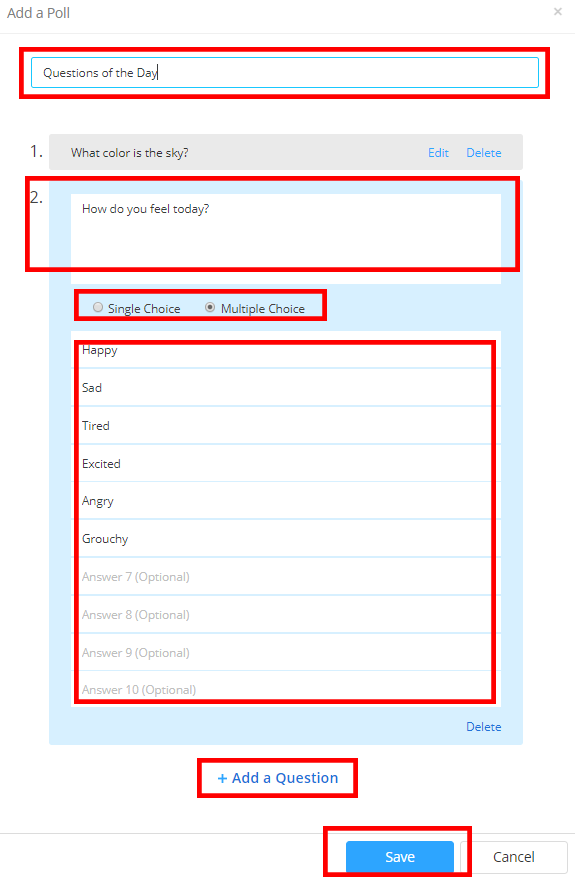
- Enter a title for the poll and type your first question. You can mark the question as a single choice or multiple choice question.
- Type in answers to your question.
- If you want to add another question, click the Add a Question link to create a new question for that poll.
- When you are done creating your questions click the Save button.
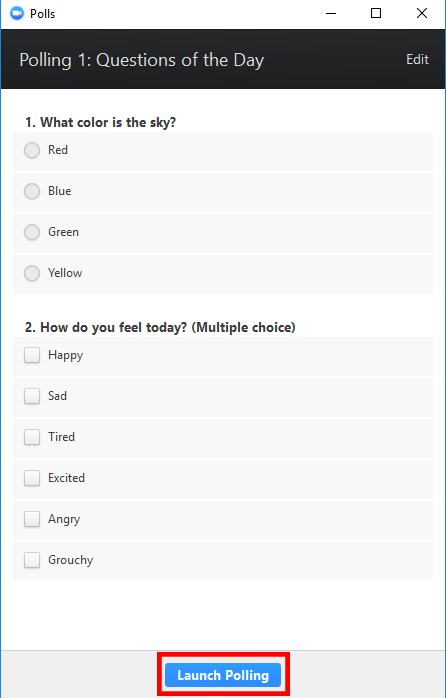
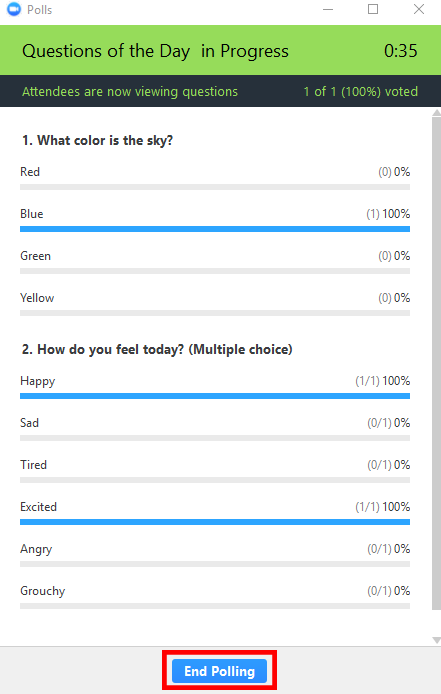
When you go back into the Zoom meeting you will see your poll you just created. To launch the poll to all of the meeting participants click the Launch Polling button. When the poll is launched the participants can then begin responding. When they submit their answers you will see the results of how the overall group responded to the poll questions. When you are ready to close the poll, click the End Polling button. Once the polling has ended, you as the host have the option to share the results with the rest of the participants. To share results, click the Share Results button. If you want to re-launch the poll because maybe not everyone was able to respond in the time allotted you can click the Re-launch Polling button.
10. Breakout Rooms
Learn how to create breakout rooms in a Zoom meeting.
Breakout Rooms
For detailed information visit Zoom's Support Page on "Managing Video Breakout Rooms".
Breakout rooms allow you to split your Zoom meeting in up to 50 separate sessions. The meeting host can choose to split the participants of the meeting into these smaller groups automatically or manually, and can switch between session at any time. Breakout room participants have full audio, video and screen share capabilities.
- To create breakout rooms, click on the Breakout Rooms button in the meeting toolbar.

- Select the number of rooms you would like to create, and how you would like to assign your participants to those rooms. Selecting Automatically will let Zoom split your participants up evenly into each of the rooms. Selecting Manually will allow you to choose which participants you would like in each room. When finished selecting those options, click Create Breakout Rooms.
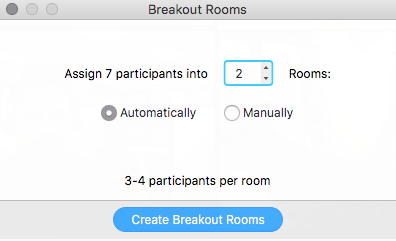
- If you choose for Zoom to automatically assign the participants to the room, that will occur instantaneously. If you choose to manually assign participants to the rooms you will now have to assign them to the rooms. To do so, select the Assign link next to the room you wish to assign participants to and select the checkbox next to each participant you wish to assign to that room.

- Once you are finished assigning participants to the rooms and are ready to begin the breakout rooms, click the Open All Rooms button.
11. Recording
Learn how to record your Zoom Meetings.
Recording
For detailed information visit Zoom's Support Page on "Cloud Recording" and "Local Recording".
If you want to record your meeting you will have the option to record the meeting locally onto your computer or record to the cloud.
Record to Your Computer (Local Recording)
Local recording allows users to record meeting video and audio locally to their computer. The recorded files can then be uploaded to file storage websites like Box or Google Drive, and/or streaming servers such as Panopto.
Start a Local Recording
- Click the Record button in the meeting toolbar.

- A menu prompt will appear, select Record on this Computer.
- Hosts will see the following recording indicator in the top left corner when the recording has started.

Participants will see the following recording indicator in the top left corner when the recording has been started by another user.
Note: If the above icons are not visible in the meeting, the meeting is not being recorded.
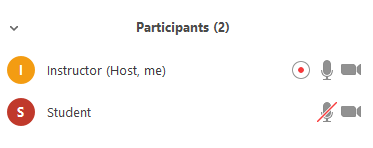
- In the participants window it will also display a recording indicator next to the user who is actively recording.
- In the meeting toolbar you will notice the record button has switched to a Pause/Stop Recording button. You can click the Pause or the Stop button separately to perform those actions. If you click Pause it will switch to a Resume button. Clicking Resume will then resume the recording of the meeting.


- Once the meeting has ended, a prompt will appear stating "You have a recording that needs to be converted before viewing." Wait for the recording to convert before it can be accessed.
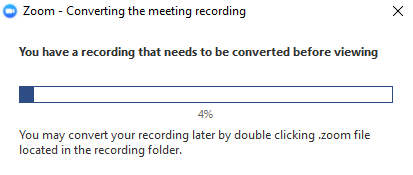
Note: If the meeting unexpectedly shuts down or the conversion process is interrupted, the recording files could become corrupted and non-recoverable.
- Once the conversion process is complete, the folder containing the recording files will automatically open.
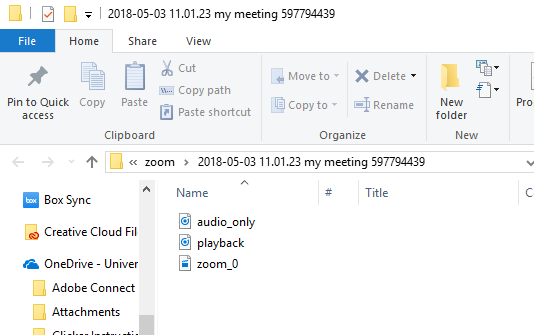
Recording File Formats
- MP4: Audio/Video format the Zoom recording uses. This is named "zoom_0.mp4" by default. Each subsequent recording is then in sequential order: zoom_0, zoom_1, etc.
- M4A: Audio format the audio-only file uses. This is name "audio_only.m4a" by default. Each subsequent recording is in sequential order: audio_only_0, audio_only_1, etc.
- M3U: Playlist file to play/load all individual MP4 files (Windows only).
- Chat: Standard text or .txt file. This is named "chat.txt" by default.
Cloud Recording
When you record a meeting and choose Record to Cloud, the video, audio, and chat text are recorded in the Zoom Cloud. The recording files can then be downloaded to a computer or streamed from a browser via HTML5 or Flash.
Start a Cloud Recording
- Click the Record button in the meeting toolbar.

- A menu prompt will appear, select Record to the Cloud.
- To stop the recording press Stop Recording or end the meeting.
Once the recording has been stopped, the recording must be processed before viewing. Zoom will send an email to the host email address when the processing is completed. In that email will be links to view the recording as well as share the recording with others.
Viewing Cloud Recordings
- Log in to the Zoom SSO web portal at https://arizona.zoom.us and sign-in with your UA NetID and password.
- Click on the Recordings button in the left-hand navigation.
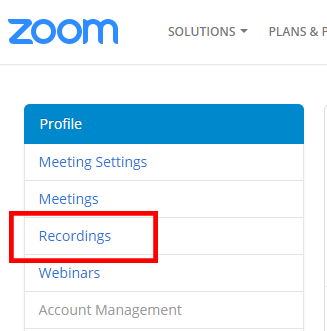
- You will then see listed any cloud recordings from meetings that you have recorded.
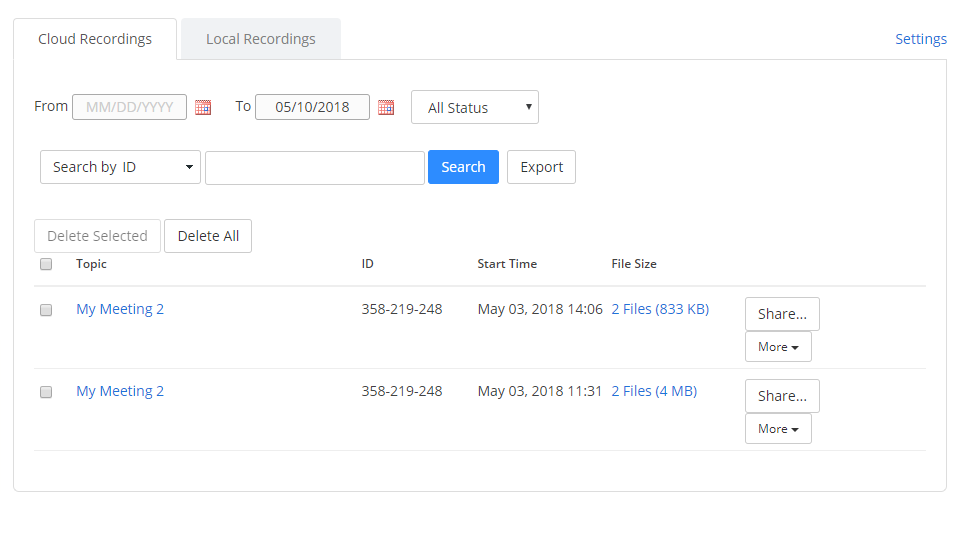
- To view a recording click on the name or title of one of your meeting recordings.
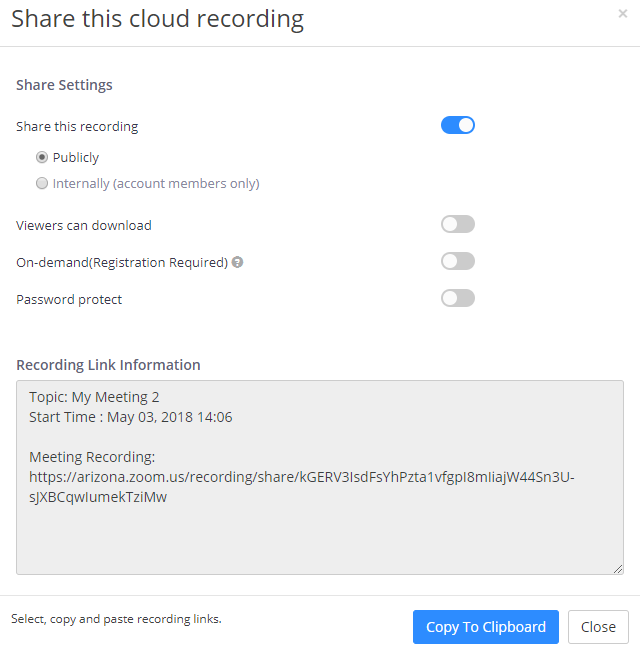
- To share the recording with others click on the Share button listed for that meeting. This will bring up a window to choose different share settings. Settings to choose from are:
- Share recording Publicly or Internally.
- Can viewers download your recording.
- On-demand viewing, enabling this options requires invitees to register before watching the recording online.
- Password protect your recording.
- Then you can copy the recording link information and send it to those that you want to view your recording.
- Or you can click the More button listed for the meeting and choose to Download All of the recording files for that particular meeting or you can Delete the recordings of that meeting.

