***Announcement***
-
Top Hat is now the official enterprise polling solution for use on campus. This means that it will no longer require out-of-pocket costs to students for participating in the campus supported polling solution in their course(s).
-
As you transition over to Top Hat, we are happy to provide customized trainings for both individuals as well as groups or departments. Please reach out to us at intech@arizona.edu if you desire a customized training session.
-
Campus support for PointSolutions will end after the Fall 2023 semester. If you decide to continue to use PointSolutions beyond the Fall 2023 semester you will need to reach out directly to the vendor for direct support.
-
For the first year (through August 2024) of our contract with Top Hat we have dedicated migration support from other polling systems. The migration process starts with a meeting between an instructor and Top Hat, to discuss how you currently use polling in your course and view some of your content. From there, Top Hat's team will re-build your content, while checking in with you to make sure you're satisfied with the end-result. To start the content migration process, please reach out to our Top Hat rep Sumi Voora at sumi.voora@tophatmonocle.com or schedule an appointment.
PointSolutions Web Polling
Create content, conduct polls and manage results entirely online with PointSolutions web while supporting interactive learning both inside and outside the classroom. Automatically save and manage results online. Poll on the web, through a PowerPoint integration, and schedule surveys and assessments.
If you are wanting to use the PointSolutions Web Polling to conduct your polling please follow the instructions in the different sections below.
1. Getting Started
Learn how to get started with using the clicker technology.
If you are new to PointSolutions and want to incorporate this technology into your course(s) the best thing to do first is to schedule a meeting with a member of the UCATT D2L Consulting and InTech team to get an introduction to the technology. Send and email to d2l@arizona.edu to schedule this meeting.
Here is a syllabus template Word document discussing clicker usage in UA Courses. You can download and edit it as you need.
Syllabus Template for Clicker Usage in UA Courses
User Manuals for PointSolutions (formerly TurningPoint)
Use these online user manuals as reference material to learn all of the in-depth options and tools within the PointSolutions web interface.
2. Connect: Connecting Your D2L Course
Learn how to connect your D2L course for use with PointSolutions Web Polling.
- Log in to D2L (d2l.arizona.edu) and access one of your courses.
- Once you are within one of your courses, click on UA Tools in the navbar and choose Clickers.
- You will be taken to your PointSolutions account and you will land on your Courses page.
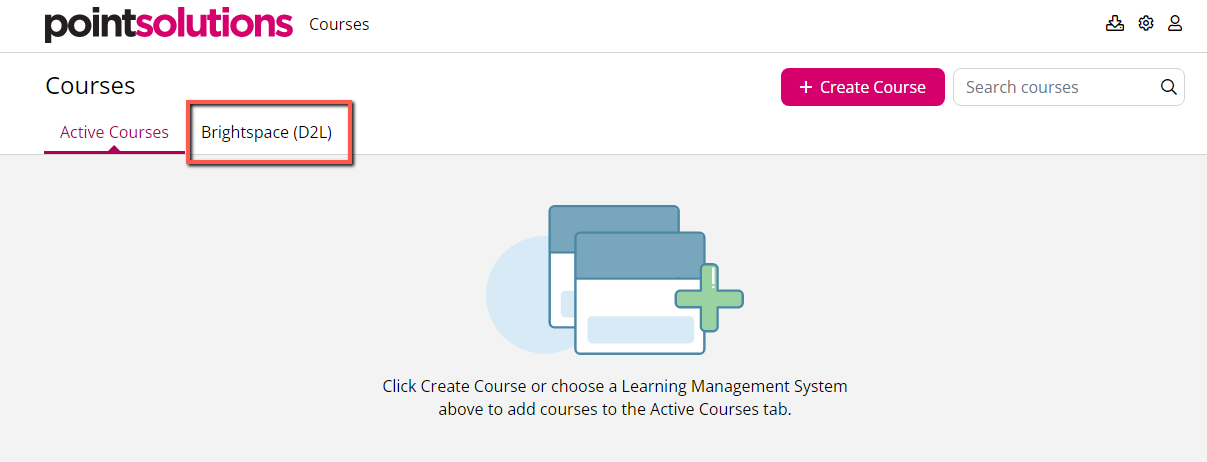
- You will see two tabs, the first tab will say "Active Courses" and next to that tab it will say "BrightSpace (D2L)". (IGNORE the red/pink button that says "Create Course").
Click on the BrightSpace (D2L) tab.
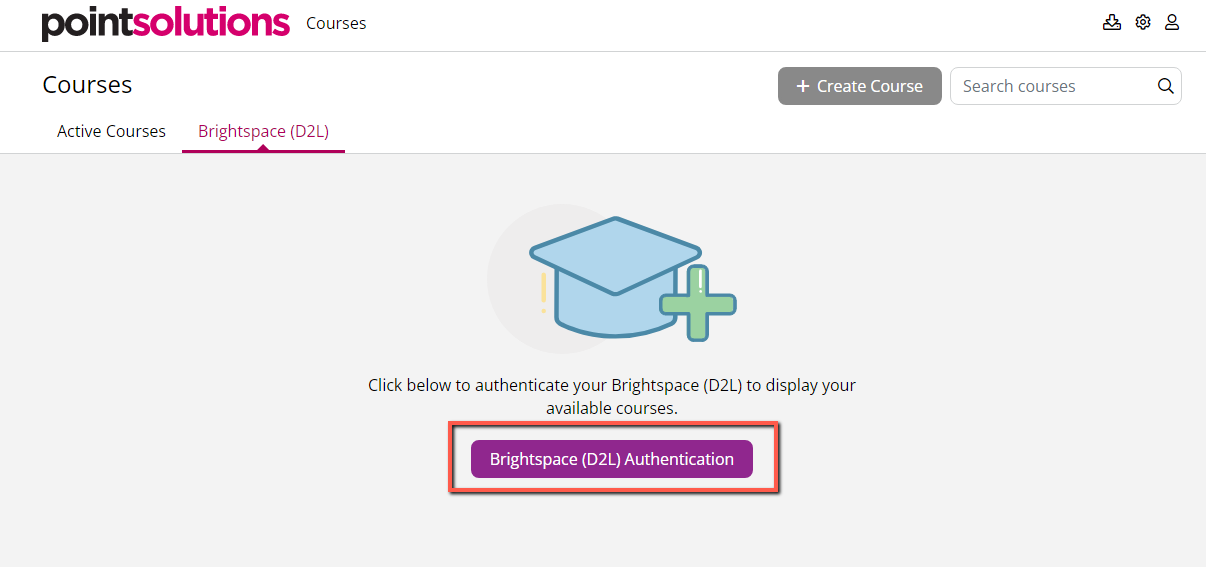
- If this is your first time accessing this tab, you should see a message that says "Click below to authenticate your BrightSpace to display your available courses". Click the BrightSpace Authentication button. It may then ask you to sign in to BrightSpace (D2L) if you aren't already.
Note: You will only see this BrightSpace Authentication button the first time you access this BrightSpace tab.
- It may take you to a screen that says "Application Turning Technologies Registration TP8 v8.0 by Learning Technology Center is trying to access your information. Would you like to proceed?" Click the Continue button to proceed.
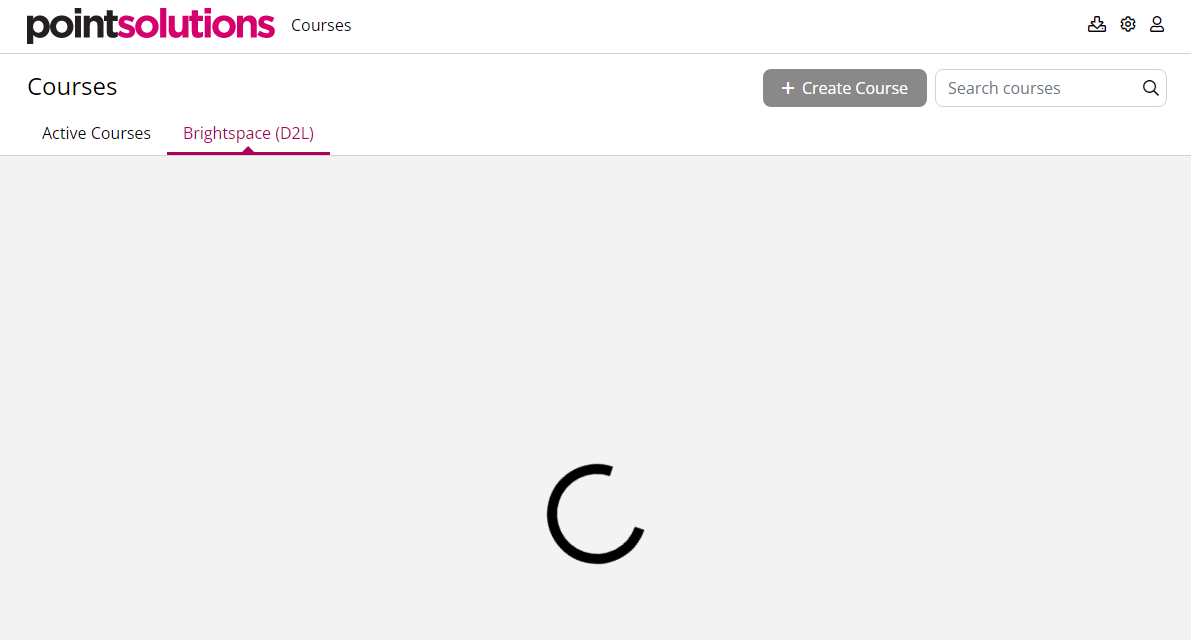
- Once signed in it will begin syncing your available courses from D2L.
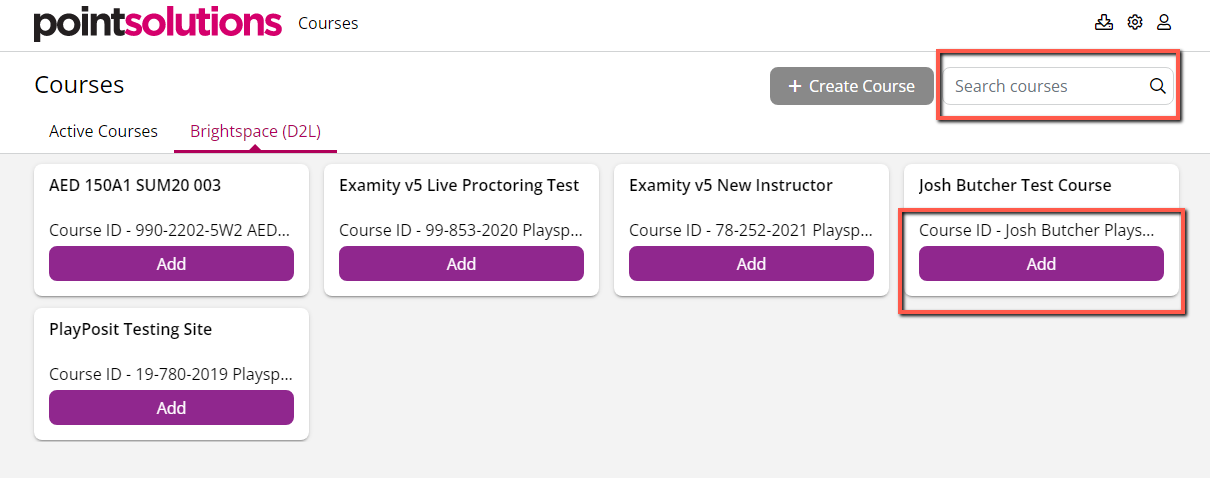
- It will find and list all courses that you are listed as Instructor in. Find the course you want to add and click the Add button. If you have a long list of courses you can use the Search courses box to type in the name of the course to search for it.
- After clicking Add, that course then moves over into the Active Courses tab.
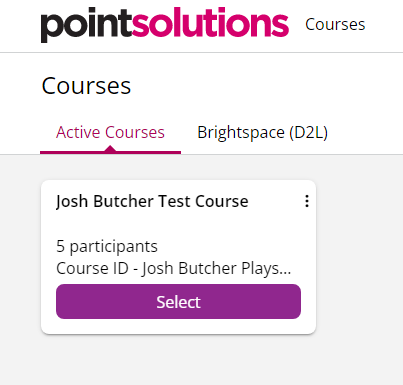
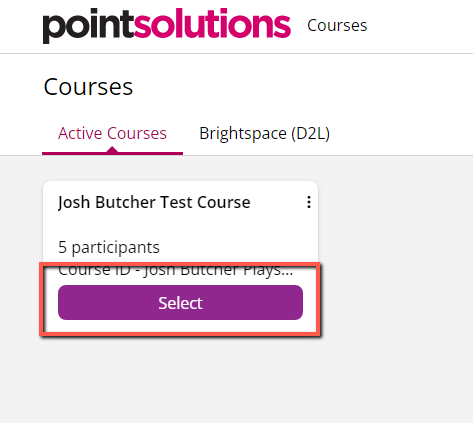
- Once a course is connected, click the Select button for the course in which you want to use web polling.
3. View: Viewing Your Course Roster
Learn how to view your course roster within the PointSolutions Web interface.
- Log in to D2L (d2l.arizona.edu) and access one of your courses. Once you are within one of your courses, click on UA Tools in the navbar and choose Clickers.You will be taken to your PointSolutions account and you will land on your Courses page.
- If you connected your courses successfully in section 3 above then you should see your connected courses in the list of "Current Courses".
- Find the course you want to view the roster from and click on the Select button from that course.
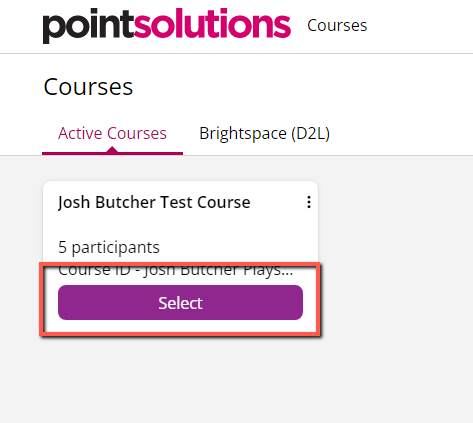
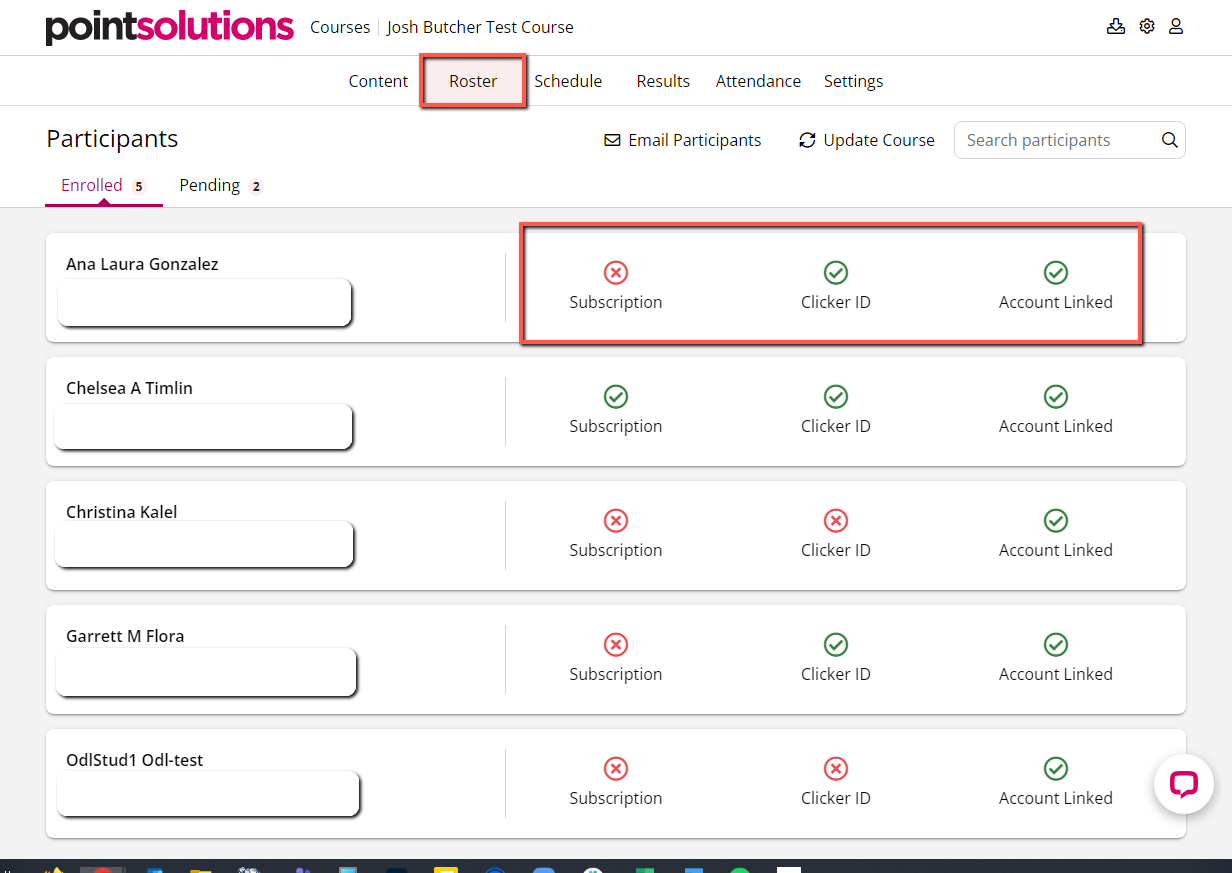
- You will then be taken to that course page. Click the Roster tab at the top.
Here you can see all the enrolled students in the course and if they have completed the 3 different tasks that are required to successfully register their clickers. For each student you will see to the right of their name Clicker ID, Subscription, and Account Linked and there will either be a "green checkmark" or an "X" signifying if they have completed that task yet. The web roster will not show the clicker ID's that are connected to each student. To find out what clicker ID a student has you will need to view that from within the PointSolutions desktop app.
-
Also on the roster page you'll see two tabs labeled Enrolled and Pending. The only difference between these two tabs is that those students that appear in the Pending tab are students that have not have not done anything in regards to their clicker registration. They'll have red circle "x's" in all three categories.
- If you want to email students that haven't completed ALL of the tasks to send them a reminder to get them completed you can click on the Email Participants link in the upper right.

- You'll have the options to check what reminder tasks you want to send. You can check Clicker ID, Subscription, and Create Account. The reminder emails will only be sent to those students who don't have a green checkmark in those categories. Click Send to send the email reminders.
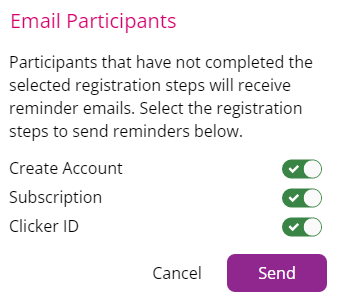
- Clicking on the Update Course link will sync the roster with D2L and get the latest roster updates.
Note: Your connected course rosters will automatically sync with D2L roster every night around midnight.

4. Create: Creating Content
Learn how to create content for use with PointSolutions Web Polling.
Within the Content area of your synced course(s) you'll be able to create, organize, start, schedule, and manage all of your content. All content you create will be available to you in every course's content tab. This allows you to choose any piece of content to poll in any course that you have connected/synced. You'll have the ability to create folders where you can neatly organize your content if you desire. Quick note to point out is that content created on the web cannot be polled via the desktop app and vice versa.
- Click on the Select button for the course in which you want to do web polling.
- Select Content from the top navigation.

- To begin creating your content click the Create Content button.

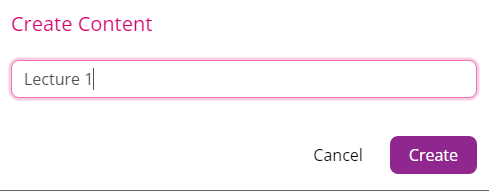
- Give your content file a name and click Create.
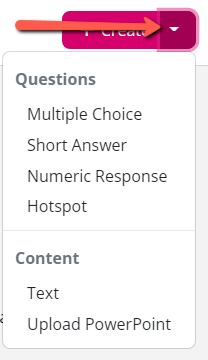
- Click the arrow on the Create button and choose which type of question or content you want to create. You have the option to choose question slides like Multiple Choice, Short Answer, Numeric Response, Hotspot, or a content slide to enter just regular informational Text that is not interactive or Upload PowerPoint slides as still image slides with no interactivity.
- Multiple Choice - A multiple choice question includes question input field and fields for two answers. Click Add or Shift on your keyboard for additional answer choices. You can have up to 10 answer choices. With this question you have the following options:
- Anonymous Responses: Toggle on to ask an anonymous polling question.
- Points: Enter a value for scoring.
- Allow for multiple responses: Toggle between requiring a single value or a range of numbers as a response.
- Allow for participant comment in scheduled sessions: Toggle on to allow in a scheduled polling session the participant the ability to type a comment to expand on their answer choice.
- Short Answer - A short answer question includes a question input field and an input field for answer choice. Answer choices for short answer must be separated by a comma, semicolon, colon, or hard return. With this question you have the following options:
- Anonymous: Toggle on to ask an anonymous polling question.
- Points: Enter a point value for scoring.
- Enforce Capitalization: Require answers include correct capitalization.
- Numeric Response - A numeric response question includes a question input field and an input field for the numeric response. With this question you have the following options:
- Anonymous: Toggle on to ask an anonymous polling question
- Points: Enter a point value for scoring
- Answer Type: Allow participants to change answer until polling is closed
- Hotspot - A hotspot question type includes a question input field and a place to input an image. Choose your image and add the hotspot. With this question you have the following options:
- Anonymous: Toggle on to ask an anonymous polling question
- Points: Enter a point value for scoring
- Text - Text content allows you to present non-question content within your presentation. Not only can you use text, but you can also upload images and videos.
- Upload PowerPoint - You can upload a PowerPoint presentation to have it's slides be converted as still images to display during live and scheduled sessions. File size is limited to 99MB.
- Multiple Choice - A multiple choice question includes question input field and fields for two answers. Click Add or Shift on your keyboard for additional answer choices. You can have up to 10 answer choices. With this question you have the following options:
- After creating your content you can organize it into folders if you desire. The following instructions will walk you through creating a folder.
- At the main Content page click on the Create Folder button.

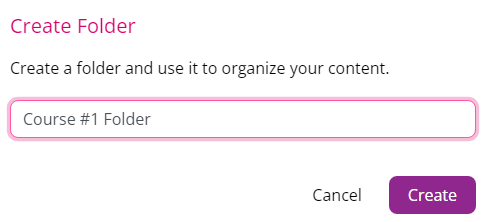
- Give the folder a name and click Create.
- You will then see your folder appear in the content area along with any content files you have created.
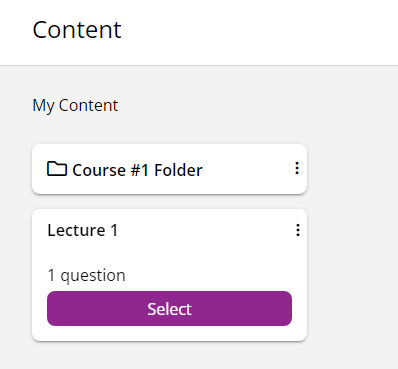
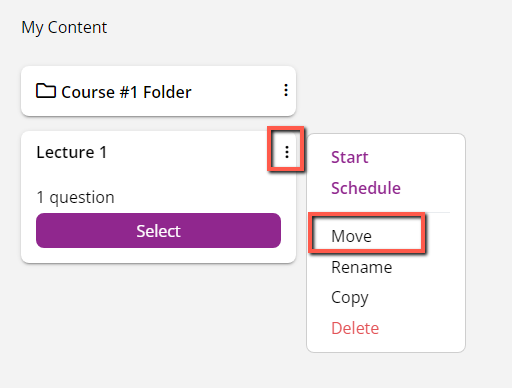
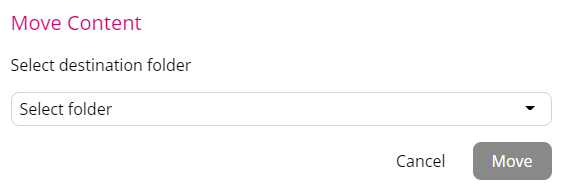
- If you want to move your existing content, you can drag and drop the content file into the folder OR click on the 3 vertical dots in the upper right of your content. Choose Move, and then choose the folder you want to move it into.
- At the main Content page click on the Create Folder button.
5. Run: Run a Live Web Polling Session
Learn how to run your live polling session with PointSolutions Web Polling.
To run a live polling session a content list must be created. See the above Section 4 on how to create your content.
- Locate the desired course and click Select. The course opens on the Content page.
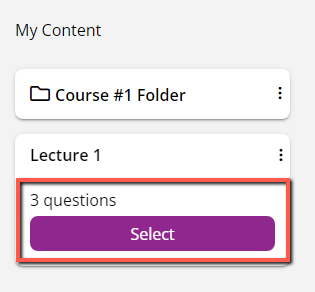
- From the content page locate the content question list you want to use and choose the Select button.
- Click Start button at the top of the screen.
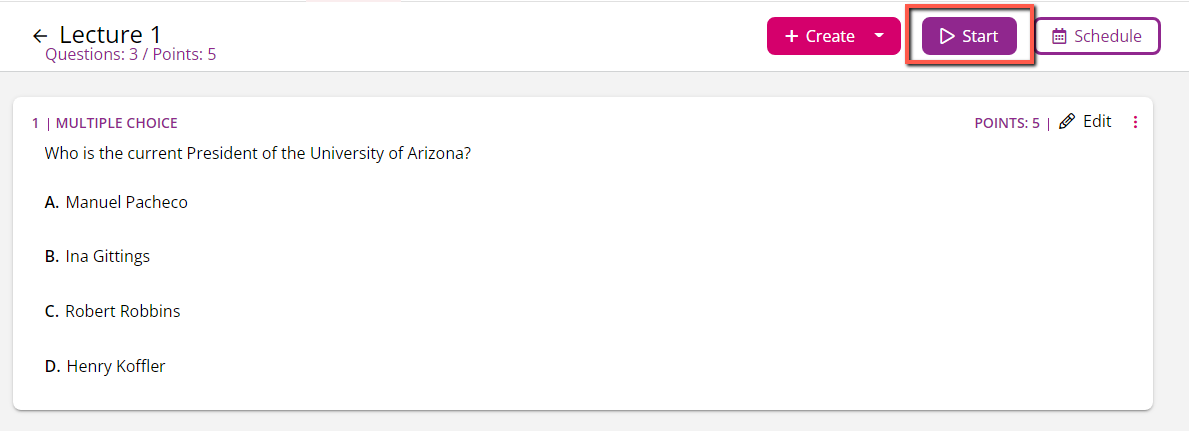
- In the Live Polling Options window choose your Session ID, how you want to Show Results, whether you want to Enforce Roster, or Require Participant Sign In.
Click the Start button.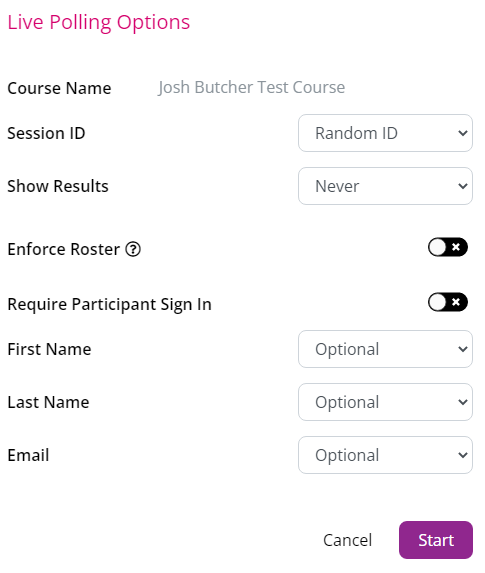
- The next screen shows you information about the session you are about to conduct. It will show you the Course and Session ID. The Session ID is what you will need to communicate to your students who are responding on their mobile devices or via the web browser. They'll need to enter this session ID to join your polling session. In the upper right corner you will be able to see how many users are connected to your session as well as how many responses you are getting once you open up a poll. In the upper left corner you can always End Session.
Click the Start Session button.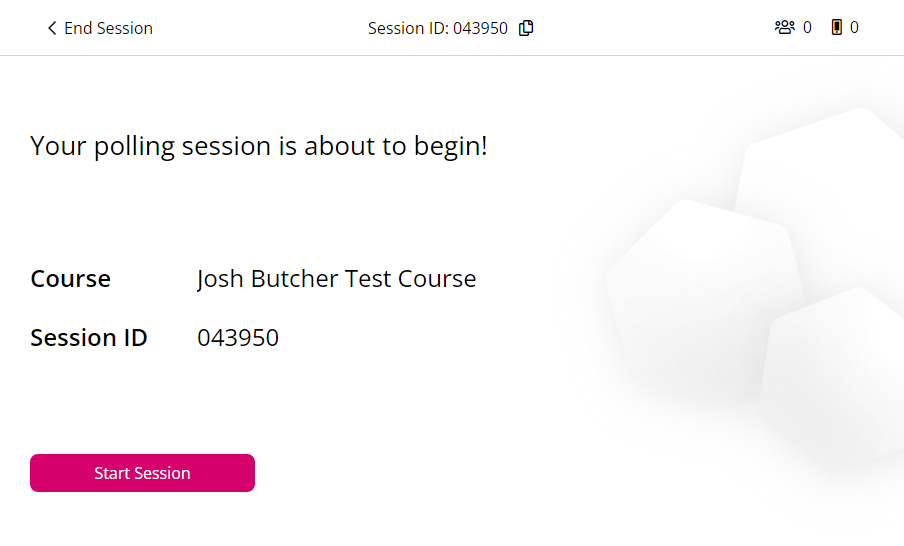
- Click the Play button to take open your poll question so your participants can respond.

- Click the Stop button to close the poll question.

- Click the Show Results button to choose how you would like to show the results of your poll. You will have options to show your results Never, Review Only, or Always.

-
Click the Forward/Next button to go to the next slide or question that you want to poll.

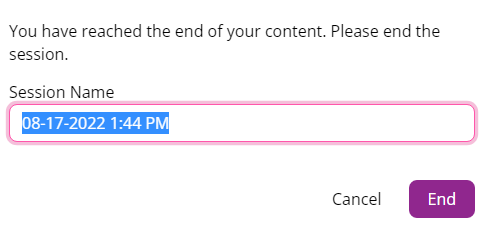
- Repeat steps 6-10 until your session is complete. You will receive a notification that you have reached the end of your content. Click End.
Close
6. Schedule: Schedule a Poll
Learn how to schedule a poll to occur outside of a live class session.
Scheduled Polling
Scheduled polling allows you to create a question list in PointSolutions web and schedule the survey or assessment for a later time.
- Locate the desired course and click Select. The course opens on the Content page.
- From the content page locate the question list you want to use and select Select.
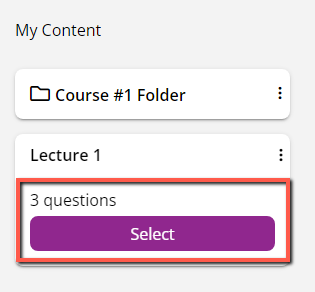
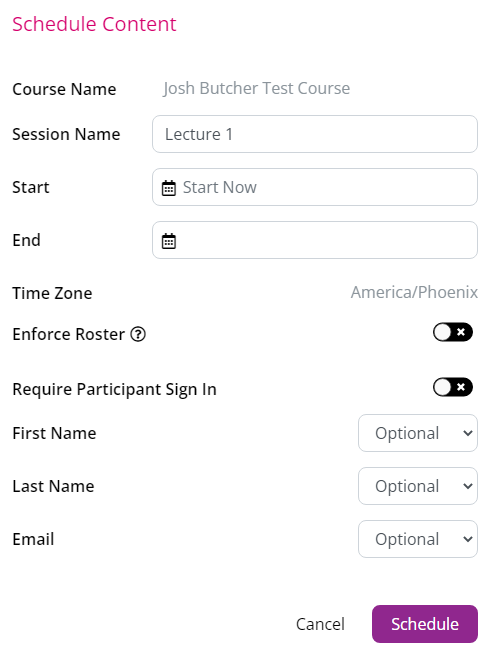
- Click the Schedule button at the top of the screen.

- Change Session Name if you desire.
- Select Start Date/Time and End Date/Time.
- Choose to Enforce Roster or Require Participant Sign In if desired.
- Choose settings for First Name, Last Name, and Email. Options are Hidden, Optional, or Required.
- Click Schedule. Content is scheduled.
- You should see a popup message that your content has been scheduled.

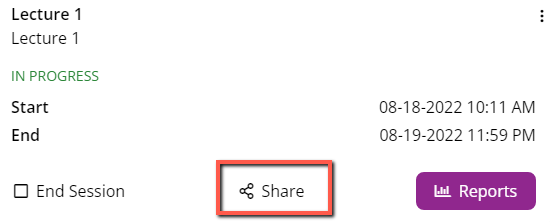
- To access that scheduled content to share it click on the Schedule tab.

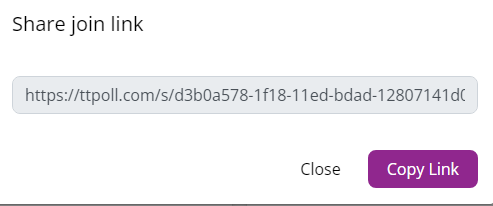
- Find the content box for the content that you scheduled. Click the Share button to copy link for participants. Additionally your student's will receive a notification on their devices that a scheduled session is available and they can access it from the notification on their device.
- You can then copy the share link and post in D2L content or email to your students.
7. Access: Accessing Results
Learn how to access the results of the polls you deliver via PointSolutions Web Polling.
- Access your PointSolutions account by going to D2L at https://d2l.arizona.edu and click on one of your D2L courses.
- In the navbar click on UA Tools and choose Clickers.
- You will be taken to your Instructor PointSolutions courses page.
- Click the Select button on your desired course.
- The course opens on the Content page.
- Click Results on the top navigation. The Results page will open and show your gradebook.
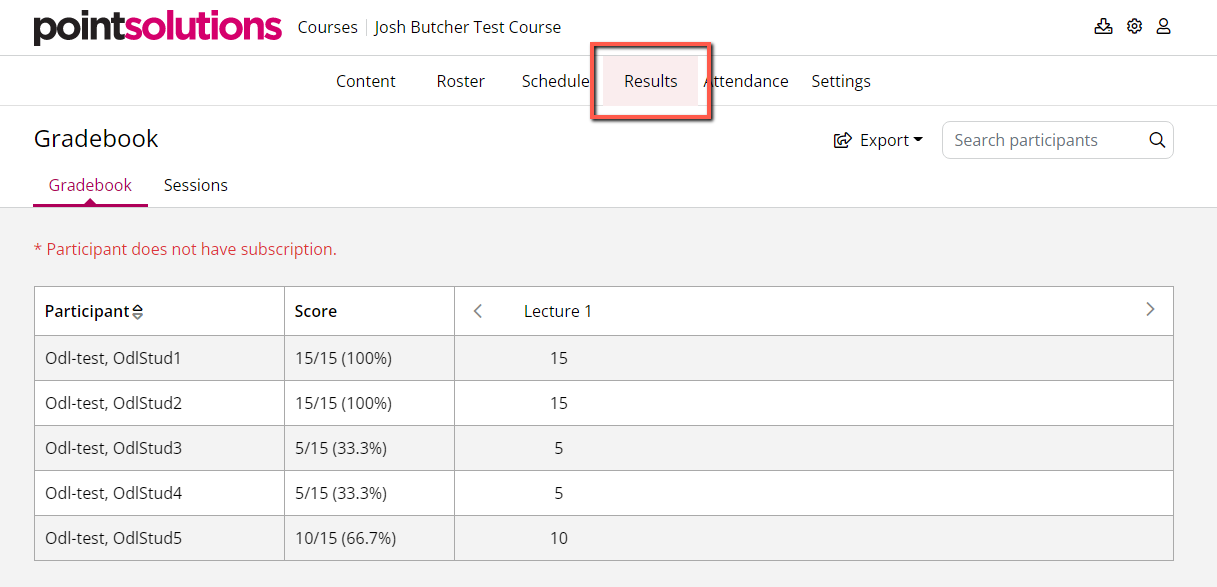
- You can edit the session name as well as the session scores for individual participants.
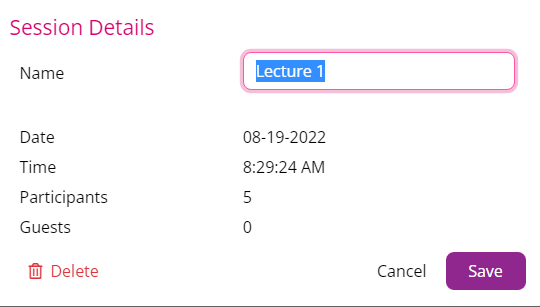
- To edit the session name hover over the session title and click on the
 . A Session Details box will appear where you can change the name of the session. Click Save. Optionally, you can delete the session by clicking Delete.
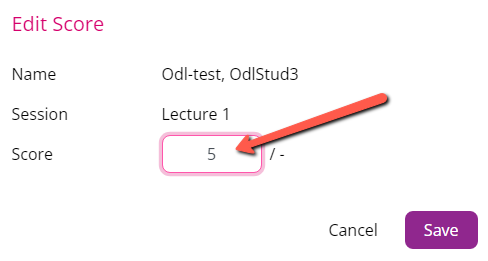
- To edit the score for an individual participant click on the individual's score within the session column. An Edit Score box will appear where you can edit the score. Click Save.
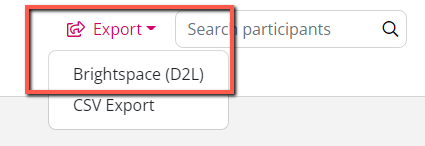
- To upload a session to your D2L gradebook, click the Export link and choose Brightspace (D2L).
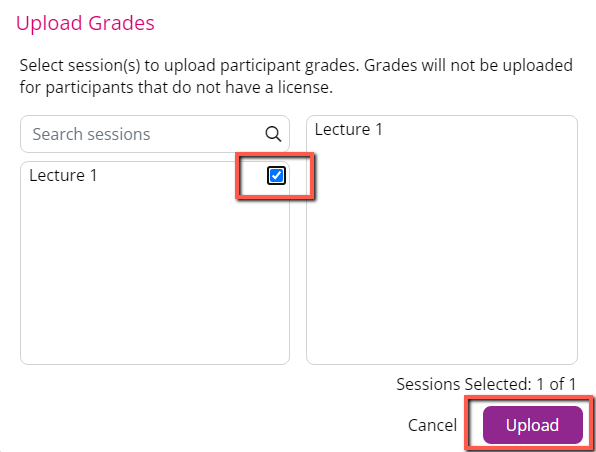
- Select the session(s) you want to upload and click Upload.
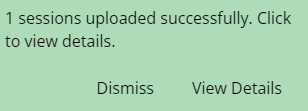
- You will receive a message that it succeeded or failed.
8. Attendance: Take Attendance
Learn how to take attendance within the PointSolutions Web interface.
The web attendance feature allows you to take, view, and edit attendance for your course and then export it to Excel or to your D2L gradebook. All of this is conducted within your PointSolutions web instructor account in a web browser. Here is what is required from your students to participate in a web attendance session.
- Students must have a PointSolutions account.
- Students must have the PointSolutions mobile app downloaded on their mobile device and sign in at least once or be logged into their PointSolutions account in a web browser on their tablet or laptop.
- Their mobile device, tablet, or laptop must have location services enabled if you plan to use location-based attendance.
- Have notifications enabled on their mobile device if they want to receive a notification that an attendance session has been opened.
Note: Students CAN NOT use their physical clicker device to participate in a web attendance session.
Taking Attendance (non location-based)
The following instructions will walk you through how to enable and run attendance that requires the students to be within a certain radius of the location that you establish. If they are within that radius they will be able to successfully check-in to your attendance session.
You can share this document with your students that walks them through what they will need to do on their end.
Student Participation Instructions for PointSolutions Web Attendance
- Access your PointSolutions Web account by going to D2L at https://d2l.arizona.edu and click on one of your D2L courses.
- In the navbar click on UA Tools and choose Clickers.
- You will be taken to your Instructor PointSolutions courses page.
- Click Select button on your desired course. The course opens on the Content page.
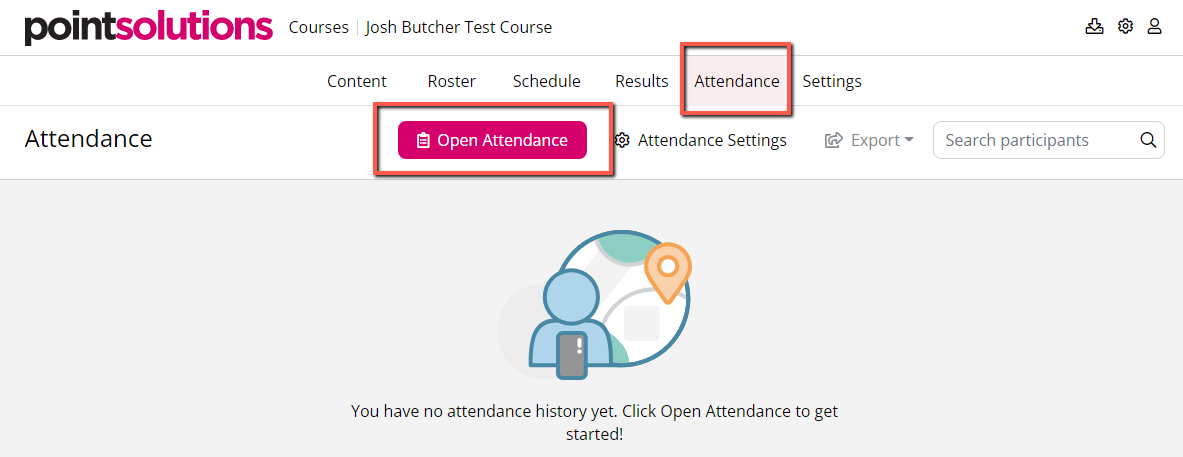
- Select Attendance from the top navigation. The Attendance page opens.
- Click Open Attendance to open attendance.
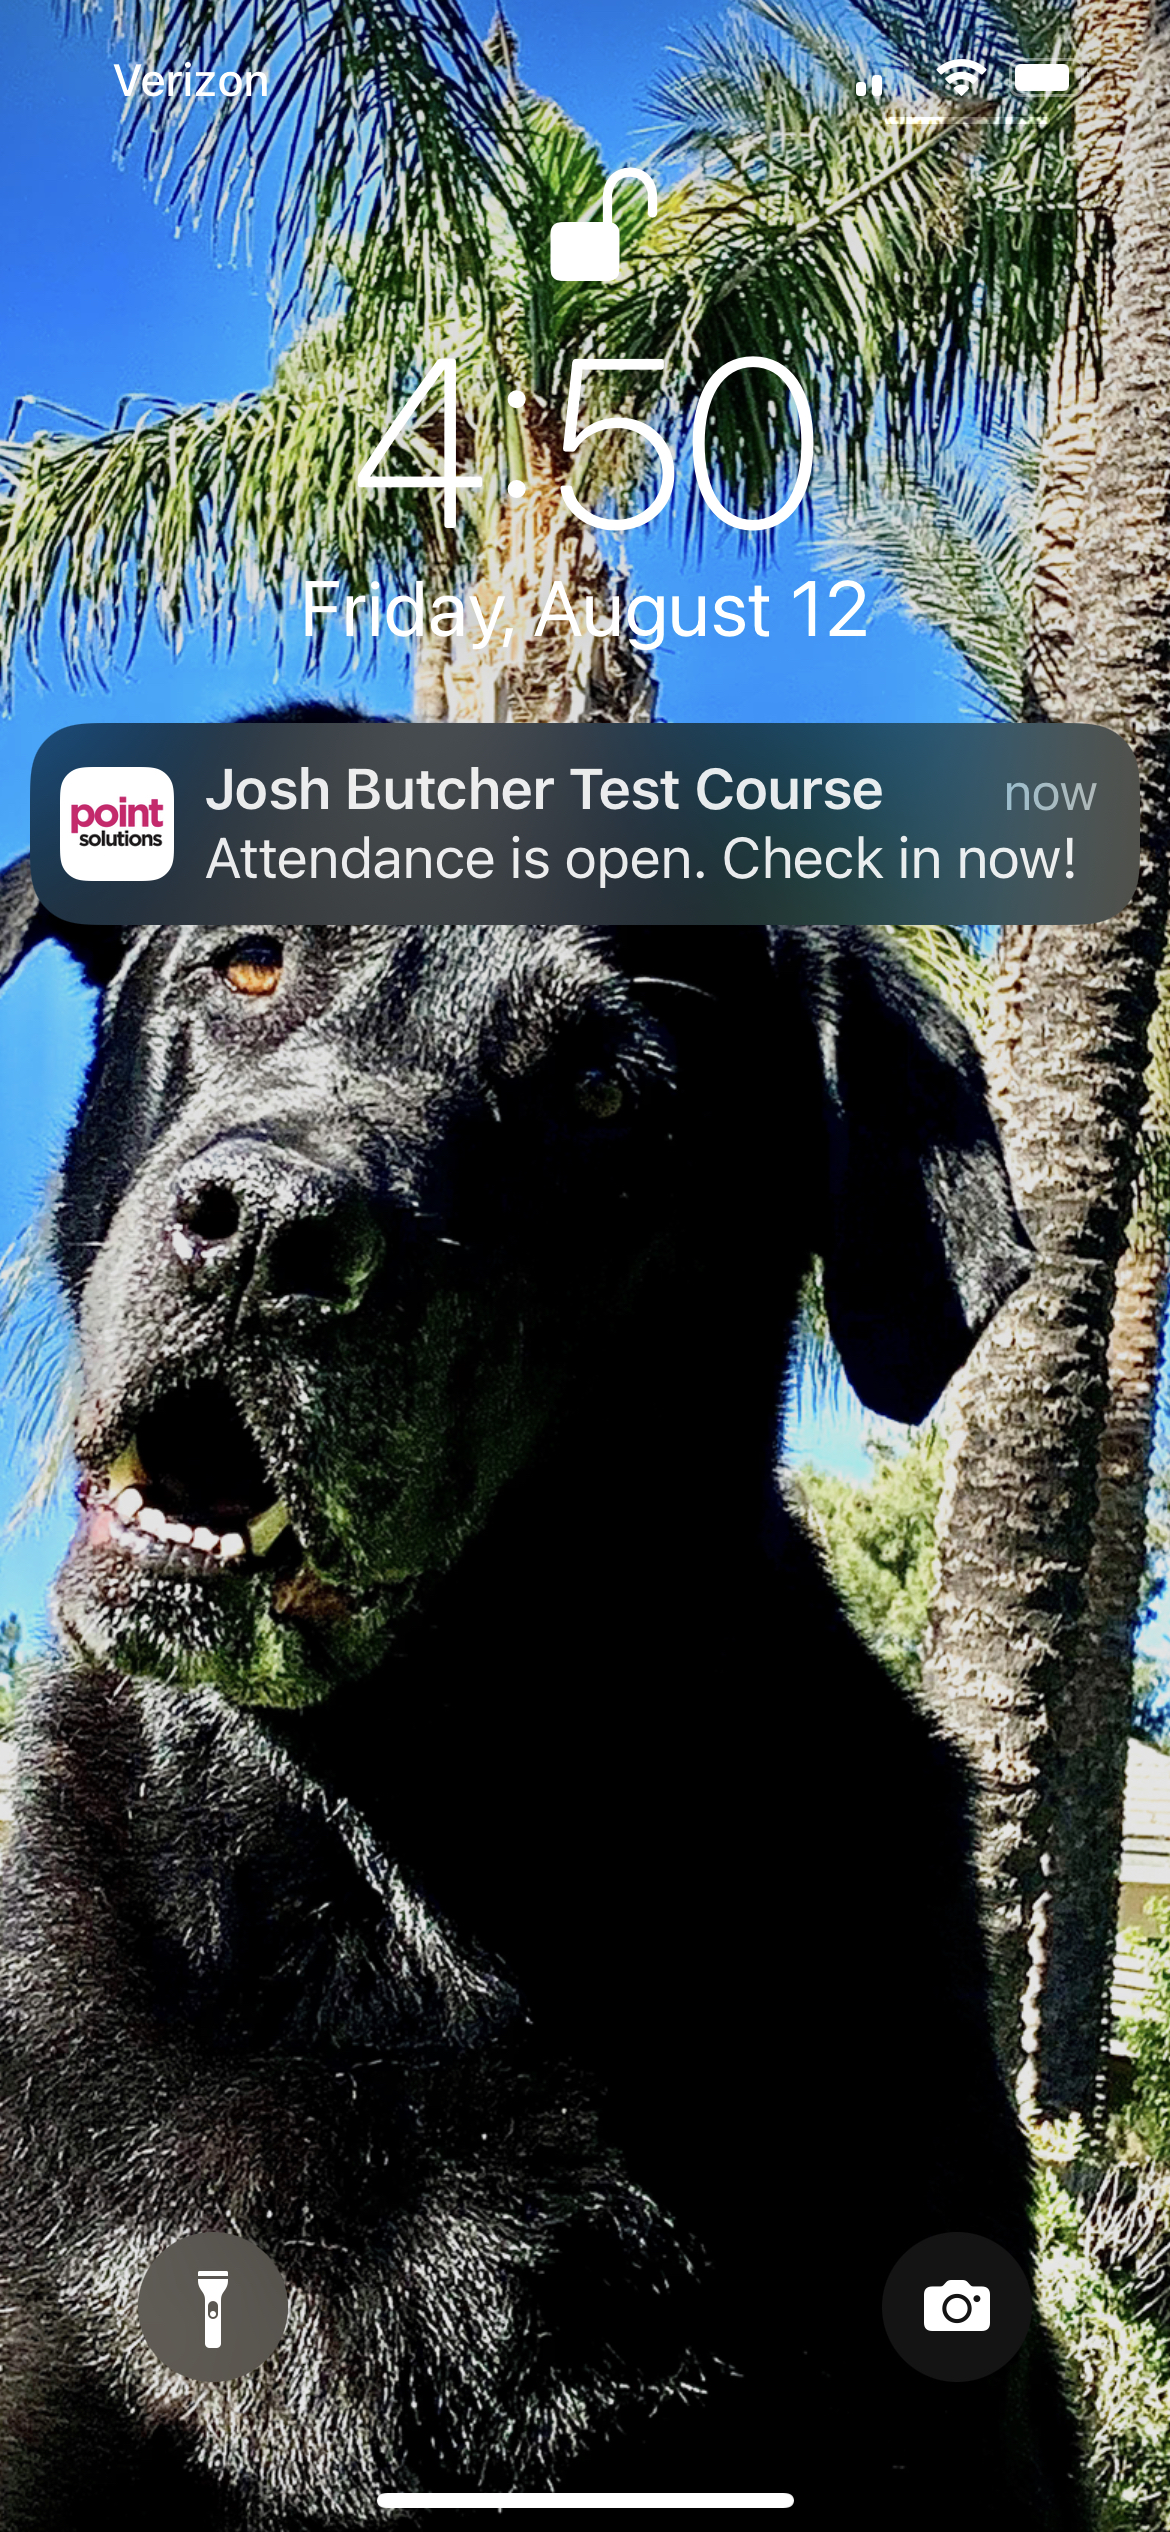
- When attendance is open your students will receive a notification on their mobile device or laptop indicating that attendance is open for the class. When students click on that notification it will mark them Present in class.
- Click Close Attendance to close attendance.

Taking Location-Based Attendance
- Within the Attendance page, click on Attendance Settings. The Attendance Settings page opens.

- Toggle the Location-Based Attendance setting on to enable location-based attendance. This feature allows you to select a check-in location and radius for your course.
Reminder: Participants must enable location services on their mobile device, tablet or laptop to use this feature.
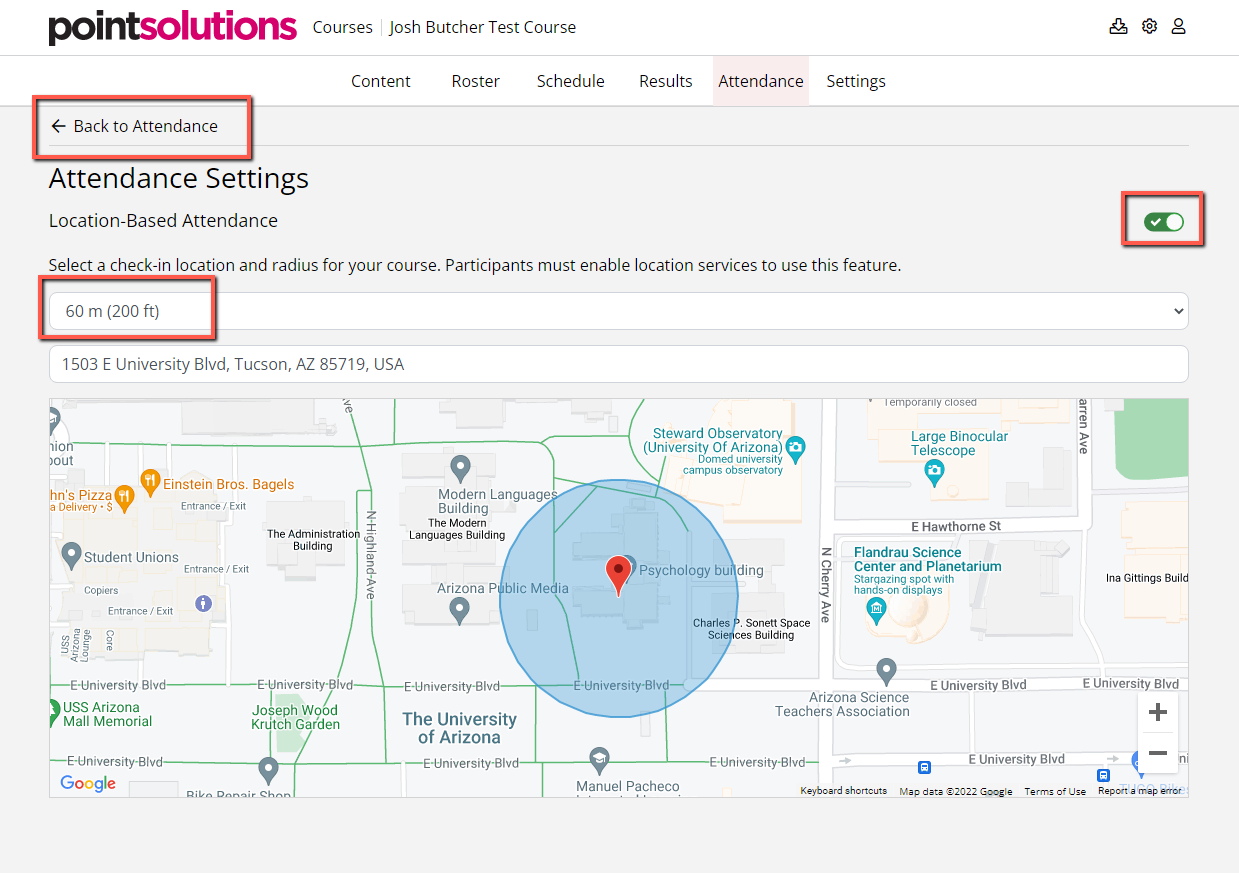
- Select your radius from the drop-down menu. We suggest starting with a larger radius for accuracy. Your options are 50 ft, 100 ft, 150 ft, and 200 ft.
- Enter your course location by typing an address in the Enter a location field or by clicking on the map to establish your current location.
- Once you have established your settings, click the Back to Attendance link at the top left.
- To take attendance click the Open Attendance button.

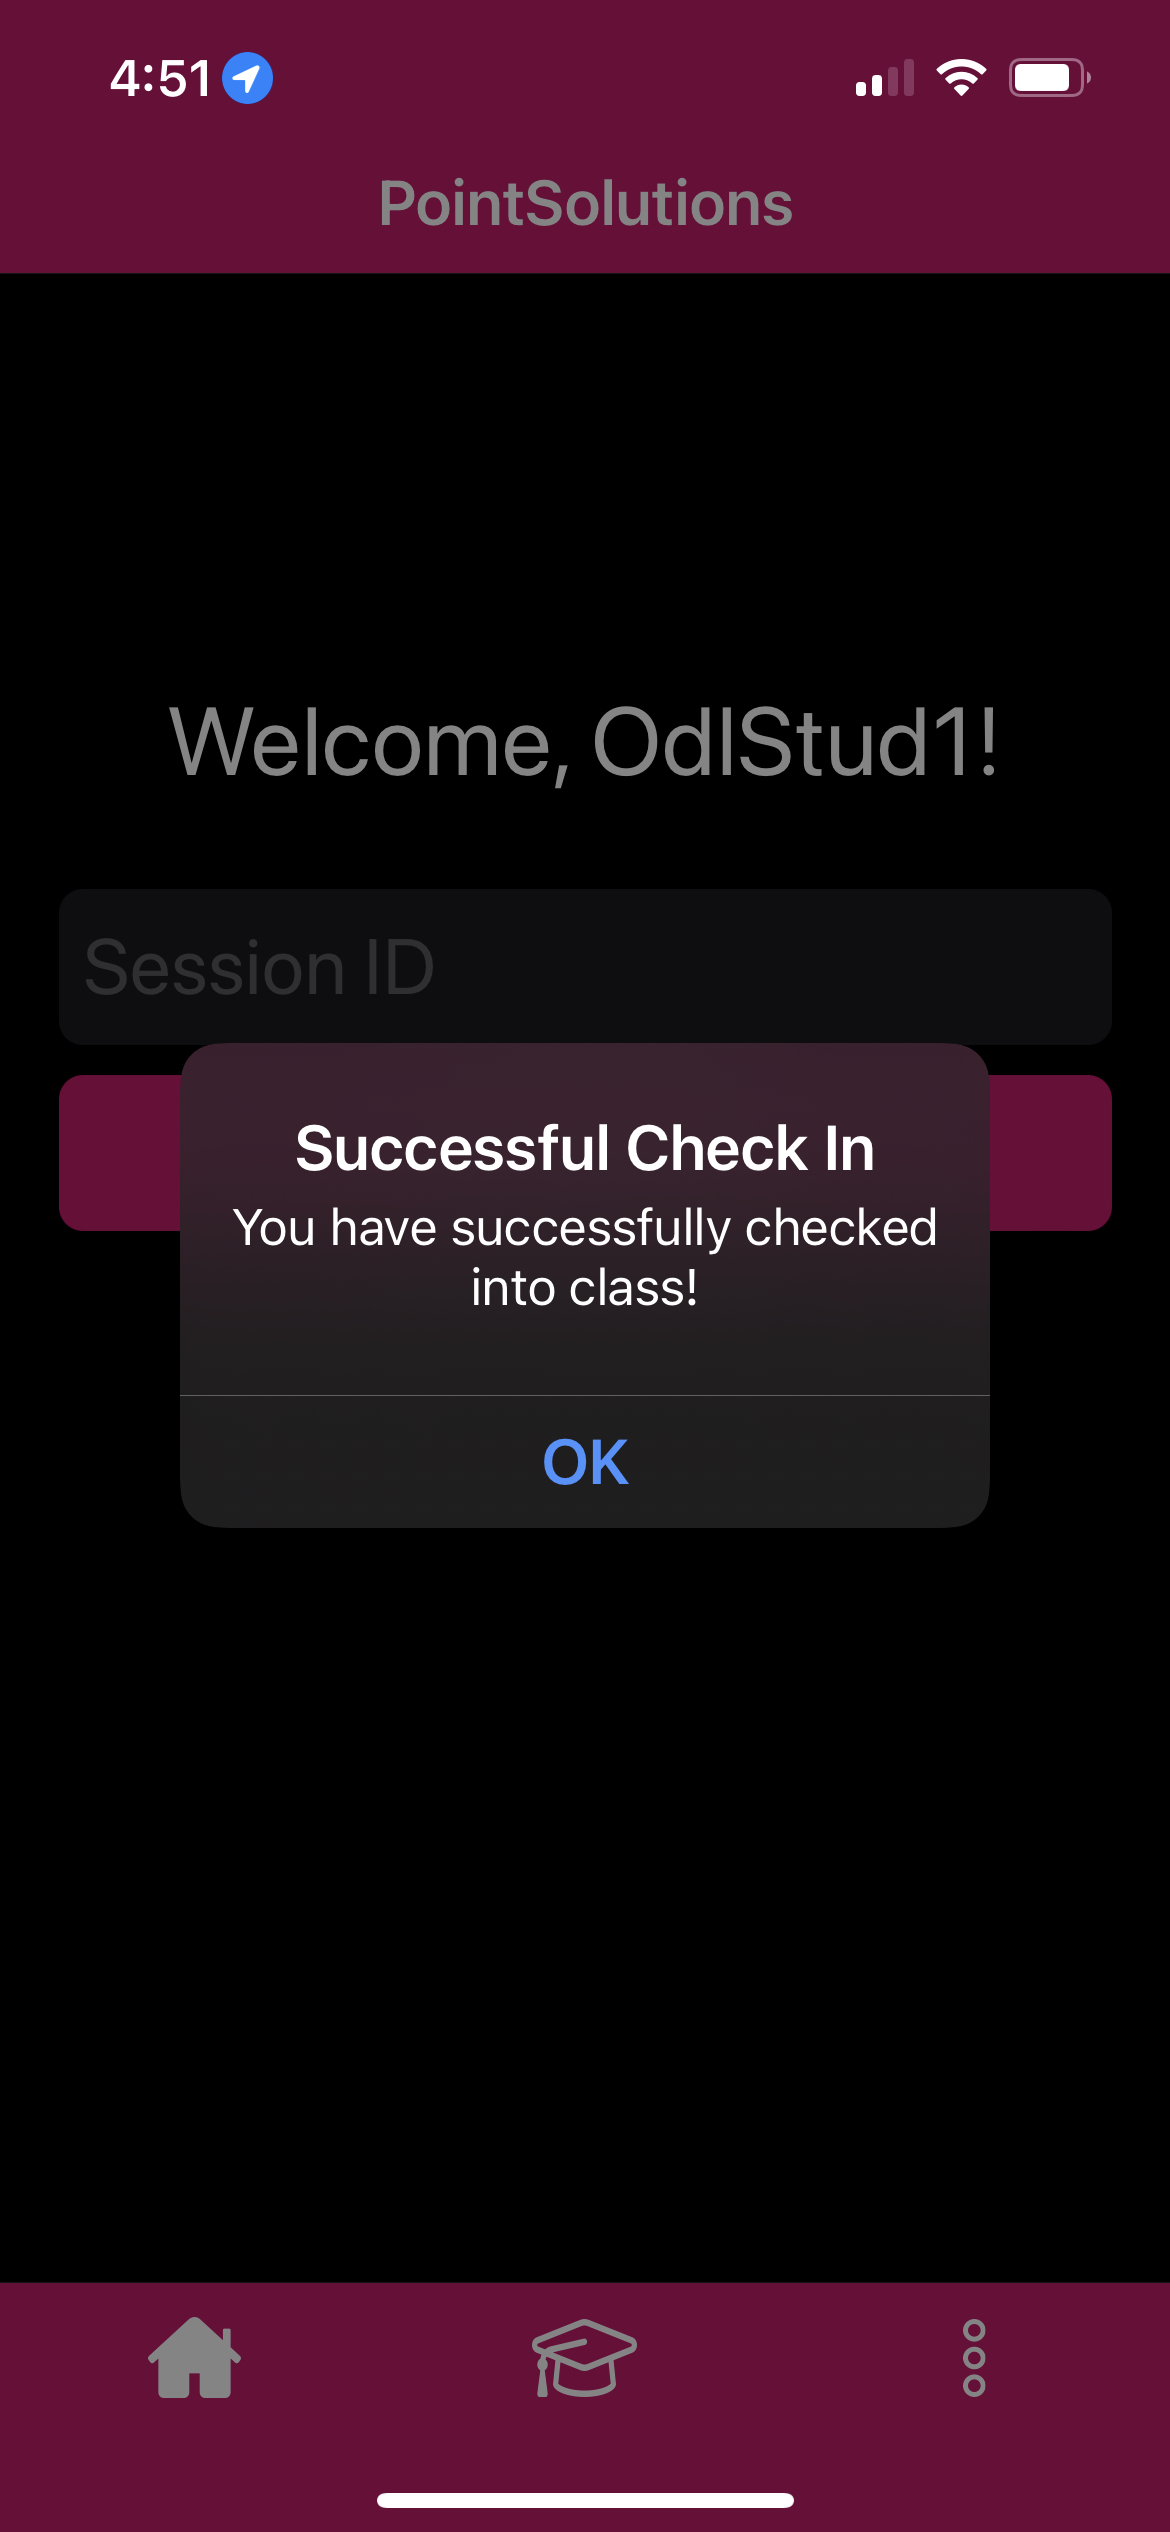
- When attendance is open your students will receive a notification on their mobile device or laptop indicating that attendance is open for the class. When students click on that notification it will mark them Present in class IF they are within the radius you selected. They will receive a message that the check-in was successful.
- If the student is not within the radius it will notify them that they are not within acceptable range of the course for attendance and they can retry to check-in once they are in range or they can cancel and they'll be marked Absent.
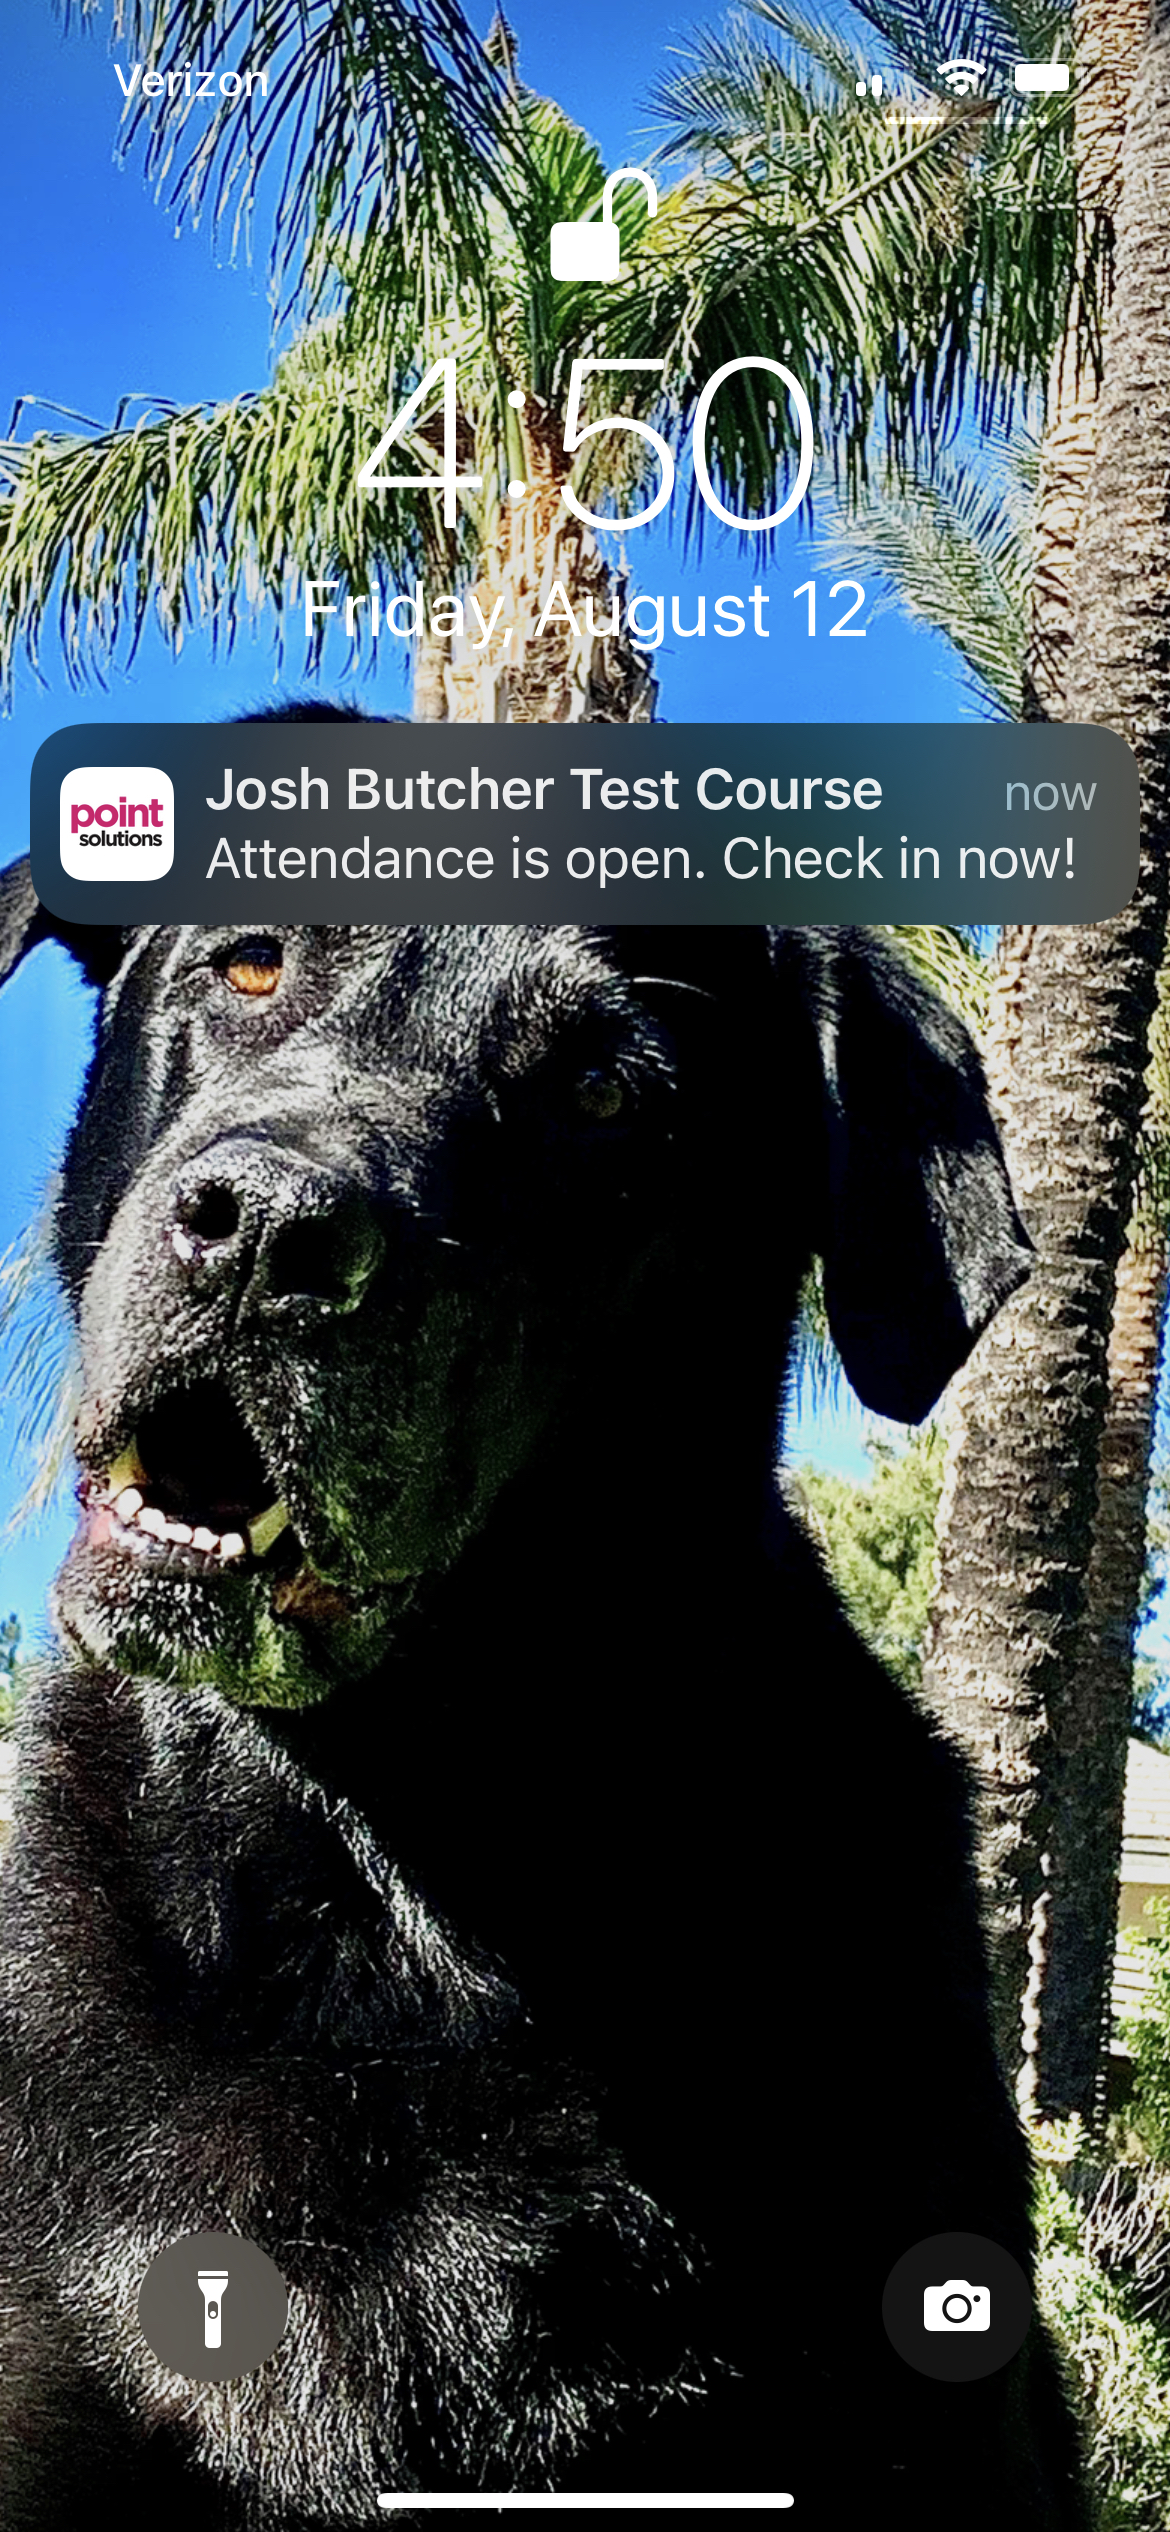
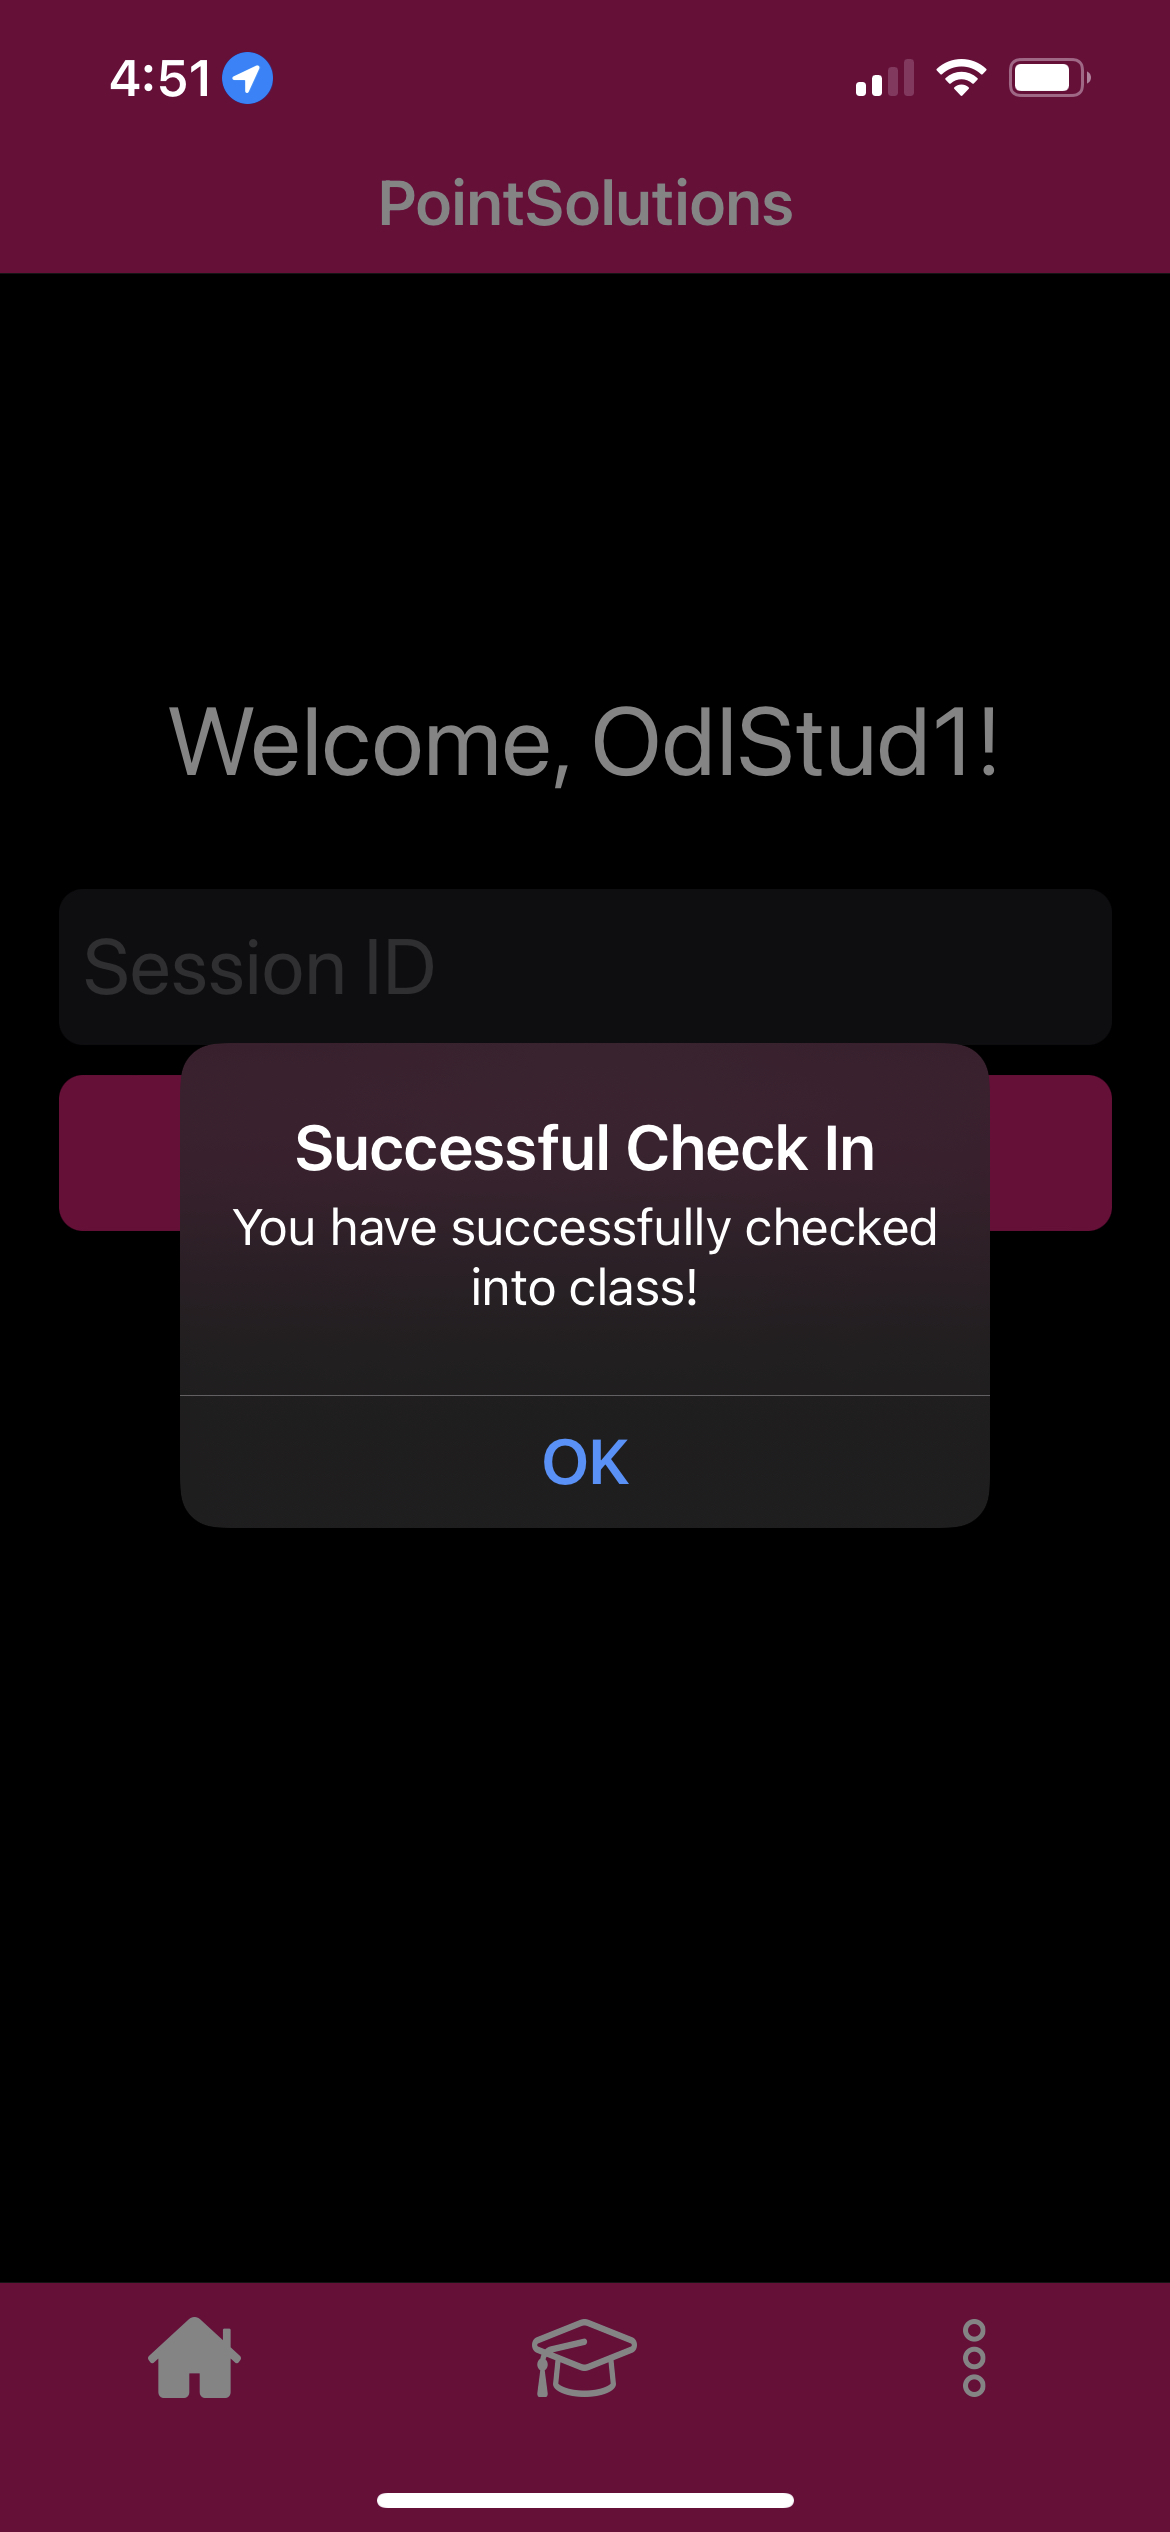
- When you as the instructor are ready to close the attendance session, click Close Attendance.

View and Edit Attendance Results
After the attendance session has been closed you can view and edit the attendance results. Clicking on the header of any column in the attendance grid will sort the grid by that column. Also, you can use the search bar to look up a specific participant.
You can easily edit an individual participant's data after attendance is closed if needed.
- From the Attendance tab, locate the participant you want to edit attendance data for. Click on the
 or
or  in the attendance session you want to edit.
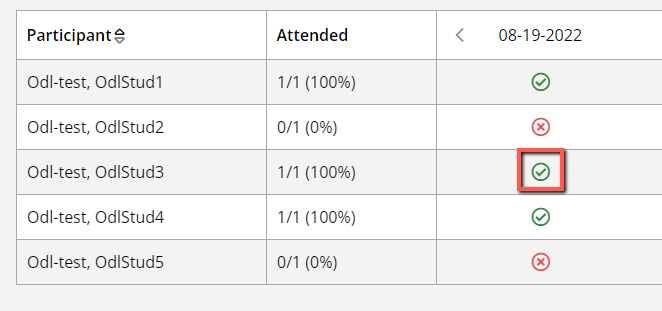
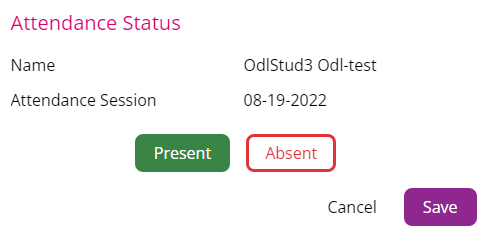
- The Attendance Status window opens.
- Select to change the status to Present or Absent. Select Save when finished.
- If you need to edit or delete an attendance column, mouse over the dated session data column header and select
 .
.
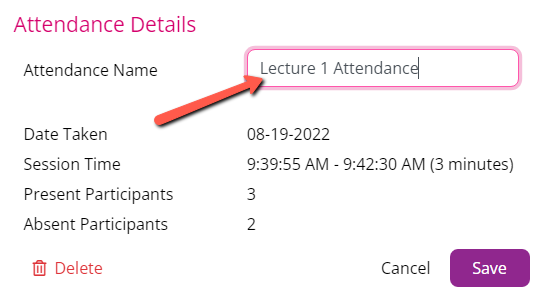
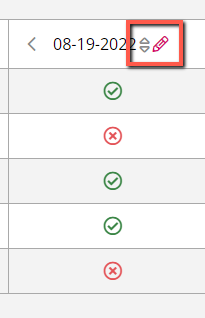 The Attendance Details window opens.
- Rename the session in the entry field next to Attendance Name if desired. Select Save.
- Optionally, select Delete to delete the attendance session.
Export Attendance Results to D2L or Excel
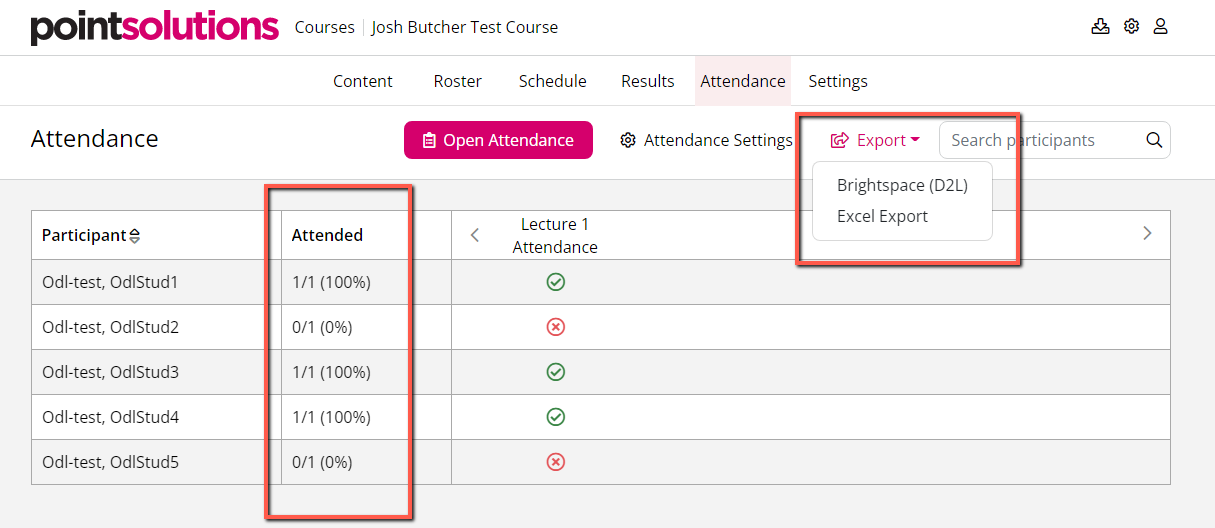
- From the Attendance page, click Export and choose either Brightspace or Excel Export.
- Choosing Brightspace will upload the total attendance column (labeled Attended) to the course D2L gradebook. As you conduct more attendance sessions you can re-upload multiple times and it will update the existing column in the D2L gradebook.
- Choosing Excel Export will download an excel file to your computer.
9. Settings: Adjust Course Settings
Learn how to adjust course settings within the PointSolutions Web interface.
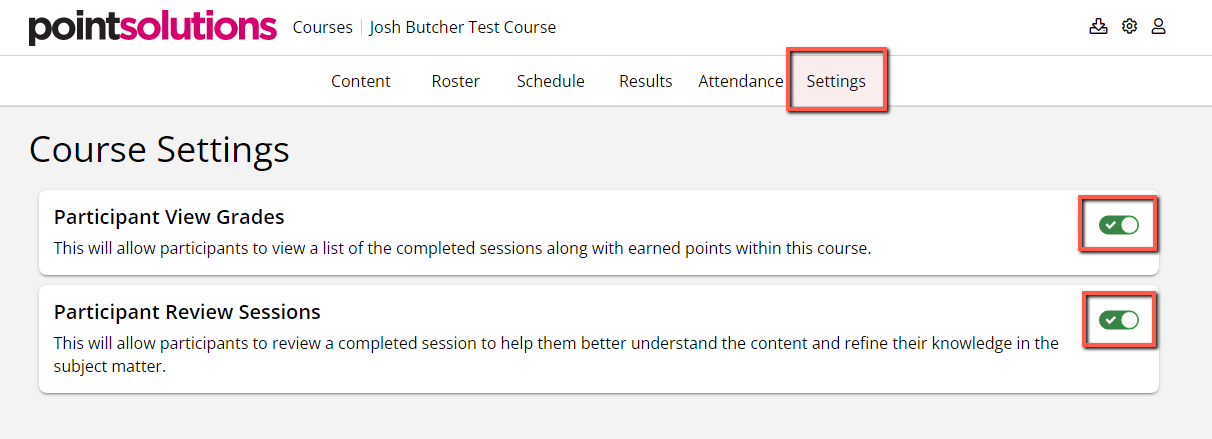
There are a few settings that you can enable in relation to your PointSolutions web course. The first is Participant View Grades and the second is Participant Review Sessions.
To enable/disable each setting do the following:
- Access your PointSolutions Web account by going to D2L at https://d2l.arizona.edu and click on one of your D2L courses.
- In the navbar click on UA Tools and choose Clickers.
- You will be taken to your Instructor PointSolutions courses page.
- Click Select button on your desired course. The course opens on the Content page.
- Select Settings from the top navigation. The Settings page opens.
- Toggle on/off each of the desired settings on this page.
- Participant View Grades will allow participants to view a list of the completed sessions along with earned points within this course.
- Participant Review Sessions will allow participants to review a completed session to help them better understand the content and refine their knowledge in the subject matter.
TurningPoint Web for PowerPoint (Light Add-in)
The TurningPoint Web for PowerPoint light add-in lets you collect results online while enjoying Turning Technologies industry-leading native PowerPoint integration. A streamlined user interface makes it even easier to create content and poll participants. Note: You won't have all the polling options within PowerPoint that you do when you use the TurningPoint desktop application. This is why they call it a "light" add-in as it doesn't have as many features. Benefit with this is that you don't have to open and go through the desktop application to run polls. Your content and sessions are all saved in your TurningPoint web account so there aren't files to keep track of on USB flash drives.
1. Install: Installing PowerPoint Light Add-in
Learn how to install the PowerPoint Light Add-in to use for online polling.
- To download and install the TurningPoint for web PowerPoint add-in go to https://www.turningtechnologies.com/downloads/turningpoint-web/.
- Click on either the PC or Mac download depending on the type of computer you have.
- Fill in the form fields that TurningTechnologies desires and click Submit.
- Click the Download button. It will download a .zip file to your downloads folder.
- Double-click to open up the .zip file it downloaded. It should show you a folder labeled "TurningPoint web for PowerPoint". Click Extract All to extract all contents of this folder.
- Click Extract.
- Once all the files are extracted double-click the TurningPoint web for PowerPoint folder to reveal the files inside.
- Create a desktop shortcut for the TurningPoint Web application. Right-click on the "TurningPoint web for PowerPoint file". Click Send to and then choose Desktop (create shortcut). This will place a shortcut to this application on your desktop.
- Double-click to open the TurningPoint web for PowerPoint application file on your desktop.
- This will open up PowerPoint with the TurningPoint for web add-in installed.
2. Create: Creating Content
Learn how to create content for use with the PowerPoint Polling (Light Add-in).
- Launch the TurningPoint web app from your desktop.
- Create a new or open an existing PowerPoint presentation.
- Select the location in your presentation to add a question slide.
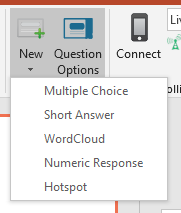
- Click New in the TurningPoint web ribbon.

- Select Question Type. You can choose from Multiple Choice, Short Answer, WordCloud, Numeric Response, or Hotspot.
- Enter question text in field provided on the slide.
- Enter answer text in field(s) provided on the slide.
- Select options from the Question Options panel on the right.
- Repeat steps 3-8 for other question slides you want to add.
- Save and close your presentation.
3. Run: Running Your Session
Learn how to run your polling session with the PowerPoint Light Add-in.
- Launch TurningPoint web from your desktop.
- Open your existing PowerPoint presentation.
- Click Sign In from the TurningPoint web ribbon to sign into your account.
- Choose your correct region.
- Enter your UA email address and click Sign-In.
- Enter in your UA NetID and password.
- Click Connect from the TurningPoint web ribbon.

- Select a Session ID and Course from the drop-down menus and click Start.
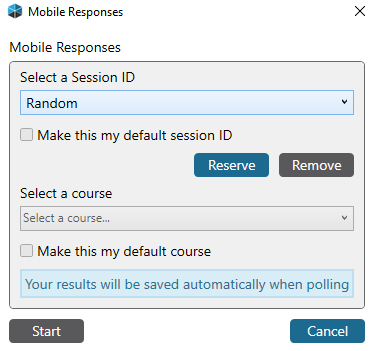
- Communicate Session ID to participants. Users using their mobile device, tablet, or laptop can use this session ID with the mobile app to respond to question polls. Click Close. Note: This will not end your session.
- To enable clicker devices (QT2, QT, NXT) to also be used for responding click on Receivers in the TurningPoint web ribbon.

- Check the box to Enable clicker support.
- Start your slideshow.
- At the end of the slideshow, click Save.
- Rename session if desired.
- Select Finish.
4. Access: Accessing Results
Learn how to access the results of the polls you deliver via the PowerPoint Light Add-in.
- Access your TurningPoint Web account by going to D2L at https://d2l.arizona.edu and click on one of your D2L courses.
- In the navbar click on UA Tools and choose Clickers.
- You will be taken to your Instructor TurningPoint courses page.
- Click the View link on your desired course.
- The course opens on the Roster page.
- Click Results on the top navigation. The results page opens and loads the first session by default.

- Select a session from the left panel to view results.
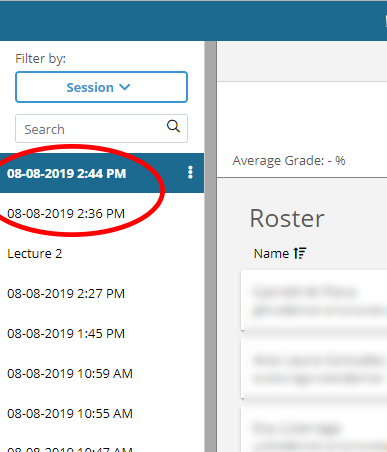
- Click on Reports to view reports about the session.
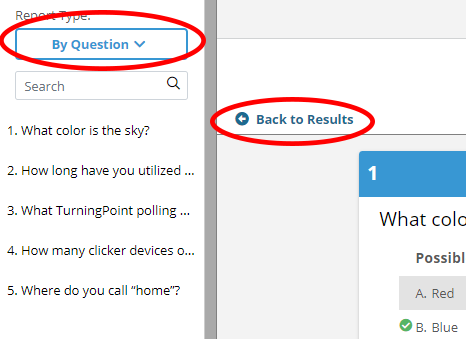
You can view either the report By Question or By Participant by choosing the report type from the Report Type drop-down list. Click Back to Results to get back to the results screen.
- Click Upload Grades to upload the grades from the polling session to your D2L course grade book. It will send the grades to the course D2L grade book and creates a column at the end of your grade book.


