***Announcement***
-
Top Hat is now the official enterprise polling solution for use on campus. This means that it will no longer require out-of-pocket costs to students for participating in the campus supported polling solution in their course(s).
-
As you transition over to Top Hat, we are happy to provide customized trainings for both individuals as well as groups or departments. Please reach out to us at intech@arizona.edu if you desire a customized training session.
-
Campus support for PointSolutions will end after the Fall 2023 semester. If you decide to continue to use PointSolutions beyond the Fall 2023 semester you will need to reach out directly to the vendor for direct support.
-
For the first year (through August 2024) of our contract with Top Hat we have dedicated migration support from other polling systems. The migration process starts with a meeting between an instructor and Top Hat, to discuss how you currently use polling in your course and view some of your content. From there, Top Hat's team will re-build your content, while checking in with you to make sure you're satisfied with the end-result. To start the content migration process, please reach out to our Top Hat rep Sumi Voora at sumi.voora@tophatmonocle.com or schedule an appointment.
PointSolutions Desktop Polling
Content and results are self-contained to either your receiver or computer. Poll in PowerPoint, over top of any application or deliver self-paced assessments. You have many more options regarding poll questions when you use the PointSolutions desktop app.
If you are wanting to use the PointSolutions desktop app to conduct your polling please follow the instructions in the different sections below. We have broken them down into three categories. What you need to do BEFORE while in your office, what you need to do when you get to a classroom and DURING a poll, and then what to do AFTER you've conducted a poll and are back in your office.
BEFORE
What you need to do in your office before going to a classroom to conduct a poll.1. Getting Started
Learn how to get started with using the clicker technology.
If you are new to PointSolutions and want to incorporate this technology into your course(s) the best thing to do first is to schedule a meeting with a member of the UCATT D2L and InTech team to get an introduction to the technology. Send an email to d2l@arizona.edu to schedule this meeting.
During this initial meeting you will be given an Instructor's Kit, shown how to download and install the PointSolutions software, and given a brief overview of how the different polling options work and how it integrates with D2L.
Here is a syllabus template Word document discussing clicker usage in UA Courses. You can download and edit it as you need.
Syllabus Template for Clicker Usage in UA Courses
User Manuals for TurningPoint
Use these online user manuals as reference material to learn all of the in-depth options and tools within the PointSolutions (formerly TurningPoint) software.
2. Install: Download and Install PointSolutions Software
Learn how to download and install the PointSolutions Desktop software on your computer.
- Log in to D2L (d2l.arizona.edu) and access one of your courses.
- Once you are within one of your courses, click on UA Tools in the navbar and choose Clickers.

- You will be taken to PointSolutions where you may need to create an account if you haven’t already.
- Once you are within your PointSolutions account page click on the Downloads button at the top right of the page.

- Depending on the computer you have you will either click on PC or Mac installation download option.
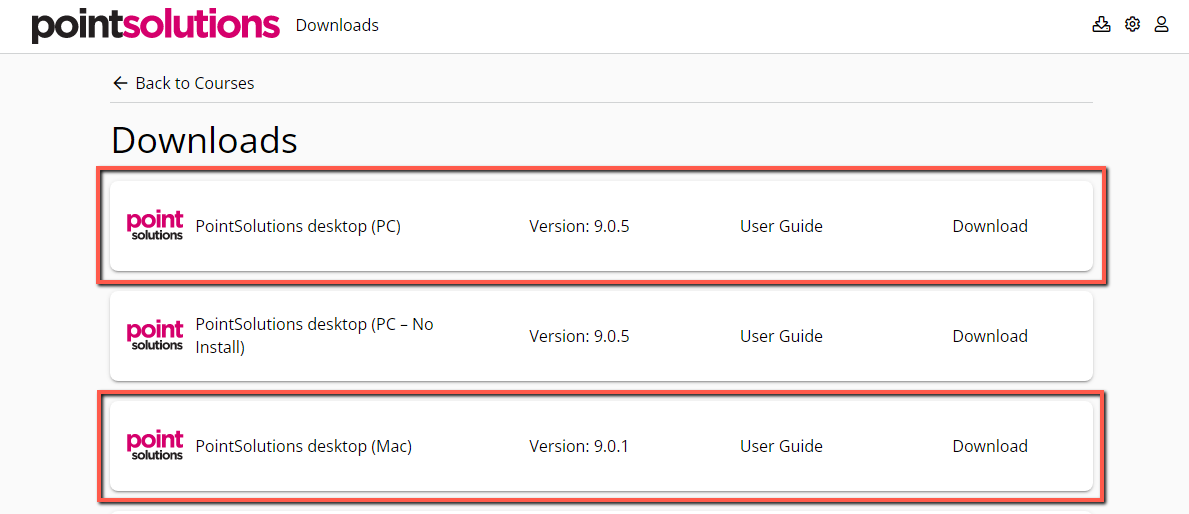
- It will download an installation file that you will need to open and run through the installation process.
3. Connect: Connect Course from LMS
Learn how to connect your course from the LMS into PointSolutions.
There are two ways that you can connect your course and course roster to PointSolutions. You can choose to do it within an internet browser or you can do it from within the PointSolutions desktop application. The instructions below will walk you through both methods.
Connect your Course via Browser
- Log in to D2L (d2l.arizona.edu) and access one of your courses.
- Once you are within one of your courses, click on UA Tools in the navbar and choose Clickers.
- You will be taken to your PointSolutions account and you will land on your Courses page.
- You will see two tabs, the first tab will say "Active Courses" and next to that tab it will say "BrightSpace (D2L)". (IGNORE the red/pink button that says "Create Course").
Click on the BrightSpace (D2L) tab.
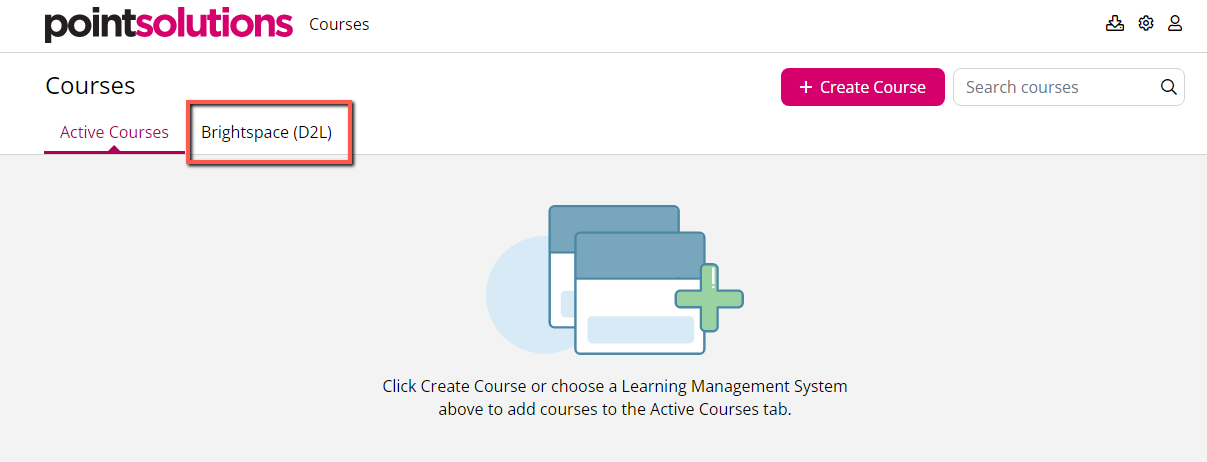
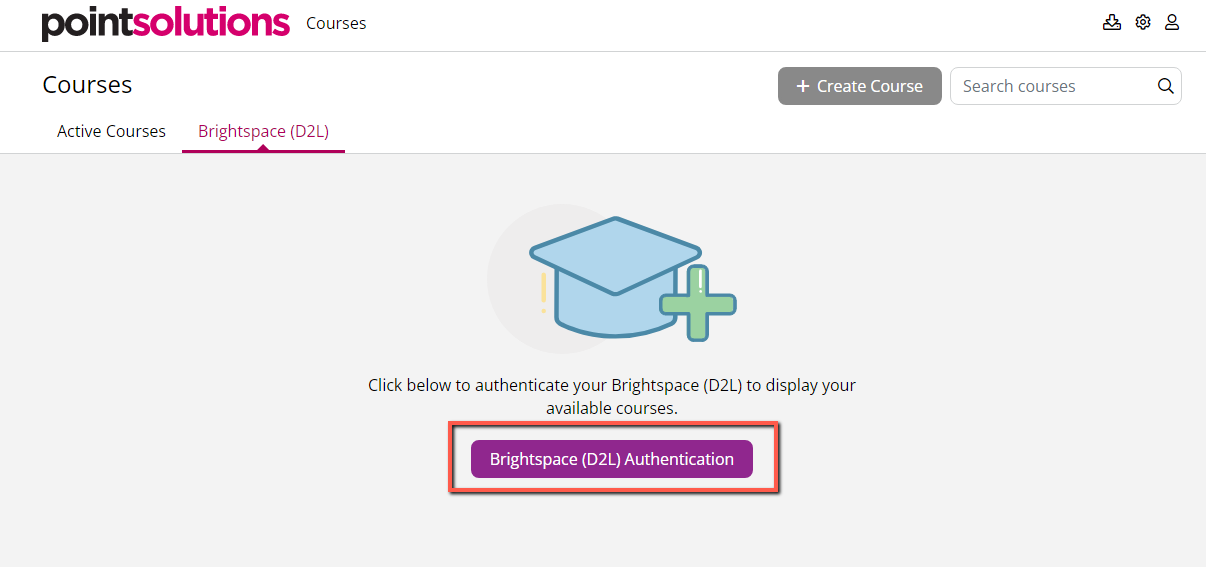
- If this is your first time accessing this tab, you should see a message that says "Click below to authenticate your BrightSpace to display your available courses". Click the BrightSpace Authentication button. It may then ask you to sign in to BrightSpace (D2L) if you aren't already.
Note: You will only see this BrightSpace Authentication button the first time you access this BrightSpace tab.
- It may take you to a screen that says "Application Turning Technologies Registration TP8 v8.0 by Learning Technology Center is trying to access your information. Would you like to proceed?" Click the Continue button to proceed.
- Once signed in it will begin syncing your available courses from D2L.
- It will find and list all courses that you are listed as Instructor in. Find the course you want to add and click the Add button. If you have a long list of courses you can use the Search courses box to type in the name of the course to search for it.
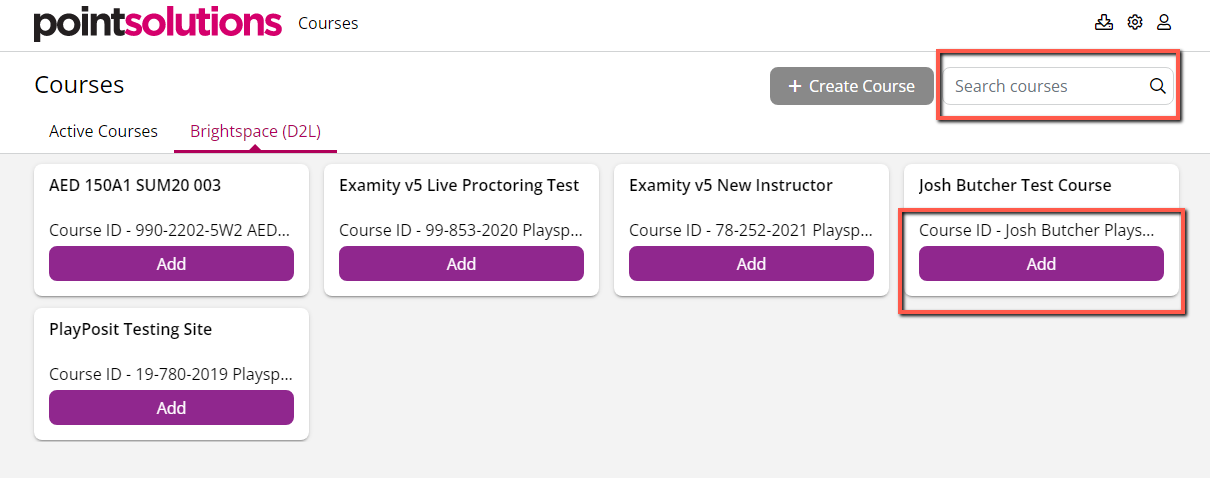
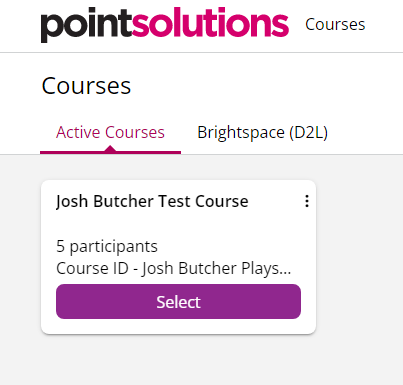
- After clicking Add, that course then moves over into the Active Courses tab.
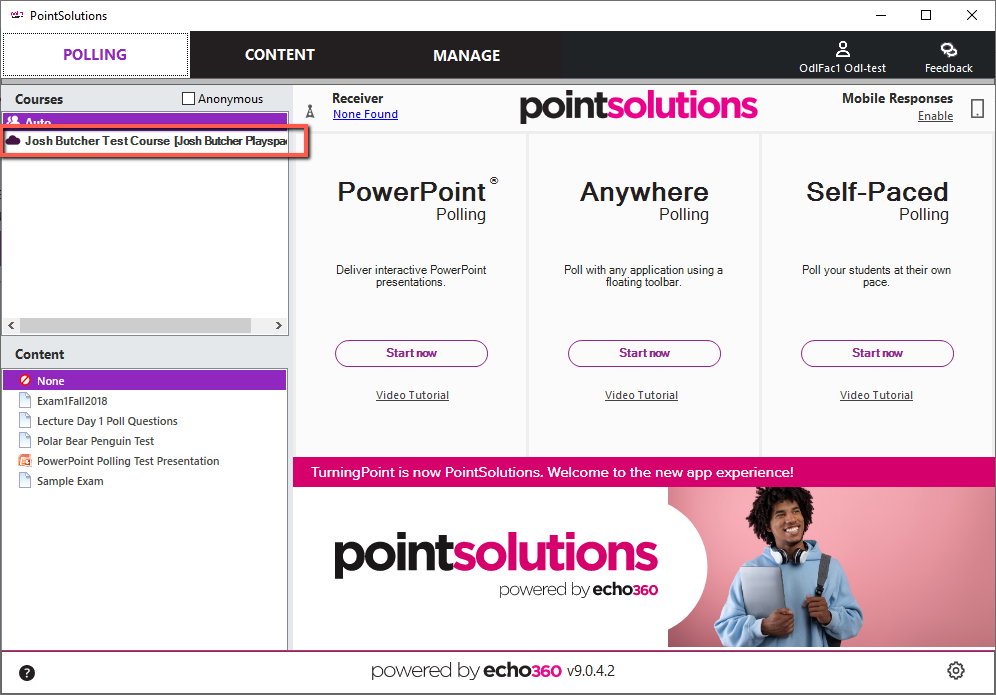
- Once a course is connected, it will automatically be added to your list of courses in the PointSolutions desktop application the next time you open and log in to the app.
Connect your Course via PointSolutions Desktop App
- Open the PointSolutions desktop application and sign in to your account using your UA email address and entering in your NetID and password.
- Select the Manage tab.
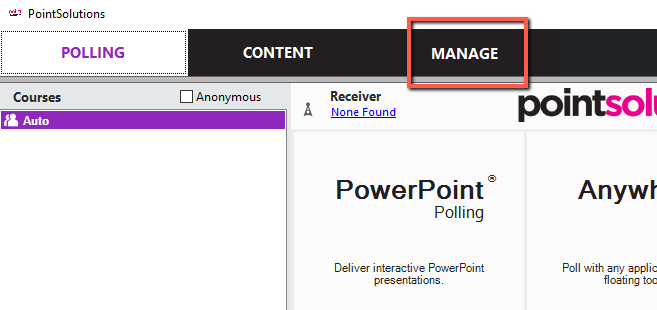
- Click the Course drop-down menu and select New.
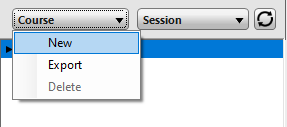
- The Create Course window opens. Select the Download from LMS Sync Integration radio button and click Create Course.
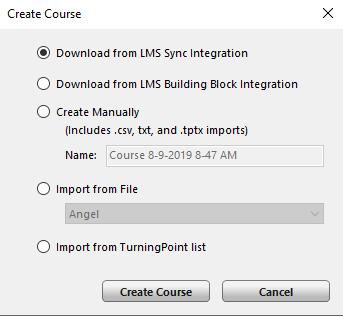
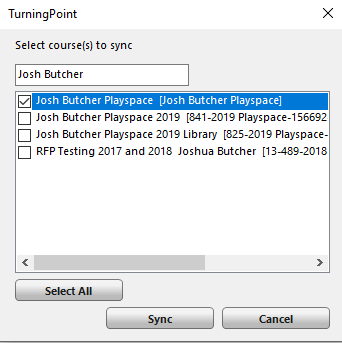
- The Select course(s) to sync window opens. Select the course(s) to be downloaded.
- Select Sync.
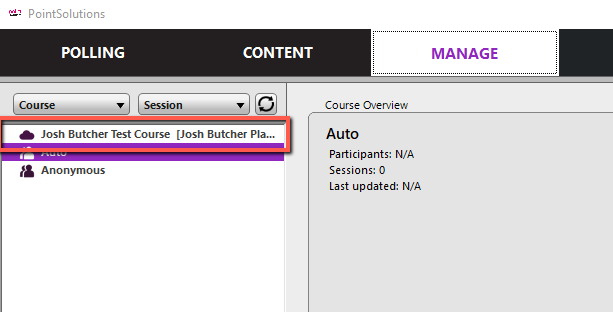
- Your course(s) are now visible in the left pane.
4. View: View Course Rosters
Learn how to view your course rosters on the web and from the PointSolution desktop app.
View Your Course Roster via Web
- Log in to D2L (d2l.arizona.edu) and access one of your courses. Once you are within one of your courses, click on UA Tools in the navbar and choose Clickers.You will be taken to your PointSolutions account and you will land on your Courses page.
- If you connected your courses successfully in section 3 above then you should see your connected courses in the list of "Current Courses".
- Find the course you want to view the roster from and click on the Select button from that course.
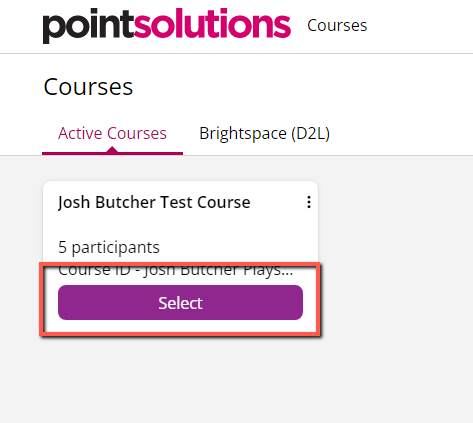
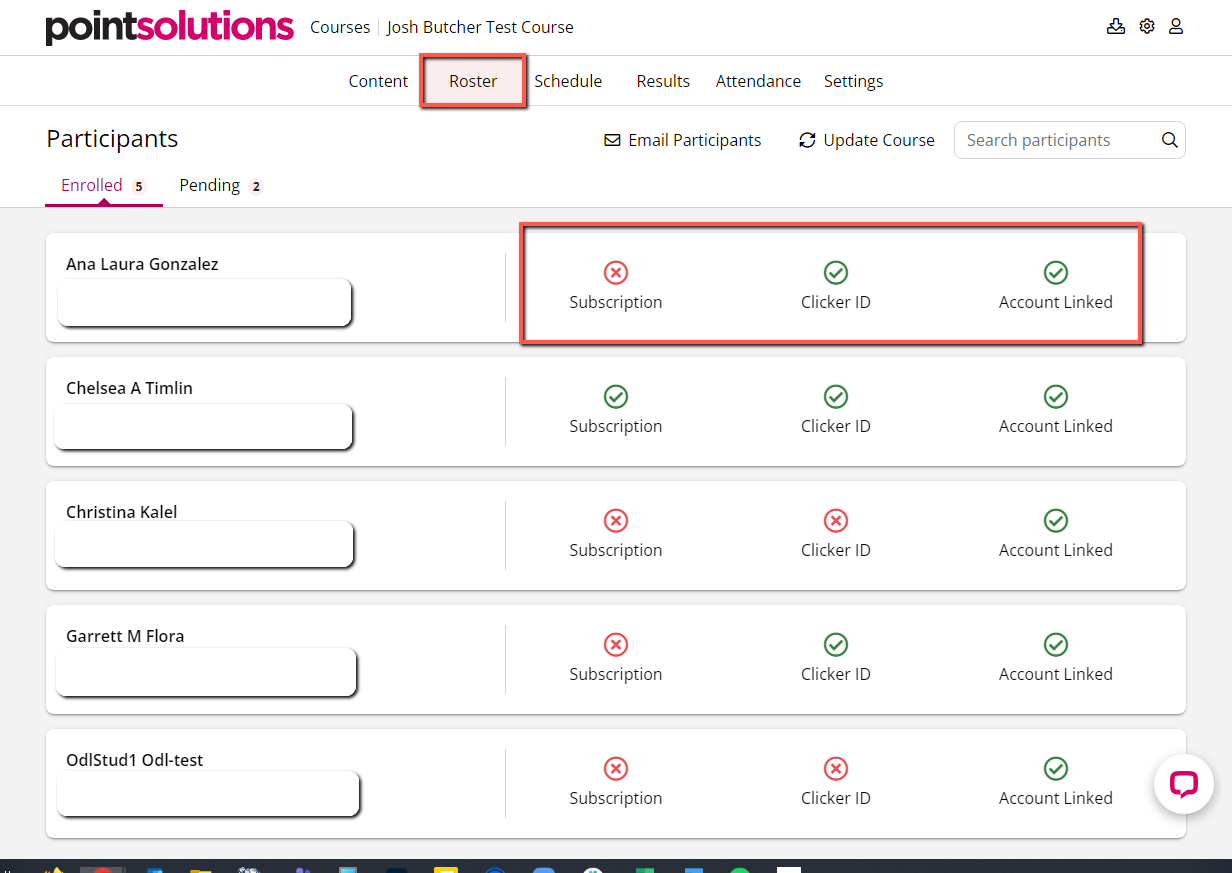
- You will then be taken to that course page. Click the Roster tab at the top.
Here you can see all the enrolled students in the course and if they have completed the 3 different tasks that are required to successfully register their clickers. For each student you will see to the right of their name Clicker ID, Subscription, and Account Linked and there will either be a "green checkmark" or an "X" signifying if they have completed that task yet. The web roster will not show the clicker ID's that are connected to each student. To find out what clicker ID a student has you will need to view that from within the PointSolutions desktop app.
-
Also on the roster page you'll see two tabs labeled Enrolled and Pending. The only difference between these two tabs is that those students that appear in the Pending tab are students that have not have not done anything in regards to their clicker registration. They'll have red circle "x's" in all three categories.
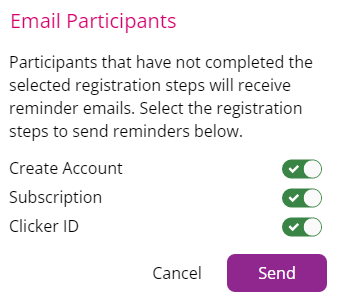
- If you want to email students that haven't completed ALL of the tasks to send them a reminder to get them completed you can click on the Email Participants link in the upper right.

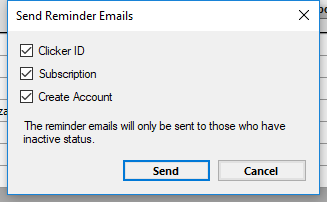
- You'll have the options to check what reminder tasks you want to send. You can check Clicker ID, Subscription, and Create Account. The reminder emails will only be sent to those students who don't have a green checkmark in those categories. Click Send to send the email reminders.
- Clicking on the Update Course link will sync the roster with D2L and get the latest roster updates.
Note: Your connected course rosters will automatically sync with D2L roster every night around midnight.

View Your Course Roster via PointSolutions Desktop App
- Launch the PointSolutions desktop application.

- Click Sign In and sign-in with your UA NetID and Password.
- Once you are at the PointSolutions Dashboard click on the Manage tab and then choose the appropriate course from the list of courses you connected. Courses that have a "cloud" icon are the courses that you connected and synced on the web in Section 3 above. If you have courses that have "people" icons, those are courses that you previously had synced and they no longer are synced via the web. For example if you were to delete/disconnect one of the courses that you connected in Section 3 above the course in the PointSolutions Desktop app would have a "people" icon next to it meaning it is no longer connected and synced to the web. You want to make sure you are always working in a course that has a "cloud" icon.
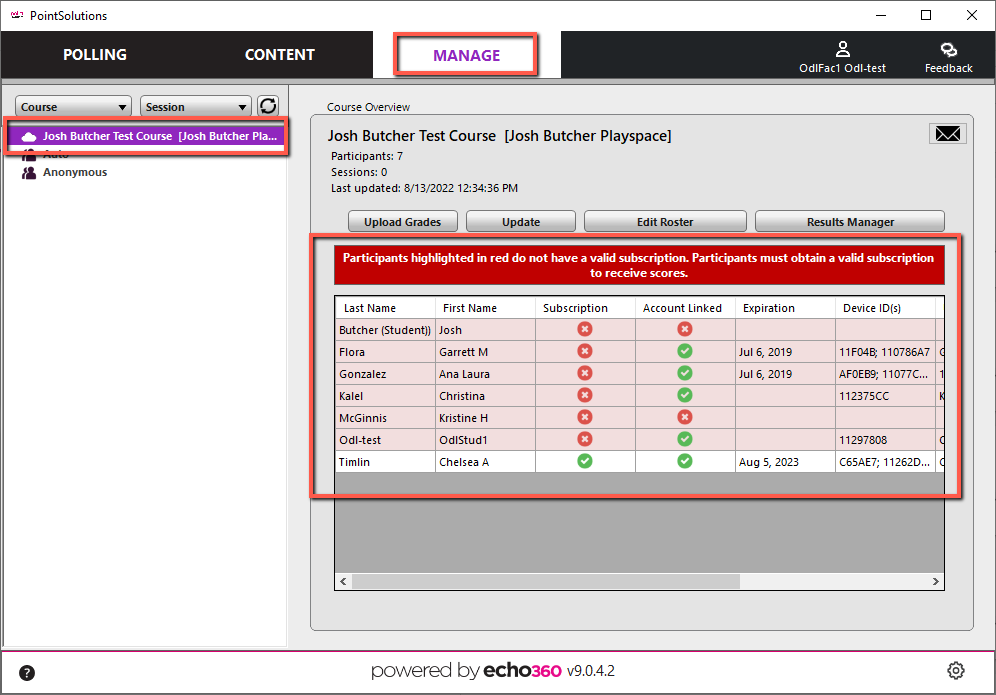 In the image above you can see your course roster and clearly see who has or hasn't completed registration tasks like entering their Subscription, getting their Account Linked, or entering their Clicker Device ID. Those with green checkmarks have completed the task, those with a red x have not.
- If you want to send the students a reminder email to get their clicker account registered click on the Email icon in the upper right.

- You can check which reminders to send (Clicker ID, Subscription, Create Account). The reminder emails will only be sent to those students who haven't completed those tasks. Click Send to send the reminder emails.
5. Create: Create Polling Content
Learn how to create polling content from within PowerPoint as well as from within the PointSolutions desktop app.
Create Content For Use With PowerPoint Polling
- Launch the PointSolutions desktop application and sign-in with your UA NetID credentials.
- From the PointSolutions Dashboard click on the PowerPoint Polling option.
This will open PowerPoint with a special PointSolutions add-in toolbar. Note: It is important that you open PowerPoint via the PointSolutions app as doing this installs and launches the PointSolutions add-in for PowerPoint. If you open PowerPoint prior to opening up the PointSolutions app you won't have this special add-in toolbar in PowerPoint.
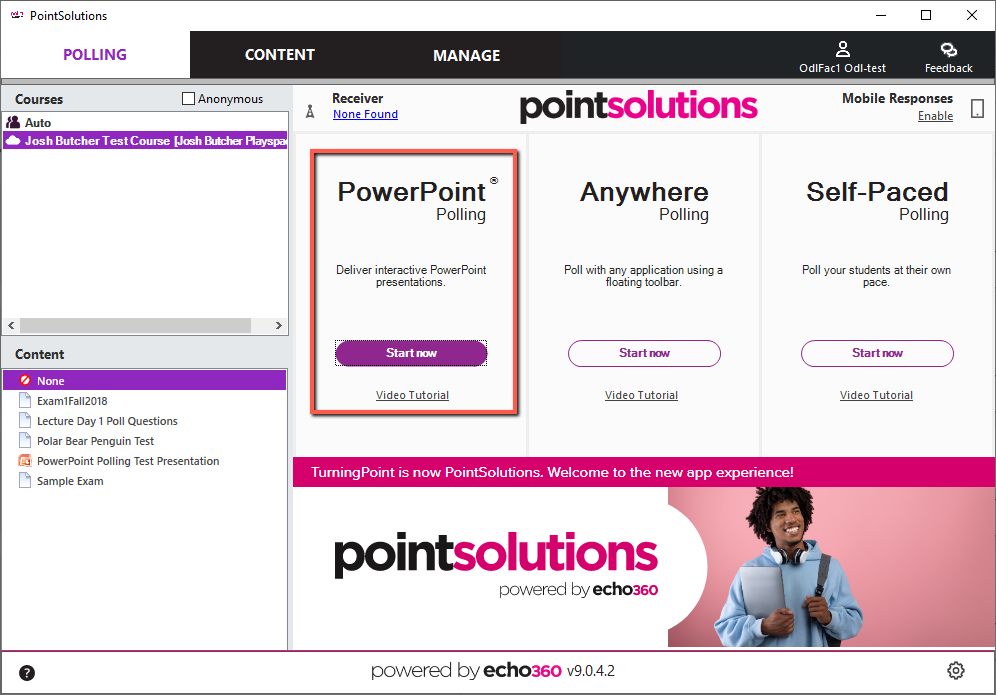
- Choose to open either a Blank Presentation or a previously made PowerPoint presentation.
- You will see the PointSolutions add-in toolbar at the top. This special toolbar allows you to add all the PointSolutions polling options. If you don't see this toolbar it is likely because you did not open up PowerPoint through the PointSolutions desktop app. On a Mac this toolbar will be an external floating toolbar.

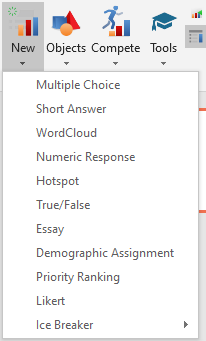
- Begin to create your PowerPoint lecture as you normally would by adding your slide layouts and content. When you get to a point where you want to add a polling slide then make sure you are selected on the PointSolutions toolbar in the ribbon at the top and click the New button.

- These are the following poll question choices you can choose to add to your presentation: Multiple Choice, Short Answer, WordCloud, Numeric Response, Hotspot, True/False, Essay, Demographic Assignment, Priority Ranking, Likert, and Ice Breaker. Choose a question type. For this example a Multiple Choice question will be added.
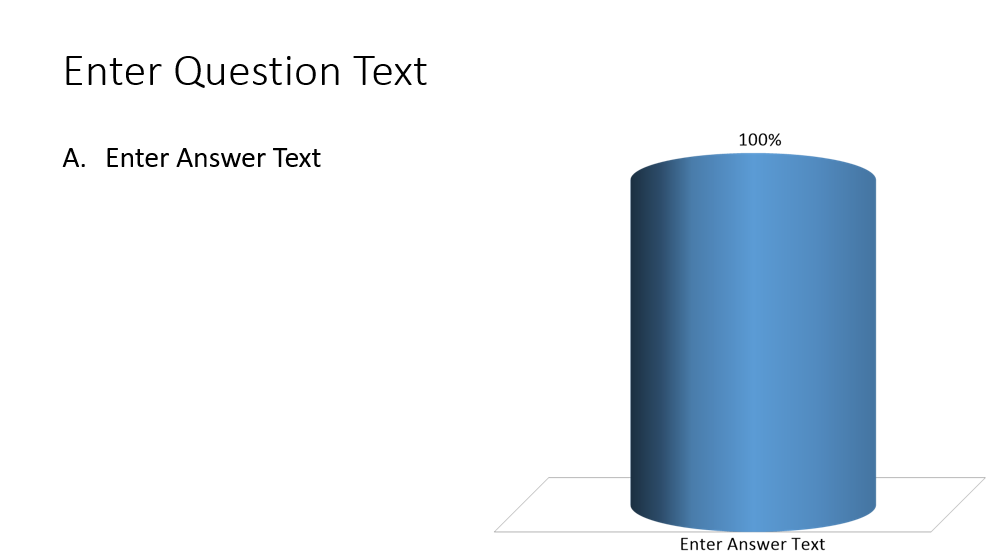
- From here it is just like a normal PowerPoint slide. Where it says "Enter Question Text" you will replace that with the question that you want to ask. Edit the "Enter Answer Text" to represent the answer choices that you want to provide. The answer text is just a bulleted list. You can format the question and answer font, size, color, bullet type, etc. just like you could with a normal PowerPoint slide. When you click outside of the answer text it will automatically update the graph to represent your answers you entered in. Note: On a Mac after typing in your question and answer choices you may have to click the "Refresh" button up in the toolbar. The Mac version of the software behaves slightly different in certain situations.

- To the right in the PointSolutions Slide Pane you will see lots of options to customize related to this slide and poll question. The most important options to look at are the Scoring Options. This is where you can apply points for correct or incorrect answers and you can also select which of the answer choices is correct.
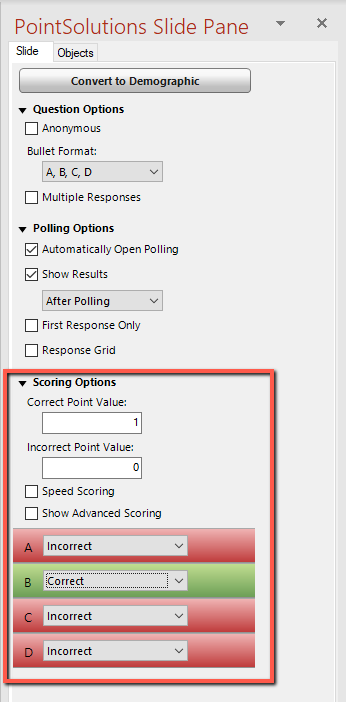
- That is all it takes to create basic polling content for PowerPoint Polling. Continue adding new polling questions where you want them to appear in your PowerPoint presentation. Save the PowerPoint presentation as you normally would when you are finished.
Create Content For Use With Anywhere Polling
With Anywhere Polling it allows you the flexibility to poll on top of any document or application that is up on your computer screen. So you can create questions and answer choices in a Word document, PDF, a website, etc. Or you also have the ability to create your questions right within PointSolutions. The instructions below will walk you through that process.
- Launch the PointSolutions desktop application and sign-in with your UA NetID credentials.
- From the PointSolutions Dashboard click on the Content tab. Click on the Content drop-down list and choose New > Question List.
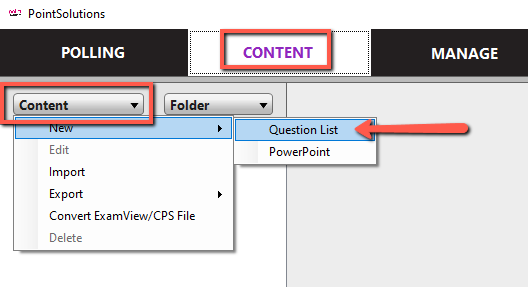
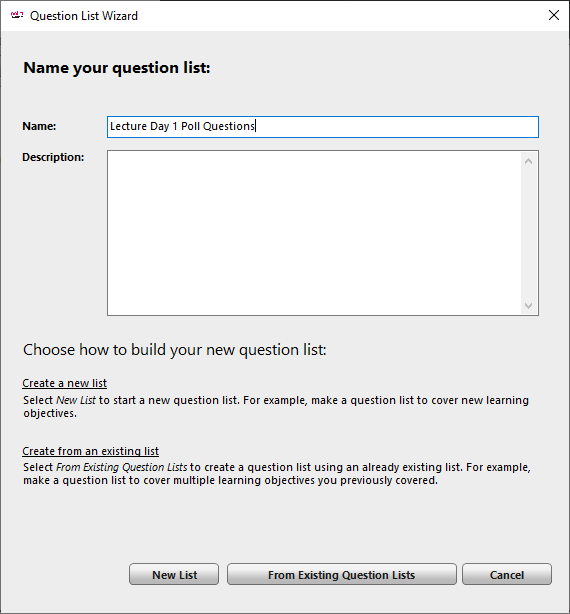
- The Question List Wizard options window will appear. Here you will give your question list a Name and Description if desired. You will then choose to Create a new list or Create from an existing list.
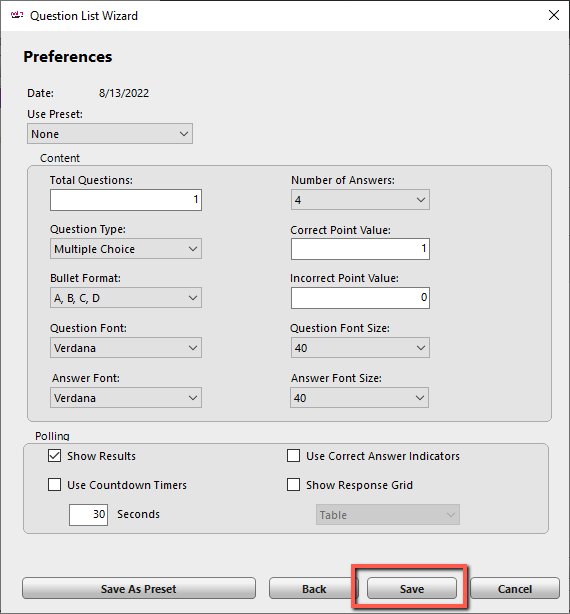
- If you choose to create a new list you will go to the Preferences window. Here you can adjust preferences like how many questions you will be asking, how many answers will the questions have, question type, point values, fonts, and sizes. One thing to point out is that if you plan on projecting this question list on a projector in a classroom it is advised to set the question font size and answer font size to the highest number "40". Click Save when you are finished setting your preferences.
- It will take you into your question list and show you the amount of questions you chose to ask. You can edit the question and answer choices by clicking on the Edit button that looks like a pencil icon. Also if you want you can change the question type and how many answer choices there are for a question by clicking on the drop-down lists. In this example those drop-down lists say "Multiple Choice" and "4 Choices". You'll also notice on the right when you are selected on a question you have the options to change the amount of points for correct/incorrect answers as well as choosing which answers are correct/incorrect.
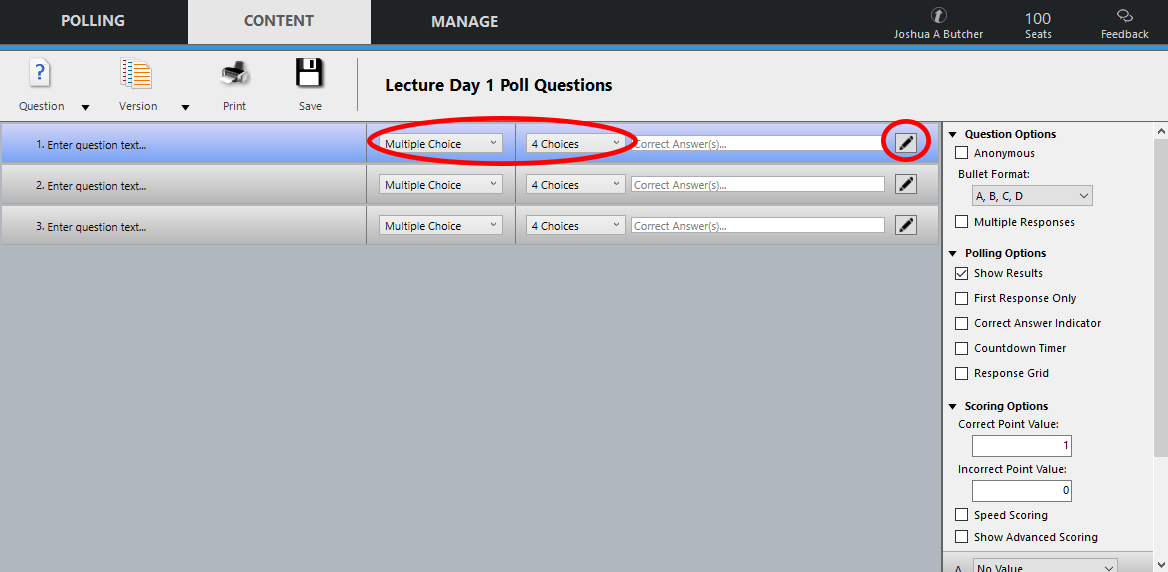
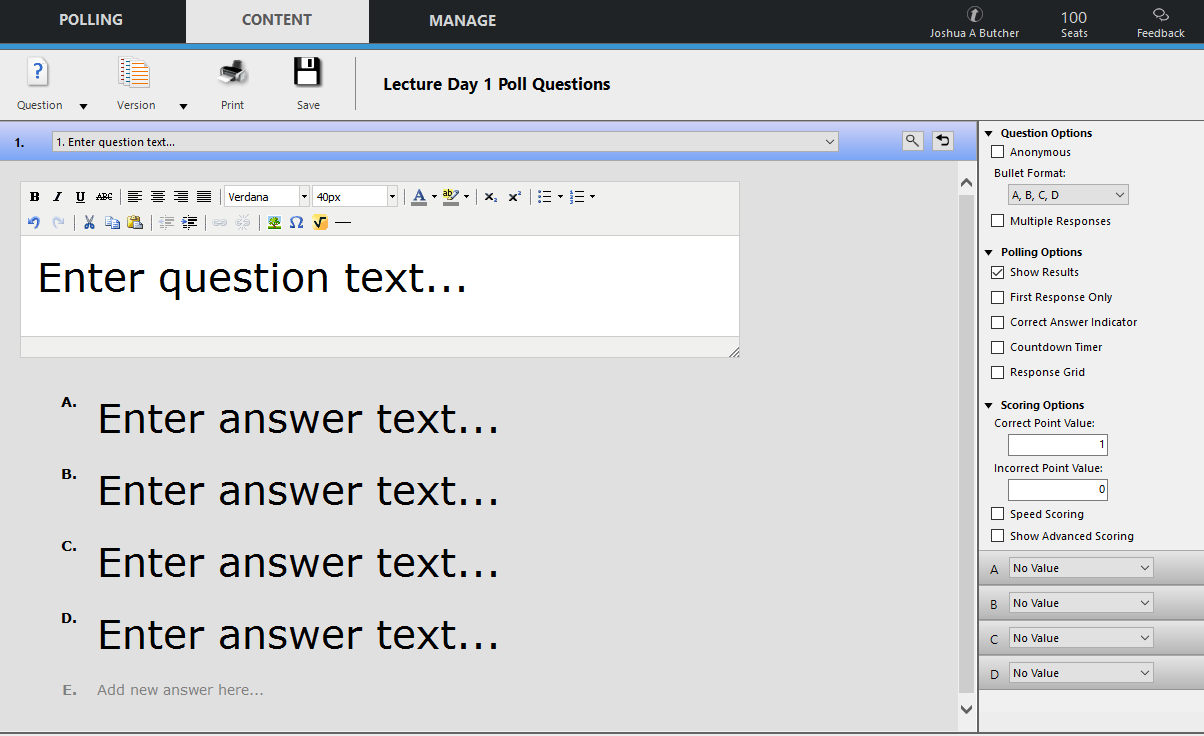
- To edit the question, click on the Edit (pencil) icon. You will then be able to input the question text in the HTML WYSIWYG editor. In this editor you can format the text the way you want it just like you can in a word document. You have the ability to insert images, special characters, and formulas into the question and answer text via this HTML editor.
- To move forward or backward between questions, if applicable, click the left/right arrow in bottom right corner.

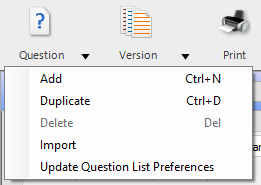
- To add, duplicate, or delete a question click on the Question button in the upper left corner.
- When you are done with adding and editing your questions click the Close button in the lower right corner. This will exit the question editor and take you back to your question list. Then if you are done click Save and Close to your question list.
- Now if you plan on using this question list in the classroom you will need to export this question list file out to a USB flashdrive or to a cloud service like OneDrive, Google Drive, or Box so you can access them on the classroom computer. To do this you will want to select your question list within the Content tab of the PointSolutions Dashboard.
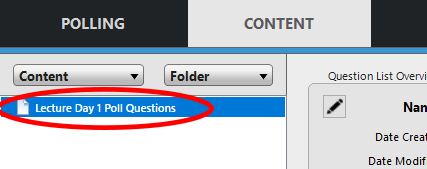
- Click the Content drop-down list and choose Export > Question List (.tpqx).
- Choose which question list you want to export and choose where you want the file to be saved. Click Save.
DURING
What you need to do once you are in the classroom to start, run, and save your polling data.6. Start: Start and Run Your Polls
Learn how to start and run your polls when you are in the classroom using the PointSolutions desktop app.
When you get to a classroom and are wanting to run a polling session during class here are the steps for that process. You will want to make sure you bring your content materials (PowerPoints, PointSolutions Question Lists, etc) with you on a USB flashdrive or have them stored up in a cloud service like OneDrive, Google Drive, or Box so that you have access to copy them on the classroom machine.
Start and Run PowerPoint Polling Session
- Launch the PointSolutions desktop application and sign-in with your UA NetID credentials.
- The first thing you will want to do is copy your content materials onto the desktop of the classroom computer. Drag and drop the files to the desktop from your USB flashdrive or download and save them to the desktop from a cloud service like OneDrive, Google Drive, or Box. We don't recommend you run your PowerPoint straight off of your flashdrive as it could perform very slowly.
- In the PointSolutions Dashboard, if you have a PointSolutions USB Receiver plugged into the computer, take note of what the receiver channel number is and let your students who are using physical clickers (QT2 or QT) know the channel number that they will need to set their clicker devices to.
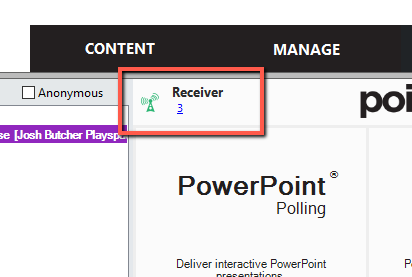
- If you are allowing your students to use the mobile app with their smartphones or respond via a browser then you will need to enable Mobile Responses. Click on Enable underneath Mobile Responses.
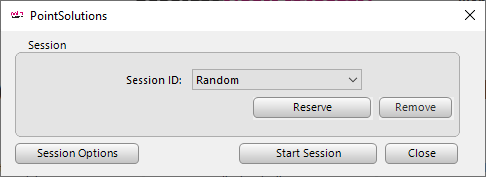
- You can choose to use a Random Session ID or a Reserved Session ID. If you select "Random" it will generate a random Session ID number that your students will need to enter on their phones. "Reserved" will be an ID that you customize and reserve only for you to use. This is a nice option if you desire the Session ID to be the same for every class period. To reserve and customize a session ID just click the Reserve button. Once you have chosen your desired Session ID option click the Start Session button.
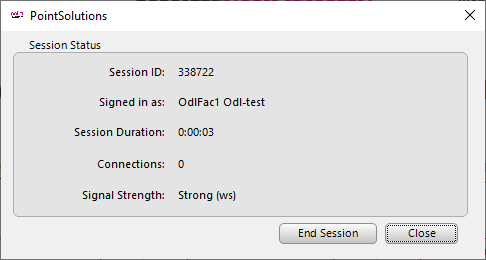
- You'll see the Session Status. It will list the session ID and you just need to let your students know what this session ID is so that they can enter it on their phones. Click Close and it will hide this window.
- In the PointSolutions Dashboard, choose the course that you are polling.
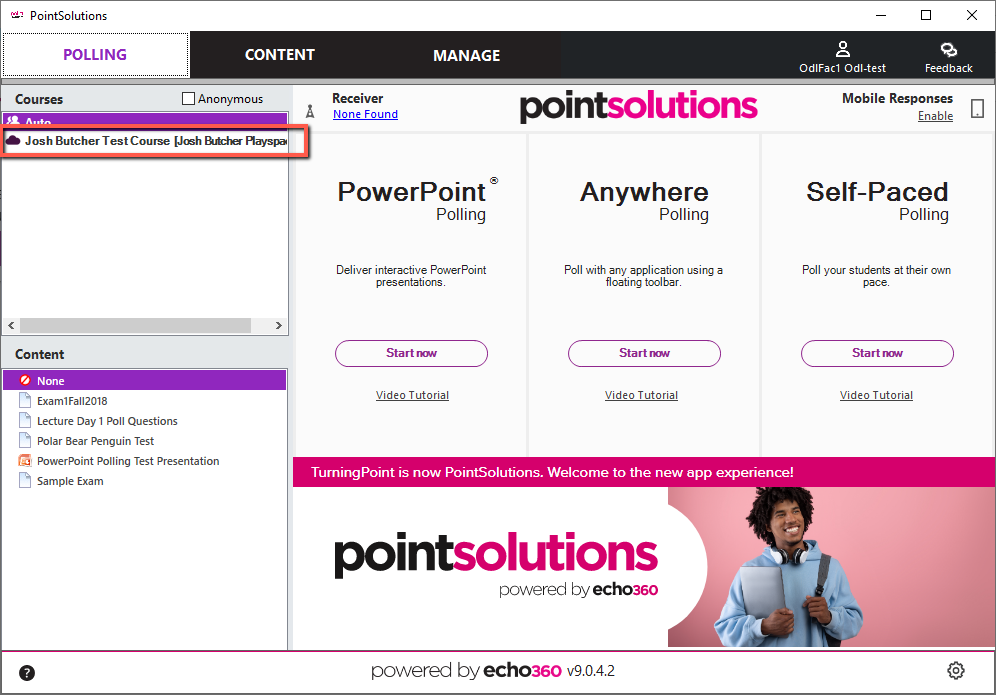
- Click on PowerPoint Polling in the PointSolutions Dashboard.
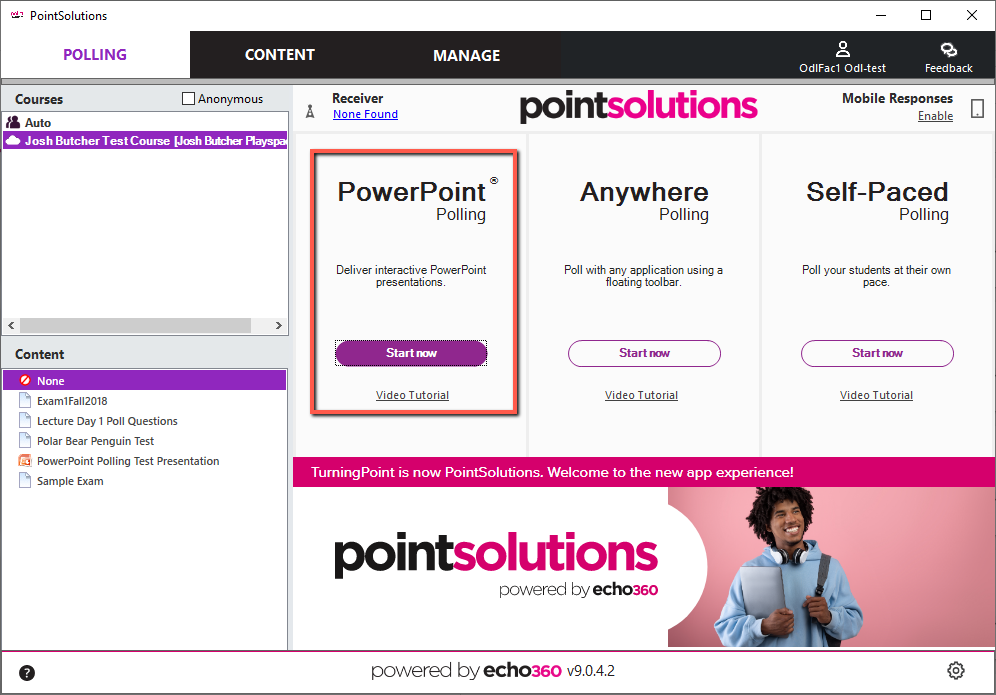
- PowerPoint will open with the PointSolutions add-in toolbar. Open the PowerPoint file that you copied to the computer.
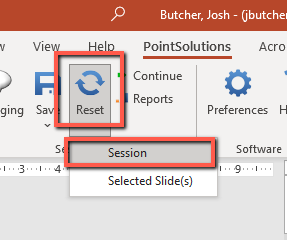
- When the PowerPoint file opens click the Reset button and choose Session to reset the entire session. Resetting the session clears out any existing data on your polls so you can start out your polling session with fresh new data. You will notice the graphs of your polls will go down to 0% meaning they are ready to receive new polling data.
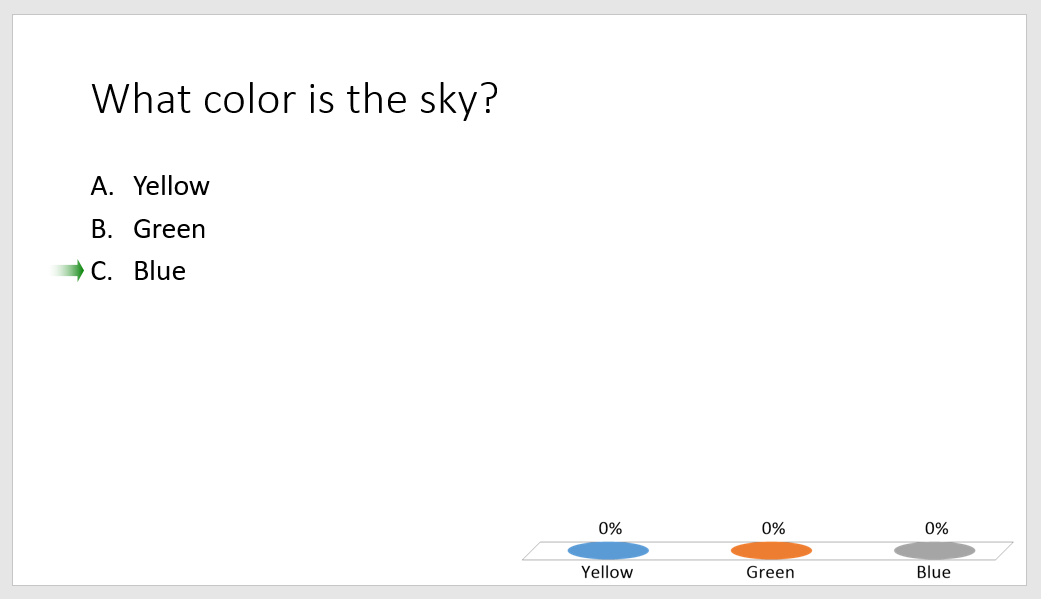
- Now you can start the PowerPoint presentation like you normally would by clicking on the Slide Show tab and choosing From Beginning. This will start your PowerPoint presentation in full screen mode from the beginning first slide.

- When you get to a polling slide the poll will automatically open. You will be able to tell by looking at the polling showbar at the top and you will see "Polling Open" in a green box. As students respond to the poll on their devices you will see the response counter increase with number of responses received.

- When you advance the slide by clicking mouse or pressing spacebar or right arrow on keyboard it will move to the next animation. Normally one click would close the poll, however if you inserted an object like a timer on the slide it would initiate the timer and then another click would close the poll. You will be able to tell the poll is closed by looking at the polling showbar at the top and you will see "Polling Closed" in a red box.

When a poll is closed you will see the graph of the results appear on the slide. Click to advance to the next slide in the presentation when you are finished viewing the results.
Start and Run Anywhere Polling Session
- Launch the PointSolutions desktop application and sign-in with your UA NetID credentials.
- The first thing you will want to do is copy your content materials onto the desktop of the classroom computer. Drag and drop the files to the desktop from your USB flashdrive or download and save them to the desktop from a cloud service like OneDrive, Google Drive, or Box.
- Next, if you have created content question lists for your Anywhere Polling session, you will want to import your content (PowerPoint or Question Lists) into PointSolutions. To do this click on the Content tab in the PointSolutions Dashboard. Click on the Content drop-down list and choose Import. If you are not using pre-created question lists you can skip this step and the next step.
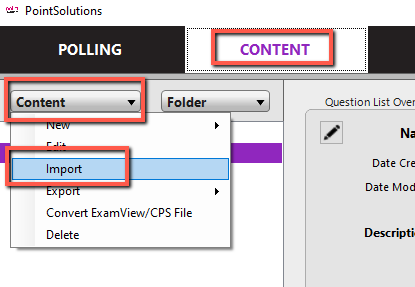
- Browse to the location of where your PointSolutions content question list file(s) are stored on the computer. Choose the file and click Open. It will then be imported into the Content section of PointSolutions.
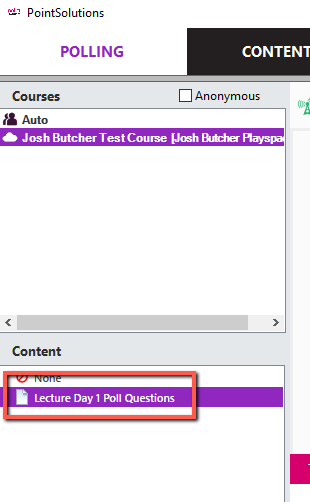
- In the PointSolutions Dashboard, if you have a PointSolutions USB Receiver plugged into the computer, take note of what the receiver channel number is and let your students who are using physical clickers (QT2 or QT) know the channel number that they will need to set their clicker devices to.
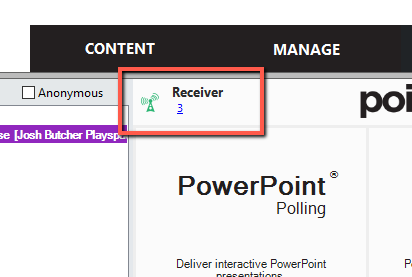
- If you are allowing your students to use the mobile app with their smartphones or respond via a browser then you will need to enable Mobile Responses. Click on Enable underneath Mobile Responses.
- You can choose to use a Random Session ID or a Reserved Session ID. If you select "Random" it will generate a random Session ID number that your students will need to enter on their phones. "Reserved" will be an ID that you customize and reserve only for you to use. This is a nice option if you desire the Session ID to be the same for every class period. To reserve and customize a session ID just click the Reserve button. Once you have chosen your desired Session ID option click the Start Session button.
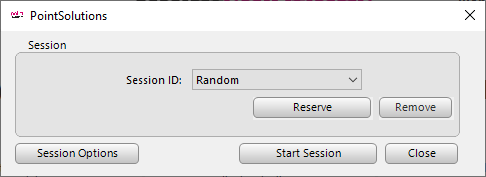
- You'll see the Session Status. It will list the session ID and you just need to let your students know what this session ID is so that they can enter it on their phones or web enabled devices. Click Close and it will hide this window.
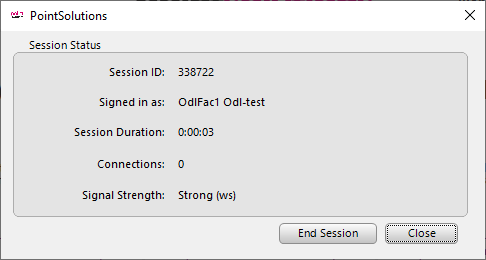
- In the PointSolutions Dashboard, choose the course that you are polling and then choose the content file that you will be using for the polling session. Then click on Anywhere Polling.
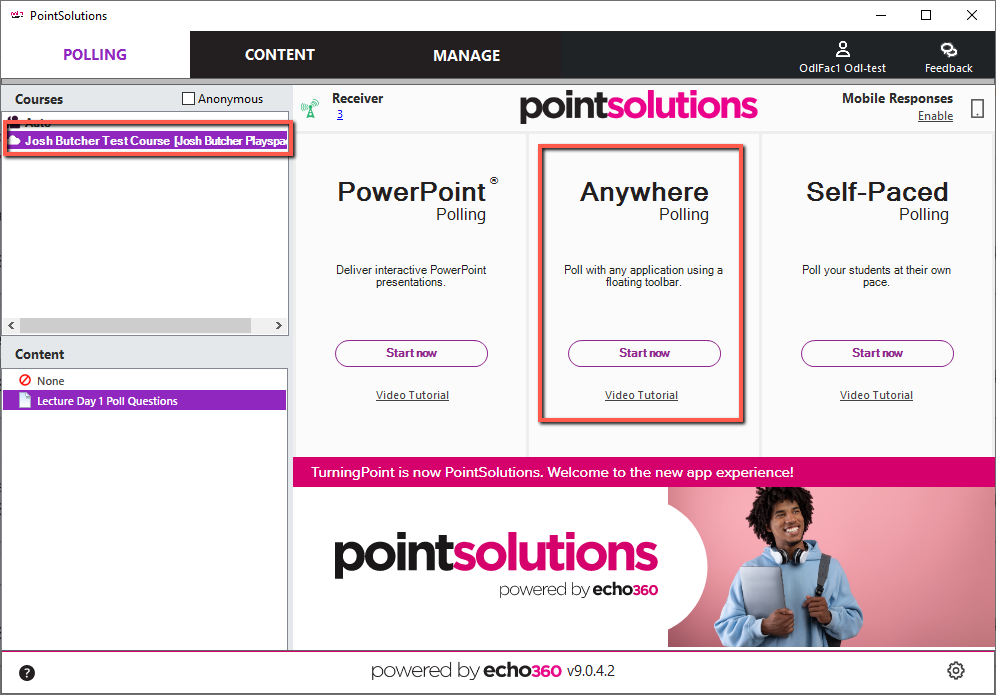
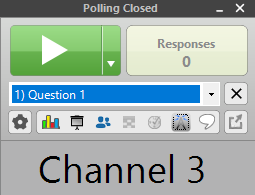
- The Anywhere Polling floating toolbar will appear. If you chose a question list you will see the first question listed in the drop-down box under the green play button. If you click on that drop-down you can change to a different question in case you want to go out of order. When you are ready to start the poll question click the green Play button.
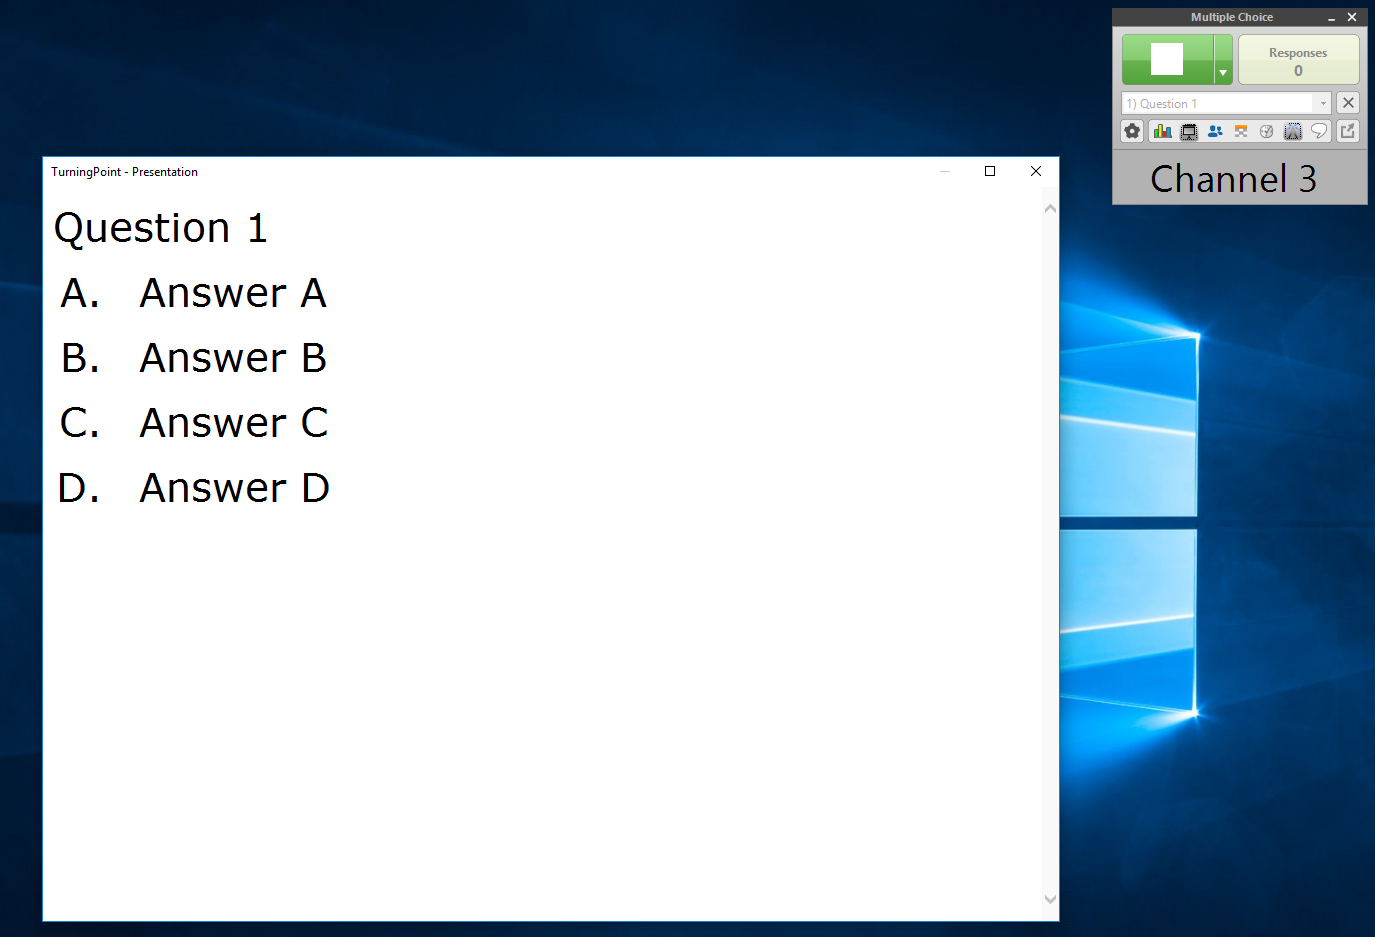
- Once a poll is open, if you had a question list chosen, it will launch a separate window that displays the question and answer choices. As students answer the response counter will increase with number of responses received.
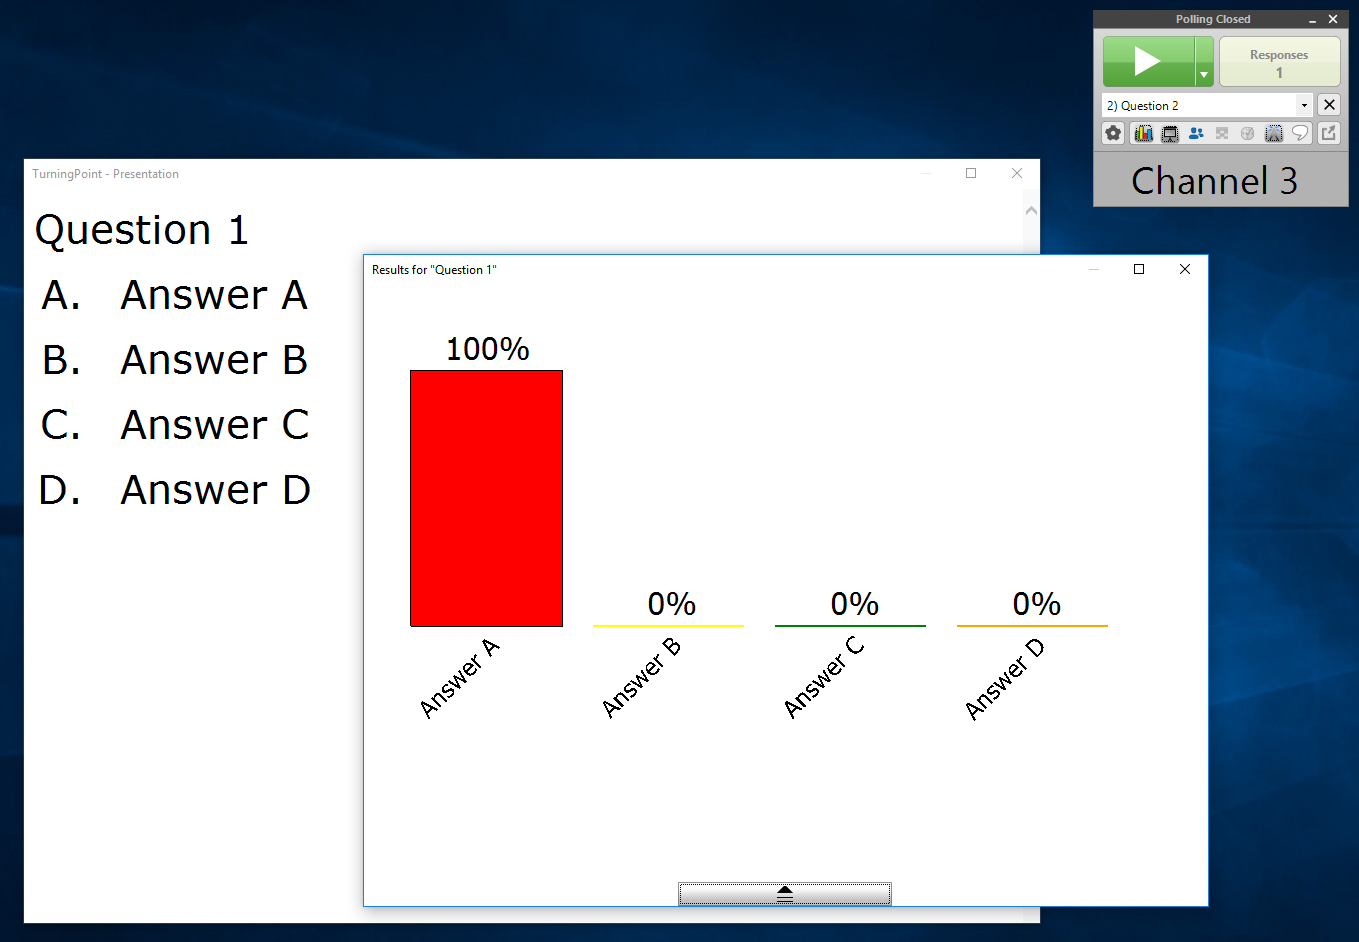
- To end the poll click the green Stop button. The graph with the results of the poll will then appear in a separate window. To start the next poll just click the green Play button and the next question will appear and the poll will be open again.
- When you are finished with Anywhere polling just close the polling toolbar by clicking on the "X" in the upper right corner.
7. Save: Save Your Session Data from Polls
Learn how to save the session data that is gathered during your polling sessions.
- Upon closing out of PowerPoint Polling, Anywhere Polling, or Self-Paced Polling if there is any unsaved data session it will prompt a window saying, “The current session contains unsaved response data. Do you wish to save this session?”
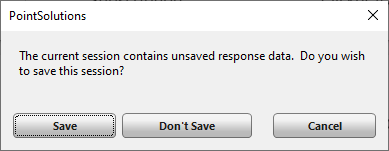
- Click the Save button.
- If you are using a classroom computer you will want to save the session file onto a USB flash drive, save it to a OneDrive, Box or Google Drive account, or email it to yourself. DO NOT save the session file onto the classroom computer as they get wiped clean of data every day.
- If you are using your own laptop computer to run the polling sessions in class then you can save the session file wherever you desire to have it stored. By default it will want to save it in the /Documents/PointSolutions/Sessions folder on your computer. Saving it in this folder will automatically import it into the courses list within the PointSolutions Dashboard within the Manage tab.
- If you are using a classroom computer you will want to save the session file onto a USB flash drive, save it to a OneDrive, Box or Google Drive account, or email it to yourself. DO NOT save the session file onto the classroom computer as they get wiped clean of data every day.
AFTER
What you need to do when you are back in your office to view and upload your polling data.8. Import: Import Session Files into PointSolutions Software
Learn how to import session files into PointSolutions to manage and examine the data from your polls.
Once back on your office computer you will need to import your session files that you saved from the classroom computer.
- Launch the PointSolutions software.
- Click on the Manage tab within the PointSolutions Dashboard.
- Click on the Session drop down menu button.
- Choose Import.
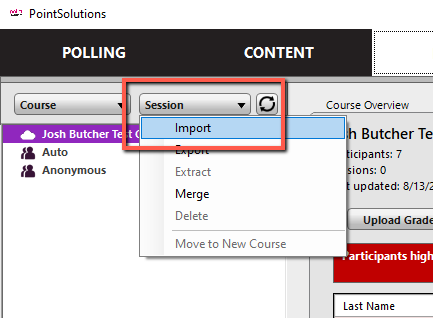
- Browse to where you have your session file saved on your computer or your USB flash drive.
- Select the session file(s) and click the Open button.
- It may prompt a window that says the session file exists outside of the default sessions directory. You will have two options here, move session or leave in place. If you choose "Move Session" it will move the session file to the default sessions directory which is normally /Documents/PointSolutions/Sessions. Your file will no longer be stored on your USB drive or wherever you had it. If you choose "Leave in Place" it will leave the session file in its current location (on USB drive or wherever you had it stored) and add it to the list of sessions within PointSolutions. This would mean that if you want to view that session you will have to have the USB drive plugged in so that PointSolutions can find the path location to where the file is stored. Choose the option you prefer and click OK.
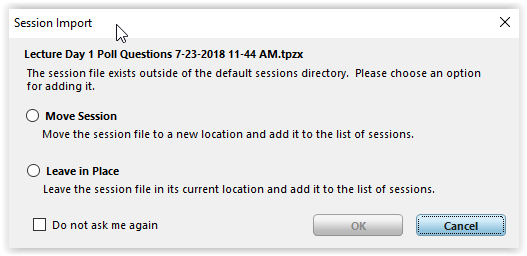
- If you have your session file(s) saved on a USB drive then it is best practice to copy those session files onto your computer prior to importing them into PointSolutions. That way you still have the original session files saved on your USB drive. When you go to import session files into PointSolutions, import the files that you copied onto your computer not the ones that are on your USB drive.
- If you have your session file(s) saved on a USB drive then it is best practice to copy those session files onto your computer prior to importing them into PointSolutions. That way you still have the original session files saved on your USB drive. When you go to import session files into PointSolutions, import the files that you copied onto your computer not the ones that are on your USB drive.
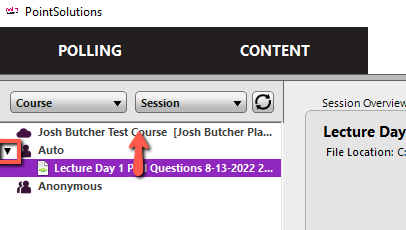
- The Import Summary window will appear and tell you the status of where it put the session file(s). It will either put it in the “Auto” participant list or it may put it within one of your courses. Pay attention to where it says it is importing the session file(s). In the below example it imported into my Josh Butcher Playspace course because that is the course I had chosen prior to running the session.
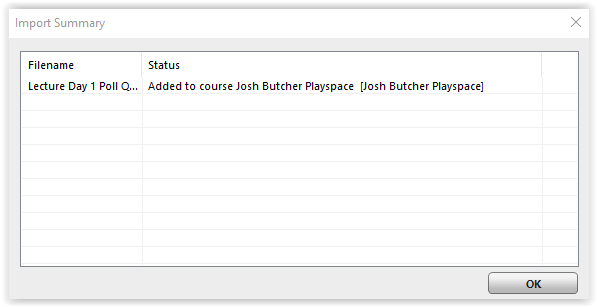
- If it put the session file(s) in the “Auto” participant list you will need to click on the triangle next to the Auto list to expand to see the session files, if you can’t see them already.
- Drag the session file(s) on top of the class participant list that the session file(s) belong to. This will link the session file(s) to your class so that you can properly view how each student scored or responded to your question polls. If you don’t link the session file(s) to one of your class participant lists then you won’t be able to view how each student specifically responded. You will get error messages when viewing the reports.
9. Upload: Upload Session Scores to LMS Gradebook
Learn how to upload the session scores to the LMS gradebook.
For your students to be able to see their grades from the clicker sessions you will need to upload them to your class D2L grade book. To do that follow these steps:
- Launch the PointSolutions software.
- Click on the Manage tab within the PointSolutions Dashboard.
- Click on your Course (will be the name of your course) within the left hand column underneath the Course button.
- Click on the Upload Grades button.
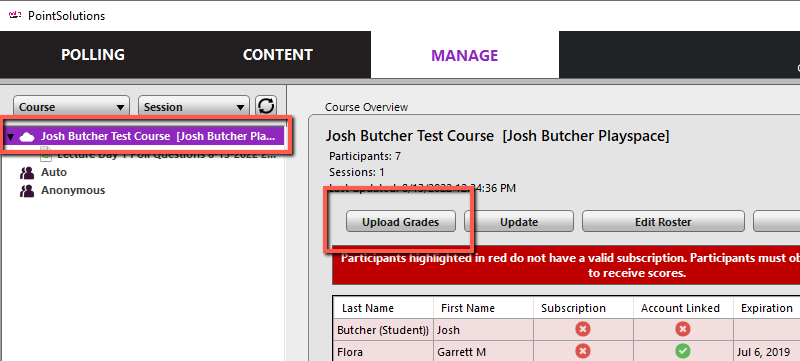
- It may open a "Grade Upload Warning" window. This window will inform you of the students in your course who have not registered their account and clicker. Grades of students listed here will not be uploaded to the gradebook. To resolve this, the students would need to get properly registered and then you would have to re-upload the grades again. You can click the Copy to Clipboard button to copy the list of students to the clipboard to paste in another application. Click OK.
- Place a checkmark next to the session you want to upload to the gradebook. Click Upload.
- The Task Status window will appear. Briefly it will say the upload is "In Progress" while it is uploading. When it is finished it will move over to one of the other three categories Succeeded, Failed, or Partial Success.
- It will list the latest tasks that are in that category. As you can see above the task labeled "Upload of "Lecture Day 1 Poll Questions" is listed in the Succeeded category. The red circle with an "x" is a way to clear that task in that category. The list here just acts as a "task history" letting you know of all the past tasks that were carried out and their results. You can clear the task history by clicking the Clear All link or individually pressing the "x" next to each task. Click Close when you are done.
-
Now you can go into your D2L course and into the grade book to see the columns that it added. By default it puts the columns at the very end of your grade book.
10. Support: Technical Support Contacts
Learn who to contact if you have questions or issues related to using clicker technology on campus.
For direct support for instructors regarding clicker technology contact:
UCATT D2L Consulting and InTech team
d2l@arizona.edu

