1. Create: Discussion Forums
Create a single Discussion Forum that contains one or more Topics.
- Click the New button and select New Forum from the action menu.

- Enter the Forum name in the Title field.
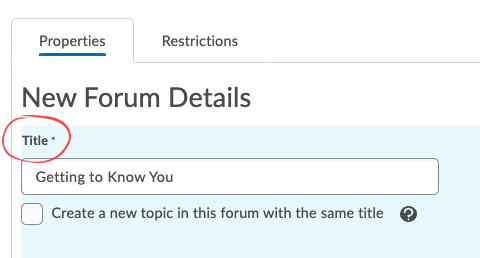
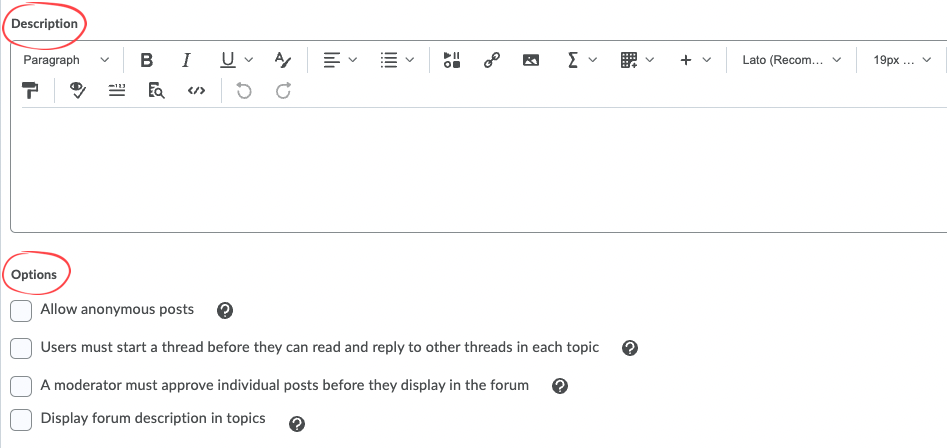
- Enter instructions or other text in the Description box, if desired. If you will include instructions and information such as prompts at the Topic level, you may leave this blank.
- Check the box next to "Create a new topic in this forum with the same title" if you will be using this Forum for a single topic. If this box is checked, D2L will automatically create a new Topic within the Forum with the same title.
Note: Remember you will need to edit the Topic separately if you want to set it as a group topic, set restrictions specific to that Topic, etc.
Options can be set at the Forum or Topic level. Any settings applied at the Forum level will apply to all Topics contained in a Forum.
Directly under the Description box, you will see four check boxes to select more Options:
- Allow students to post anonymous messages.
- Require students to start a thread before they can read or reply to other threads in that topic (commonly used).
- Choose whether an instructor must approve all messages before they are posted.
- Display the Forum description in all Topics contained in that Forum (not commonly used).
You have completed the necessary steps for creating a Forum.
If you want to control when students will be able to see a Forum and/or submit to any Topics within a Forum, select the Restrictions tab. Instructions for restricting availability at the Forum or Topic level are included in the section on this page titled Apply: Discussion Start and End Dates.
Remember to click one of the Save options at the bottom of the page.

2. Create: Discussion Topics
Create a Topic where students can post original threads and reply to others' threads.
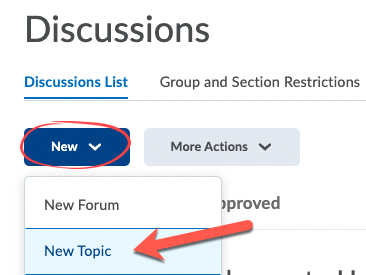
- Click the New button and select New Topic from the action menu.
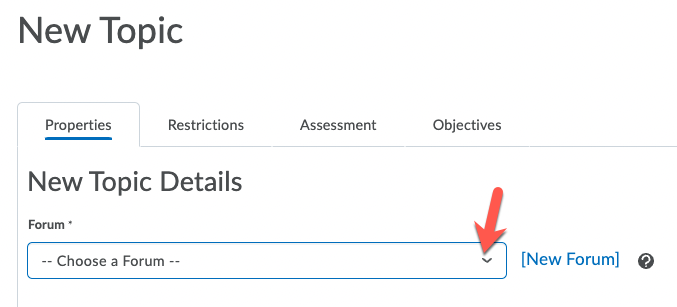
- Click on drop-down arrow in the Forum field and choose the appropriate Forum. All Topics must belong to a Forum. (If you chose the option to create a Topic with the same name as the Forum, this field will already be populated.)
- Choose a Topic Type:
- click Whole Class topic if all students should be able to see posts from the whole class,
- click Group or Section topic if students should only see and reply to posts from others placed in the same group. If you choose a group discussion, the Groups must be created first.
- If you select Group or Section topic, a drop-down menu will appear. Click the drop-down arrow to choose the appropriate Group or Section.

Note: If you choose a Whole Class Topic you may change to a Group Topic as long as no one has posted to this Topic. If you choose a Group Topic you will not be able to change back to a Whole Class Topic. You will have to create the Topic again.
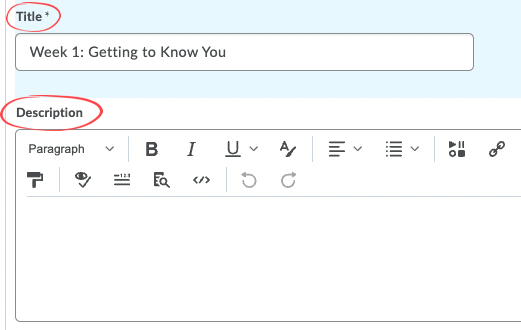
- Enter the Topic name in the Title field.
- Enter instructions or other text in the Description box, if desired. If you have included instructions and information such as prompts at the Forum level, there is no need to repeat that information here.
Options can be set at the Forum or Topic level. Any settings applied at the Topic level will apply only to that Topic.
Directly under the Description box, you will see three check boxes to select one or more Options:
- Allow students to post anonymous messages.
- Require students to start a thread before they can read or reply to other threads in that topic (commonly used).
- Choose whether an instructor must approve all messages before they are posted.
You have completed the necessary steps for creating a Topic.
If you want to control when students will be able to see or post to a Topic, select the Restrictions tab. Instructions are included in the next help section on this page: Apply: Discussion Start and End Dates.
Remember to click one of the Save options at the bottom of the page.
3. Apply: Discussion Start and End Dates
Determine when students will be able to access and post to Discussion Forums and Topics.
Start and End Date options (i.e., Availability) can be controlled at either the Forum- or Topic-level and are located in the Restrictions tab. Remember that any availability placed on a Forum will apply to all Topics in that Forum.
- Decide when students will be able to access a Forum or individual Topic under Availability. If you do not enter Start or End Dates, the Forum or Topic will always be available for posting and viewing posts. If you want the Forum or Topic to be available for a certain date range:
- Click the checkbox next to "Has Start Date" and/or "Has End Date" (you do not have to use both).
- Set the date and time for the Start and/or End Dates.
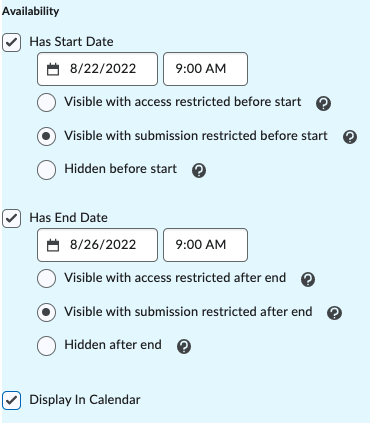
- For both Start and End Dates, you must choose between 3 options to determine how the dates will work for students:
- Visible with access restricted before start (or after end)
- Forum/Topic title, availability dates, and restrictions are visible to learners before the Start Date, but they cannot open it to post a thread / view other threads.
- Visible with submission restricted before start (or after end)
- If chosen for Start Date, Forum/Topic description, evaluation requirements (e.g., rubrics) are visible to learners before the Start Date, but they cannot post a thread / view any threads.
- If chosen for End Date, Forum/Topic description, evaluation requirements, and all posts made to the Topic are visible to learners after the End Date, but they cannot post new threads or reply to others.
- Hidden before start (or after end)
- If chosen for Start Date, the Forum/Topic will be hidden from learners until the Start Date. Calendar events for Availability Starts and Availability Ends will be hidden until the Start date. Notifications will not be sent until the Start Date.
- If chosen for End Date, the Forum/Topic will be hidden from learners after the End Date. Calendar events for Availability Starts and Availability Ends will be hidden after the End date. Notifications will not be sent after the End Date.
- Visible with access restricted before start (or after end)
Note: If you want to choose different dates or options for individual Topics within the same Forum, leave the Forum Restrictions blank and make your selections in the individual Topics.
Remember to click one of the Save options at the bottom of the page.
4. Assess: Linking Topics to your Gradebook
Link Discussion Topics to Grade Items to score Discussions and transfer directly to Grades.
Note: We recommend that you build your grade book before attaching Discussion Topics and other activities to grade items. Please visit the Grades help pages for assistance.
From either the New Topic or Edit Topic page, select the Assessment tab.
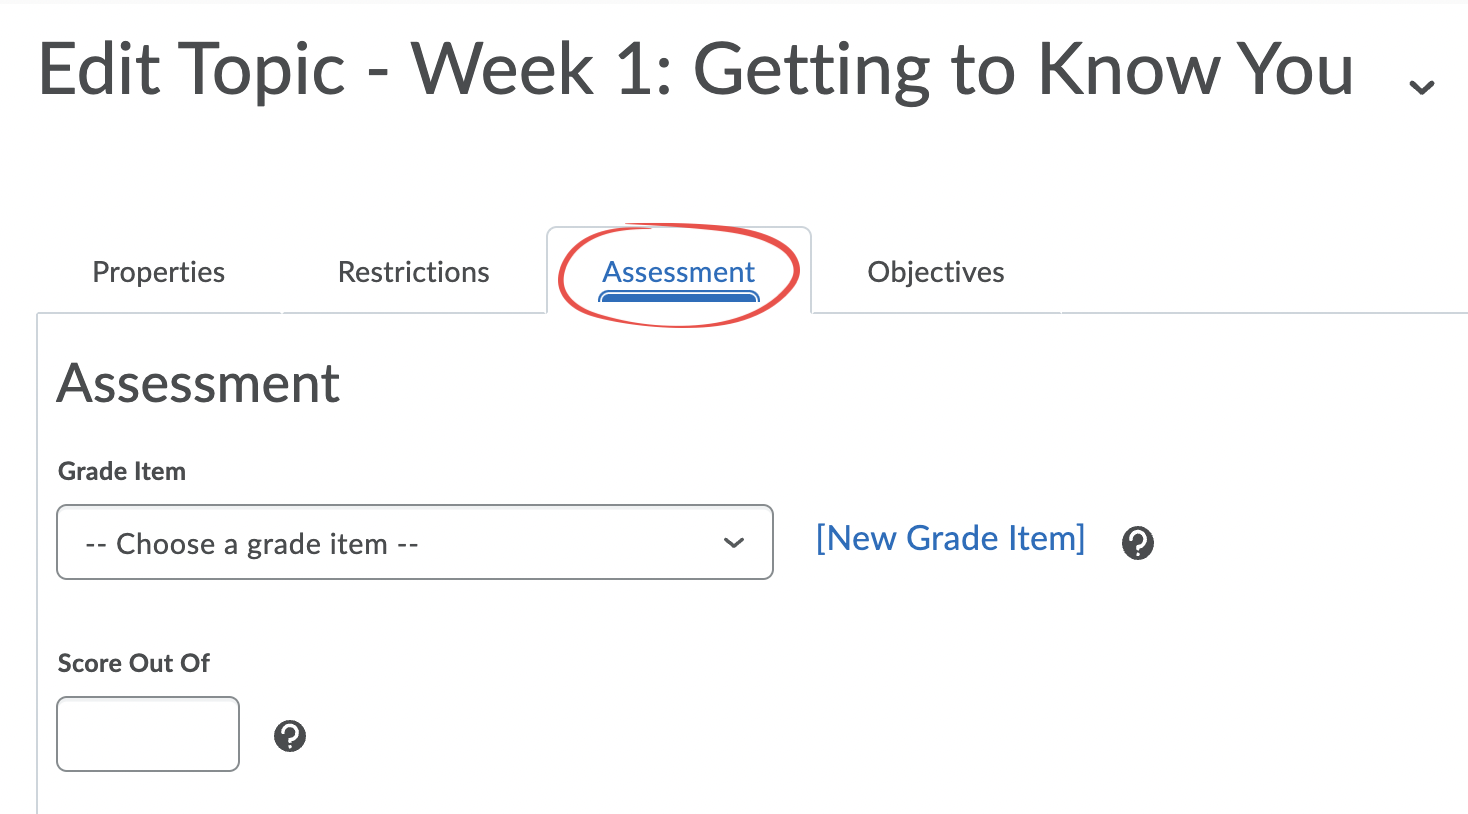
- Click the drop-down arrow in the Grade Item field and select the grade item you want to link with this Topic.
- Enter the maximum score possible in the Score Out Of box. Make sure the score entered matches the point value assigned to the grade item in the grade book and/or on the Rubric (if you've attached a Rubric to the Topic).
Remember to click one of the Save options at the bottom of the page.

